Tag Archives: Cloud

New Pluralsight Course: Automating AWS and vSphere with Terraform

I’m proud to announce that as of 10:30pm CST last night, my new Pluralsight course “Automating AWS and vSphere with Terraform” has been released!

You can find all of the details about the course on Pluralsight here.

Terraform has been a technology I was keen to get into, and this course is ultimately a 101 course on using Terraform functionality with AWS and vSphere. I decided to build this course across On-Premises and a Public Cloud because of the massive growth in Hybrid Management technologies that we are seeing today (and the amount of bad information in the industry vs real world).

Terraform as you will see in the course can solve many use cases. In addition, if you augment it with other tools in your arsenal, can be an extremely powerful way to perform most of your Infrastructure Automation.

The course covers the following topics:

  • Terraform Overview
  • Installing Terraform
  • Terraform Constructs
  • Using Terraform with AWS
  • Using Terraform with vSphere
  • Terraform Variables and Modules
  • Code Control and Provisioners

As always, please let me know if you have any feedback. Otherwise I hope you enjoy the course!

Terraform – Assigning an AWS Key Pair to your EC2 Instance Resource

In the first post on Terraform, we took a look at how to create and destroy a simple EC2 instance. However, one of the common things we need to do in AWS is to assign a Key Value pair, as well as, Tag Instances with names, project codes, etc.

Assign a Key Value Pair

In order to access an EC2 instance once it is created, you need to assign an AWS EC2 Key Pair at the time of instantiating the instance. If you haven’t already done so, go ahead and create a Key Pair from the AWS Console by clicking the Key Pairs section on the left hand side. You will see a screen like the one below. Clicking Create Key Pair will walk you through the process.

awskeypair

During the process you will be prompted to save a private key file (.pem). Keep this safe as you will need it.

Now in Terraform, we are going to add one additional line under the resource section for our EC2 Instance. You can see in my screenshot above that my demo key pair is called “AWS EC2 – SEP 2016”, so we simply need to reference this by adding the following line.

key_name = "AWS EC2 - SEP 2016"

The end result looks like this:

EC2 with keypair

If you execute a terraform apply now, you will see that your new EC2 instance is created and the Key Pair name should appear correctly in the details pane.

screenshot-2016-10-13-13-31-13

Note, if you did not destroy your previous terraform configuration, and you deployed it just like in part 1 without a key pair, you will notice the following when you execute a terraform plan.

changekeypair

The reason for this is because you cannot assign a key pair to an already running EC2 instance. Terraform is letting you know that it will be forced to delete the instance and create a new one. When you perform your terraform apply, your end result will reflect this..

screenshot-2016-10-13-13-29-17

Otherwise that completes this post. Now you know how to use your key pairs. Terraform also has the power to create the pairs on demand which we will hopefully circle back around to in the future.

New Pluralsight Course – Introduction to Workflow Development with VMware vRealize Orchestrator

I’m pleased to announce that as of last week, Pluralsight have released my first Training Course on VMware vRealize Orchestrator. I’ve been working with this product since the early days and I couldn’t be more thrilled to have completed a 2 hour course teaching people how to get up and running quickly.

Here is quick a video overview of the Course:

I aimed this course at getting people into workflow development. This means I don’t focus on product installation and plugin installations, but more on specifically how you can develop and code the workflows.

The course contains the following 7 modules:

  1.  Getting Started – A tour of vRealize Orchestrator and the components.
  2. Building Workflows – Approach to workflow design, followed by some basic workflow creation.
  3. Scriptable Tasks – Learn some basic Javascript and start using Scriptable tasks.
  4. Input Presentation and Additional Javascript – Learn some basic ways to use the presentation view, as well as more javascript.
  5. Actions – Turn scriptable tasks into reusable actions.
  6. VMware Tools and HW Upgrade – A basic real world example for combining workflows in a real world use case.
  7. Snapshot creation and automated deletion – Create a snapshot and then schedule it for automatic deletion at a future date.

In addition to my course, I also work with a large number of customers in my role at Ahead. For anyone looking to get started with Orchestrator, Ahead also now offers an AHEADStart for VMware vRealize Orchestrator which takes care of all the plumbing and gets people up and running with the product.

Please enjoy the course and I would absolutely love any feedback. Teaching in this format has been completely new to me and took some learning and getting used to. I can certainly tell when comparing the first 2 modules to the last 2, the difference as I got more comfortable. I plan to circle back and write about my experience for anyone else looking to do a course in this manner.

Finally, I can’t say enough great things about working with the Pluralsight team. Simply great people.

Nick


Terraform 101 – What is it? How do I use it?

logo_large-3e11db19

I’ve been watching Terraform over the past few years and finally have had some time to start getting stuck into it. I must say, I’m impressed by the potential of this product and others from Hashicorp.

Terraform essentially fits in the Infrastructure Automation category, and has a similar coding approach to tools like Puppet, while in some ways operating more like an Orchestrator without the visual aspect.

What is it?

Essentially it adds a layer of abstraction to services like Amazon, Google etc. Instead of an AWS Cloud Formation template, I can use a Terraform configuration instead. On top of that, and the piece that is more intriguing to me, is the ability to use their module approach as well as other providers and provisioners.

Providers allow you to use the same declarative state language for other systems. I encourage you to check out the list on the Terraform site.

Provisioners allow us to essentially determine what and where we initiate other tasks. For example, you could use local-exec to execute commands locally on the terraform box, or remote-exec to execute on a remote server via SSH or WinRM.

The idea behind all of this is that you have one place, and one language to learn which then works across public Cloud providers. You don’t need to learn say the AWS Cloud Formation Template language and then go learn another language in another cloud provider. You simply would use Terraform to deploy all.

How do I use it?

Let’s get stuck in and walk through a very basic Terraform configuration for deploying an AWS Instance. At the core of Terraform is the .tf file. This combined with other files in the same directory or module directories, form a Terraform Configuration. There are 2 formats to the Terraform files, Terraform format, or JSON. It is recommend that you use the Terraform format which is easily readable (think Puppet DSL).

Example: Create an AWS EC2 Instance with Terraform

Note: For all activities below you will need an AWS account and will be charged via Amazon appropriately. I try to use free tier for all demo examples.

  • Create a folder to store your Terraform configuration.
  • Open up notepad or your favorite editor. I use Visual Studio code along with the Terraform Extension.
  • Create the Terraform configuration and save it as a .tf file.
terraformcode

Terraform example for deploying AWS Instance

The first piece we declare is the provider which in this case is AWS. Grab your access key and secret key and then choose a region you want to provision our EC2 Instance into.

provider "aws" {
access_key = "yourkeyhere"
secret_key = "yoursecretkeyhere"
region     = "us-east-1"
}

Next, we declare  our new resource. In this case I am choosing to instantiate and AWS instance called “2ninjasexample1”. I am going to use the Amazon AMI with ID “ami-13be557e”. Finally i’m choosing my type of instance as t2.micro.

resource "aws_instance" "2ninjasexample1" {
ami           = "ami-13be557e"
instance_type = "t2.micro"
}

That’s it for our configuration file. Simply save it in the folder you created in step 1 and browse to that folder.

  • Type terraform plan and you should see a result like the screenshot below.terraformplan
    You can see that if we go ahead and run the configuration, it is going to add the aws instance.
  • Now it’s time to actually apply the configuration. Type terraform apply to go ahead and create the instance.terraformapplyaws

Terraform creates a new AWS EC2 instance as well as 2 additional files in our folder which maintain the state information.

tfstate

If we examine the .tfstate file, you will see it contains all the specific information about our AWS instance.

terrafomstate

In particular, you can see that it has captured the AWS instance ID which you can also view from your AWS console if you select your EC2 image.

  • Finally let’s destroy the stack. Type terraform destroy. You will be prompted to confirm by typing yes.

terraformdestroy

Just like that, it is destroyed! You will also notice your state file updated to reflect this.

Hopefully at this point, you can see the power behind this tool. Stay tuned for more posts on this.


2 Ninjas and Amazon Web Services

Amy and I spend a good amount of time working on external projects. In fact, we discussed at the beginning of this year what we wanted to focus on. For me it has been wrapping up my Pluralsight Course for vRO, as well as, working on extending Tintri APIs to meet business use cases. For Amy, it’s been knee deep in automating the world at UCMC, as well as, working and discussing ideas around community and charity work that we hope to start early next year.

For the rest of this year, we are going to now continue our Real World Cloud Series and given the rise in AWS ,which does not seem to be slowing down, we’ve decided to get going on a series focused around AWS. We are going to start off in the IaaS services first, expand these into the automation and service catalog discussions that we have on a day to day basis. After that we will continue on to gather AWS certifications. I will also be blogging about this on the Ahead blog site from a higher level and business standpoint. There are tons of useful posts there from many of my colleagues whom I work with so definitely check it out.

We have created 2 pages to organize this:

AWS Guides

AWS Solutions Architect Associate Exam

In some cases, both pages will share some of the same blog posts but hopefully this helps if you are just trying to focus on the exam.  It will all become clear as the posts start to come out in the next few months.


Living the cloudy life… #cloudlife

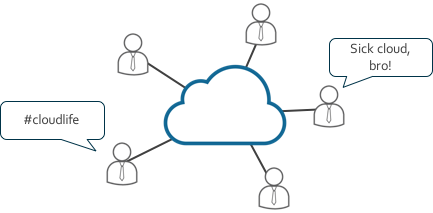
A few people asked me recently why some of us are using the hashtag #cloudlife and what it means. This came out of the Ahead Tech Summit presentation I was preparing for and worked with Nick Rodriguez on in June. I was explaining to Nick my concept and he created this great image.

Pasted image at 2016_08_08 08_27 AM

So what does it mean?

Ultimately, it comes from a belief that Cloud is about creating a true experience. This means not just changing the way customers of IT consume services via a catalog, but going that extra mile.

I’ll get on to roles and more Cloud Design topics in a future post .The one thing I want to stress over and over is that our goal in creating a Cloud is to create this place people come to for IT services and leave feeling like they got something more.

If you’re an IT person, you must put yourself in the developers shoes and try to think of the pain and annoyance they actually go through when submitting a form.  They wait weeks for their server to come and they then still have to go to subsequent teams to get various pieces of software installed such as:  DR options approved, extra storage and so on. Then, they have to make sure that everything they did in Dev works in QA and finally Production. A sysadmin might push a patch out or a VM template that doesn’t work as it did the previous month because someone else made a change.

Follow this up with the sheer amount of Public Cloud PaaS services and other external services the teams wish to consume.  Many of these services require security approvals and perhaps additional firewall and networking configurations.

It all adds up to a frustrated customer and in turn ultimately affects the businesses ability to innovate and grow.

dev_journey_0

The opposite is the #cloudlife experience..

Happy Customer A: “Wow, I came to this catalog and got everything I needed. BAM! Now I can create something awesome today while my idea is hot.”

Happy Customer B: “This Cloud is better than just the AWS or Microsoft Cloud. I get those features and more. Everything I want is here!”

Happy Customer C: “I think…I love this Cloud… #cloudlife”

Happy Customer D: “If I had a Cloud, it would be just like this cloud. I’m telling my friends about DevOps and #cloudlife.”

happy_customer

It’s not about just having the best programmer and engineering the best back end services but the full end to end experience. How you design the front end menu, how you guide every decision the user makes, and how you can get them what they need to be successful and grow the business are front and center. It takes a combination of people and skills to execute on this successfully.

What does it mean in practice?

Take an example of a Developer that has deployed an environment of SugarCRM, an Open Source CRM tool. Great they deployed it from their request catalog but what if they want to synchronize data from one environment to another for testing? Previously, they would have had to put in a request for someone to backup and restore the database to the new environment. This could then involve a piece of paper being handed around between teams until the task is completed.

The alternative is an option like the screenshot below in vRealize Automation. We add an Action which is visible in the items list that gives them the ability to execute this operation with one click.

vRA Day 2

Clicking the “vRA-DevOpsTeamX-SyncData” Button initiates a vRealize Orchestrator workflow. This workflow in turn connects to a Tintri Storage Array to initiate a Sync VM. The workflow will create all the appropriate change controls, shutting down of VMs, storage array tasks etc. Again, think of everything that you need to do to complete the task and provide it as a self service option.

Essentially, the workflow would look something like this:

Screen Shot 2016-08-09 at 8.55.24 AM

Other Examples…

Time permitting, some of these will turn into blog posts as well, but here are some examples of clear services you can offer to make peoples lives easier.

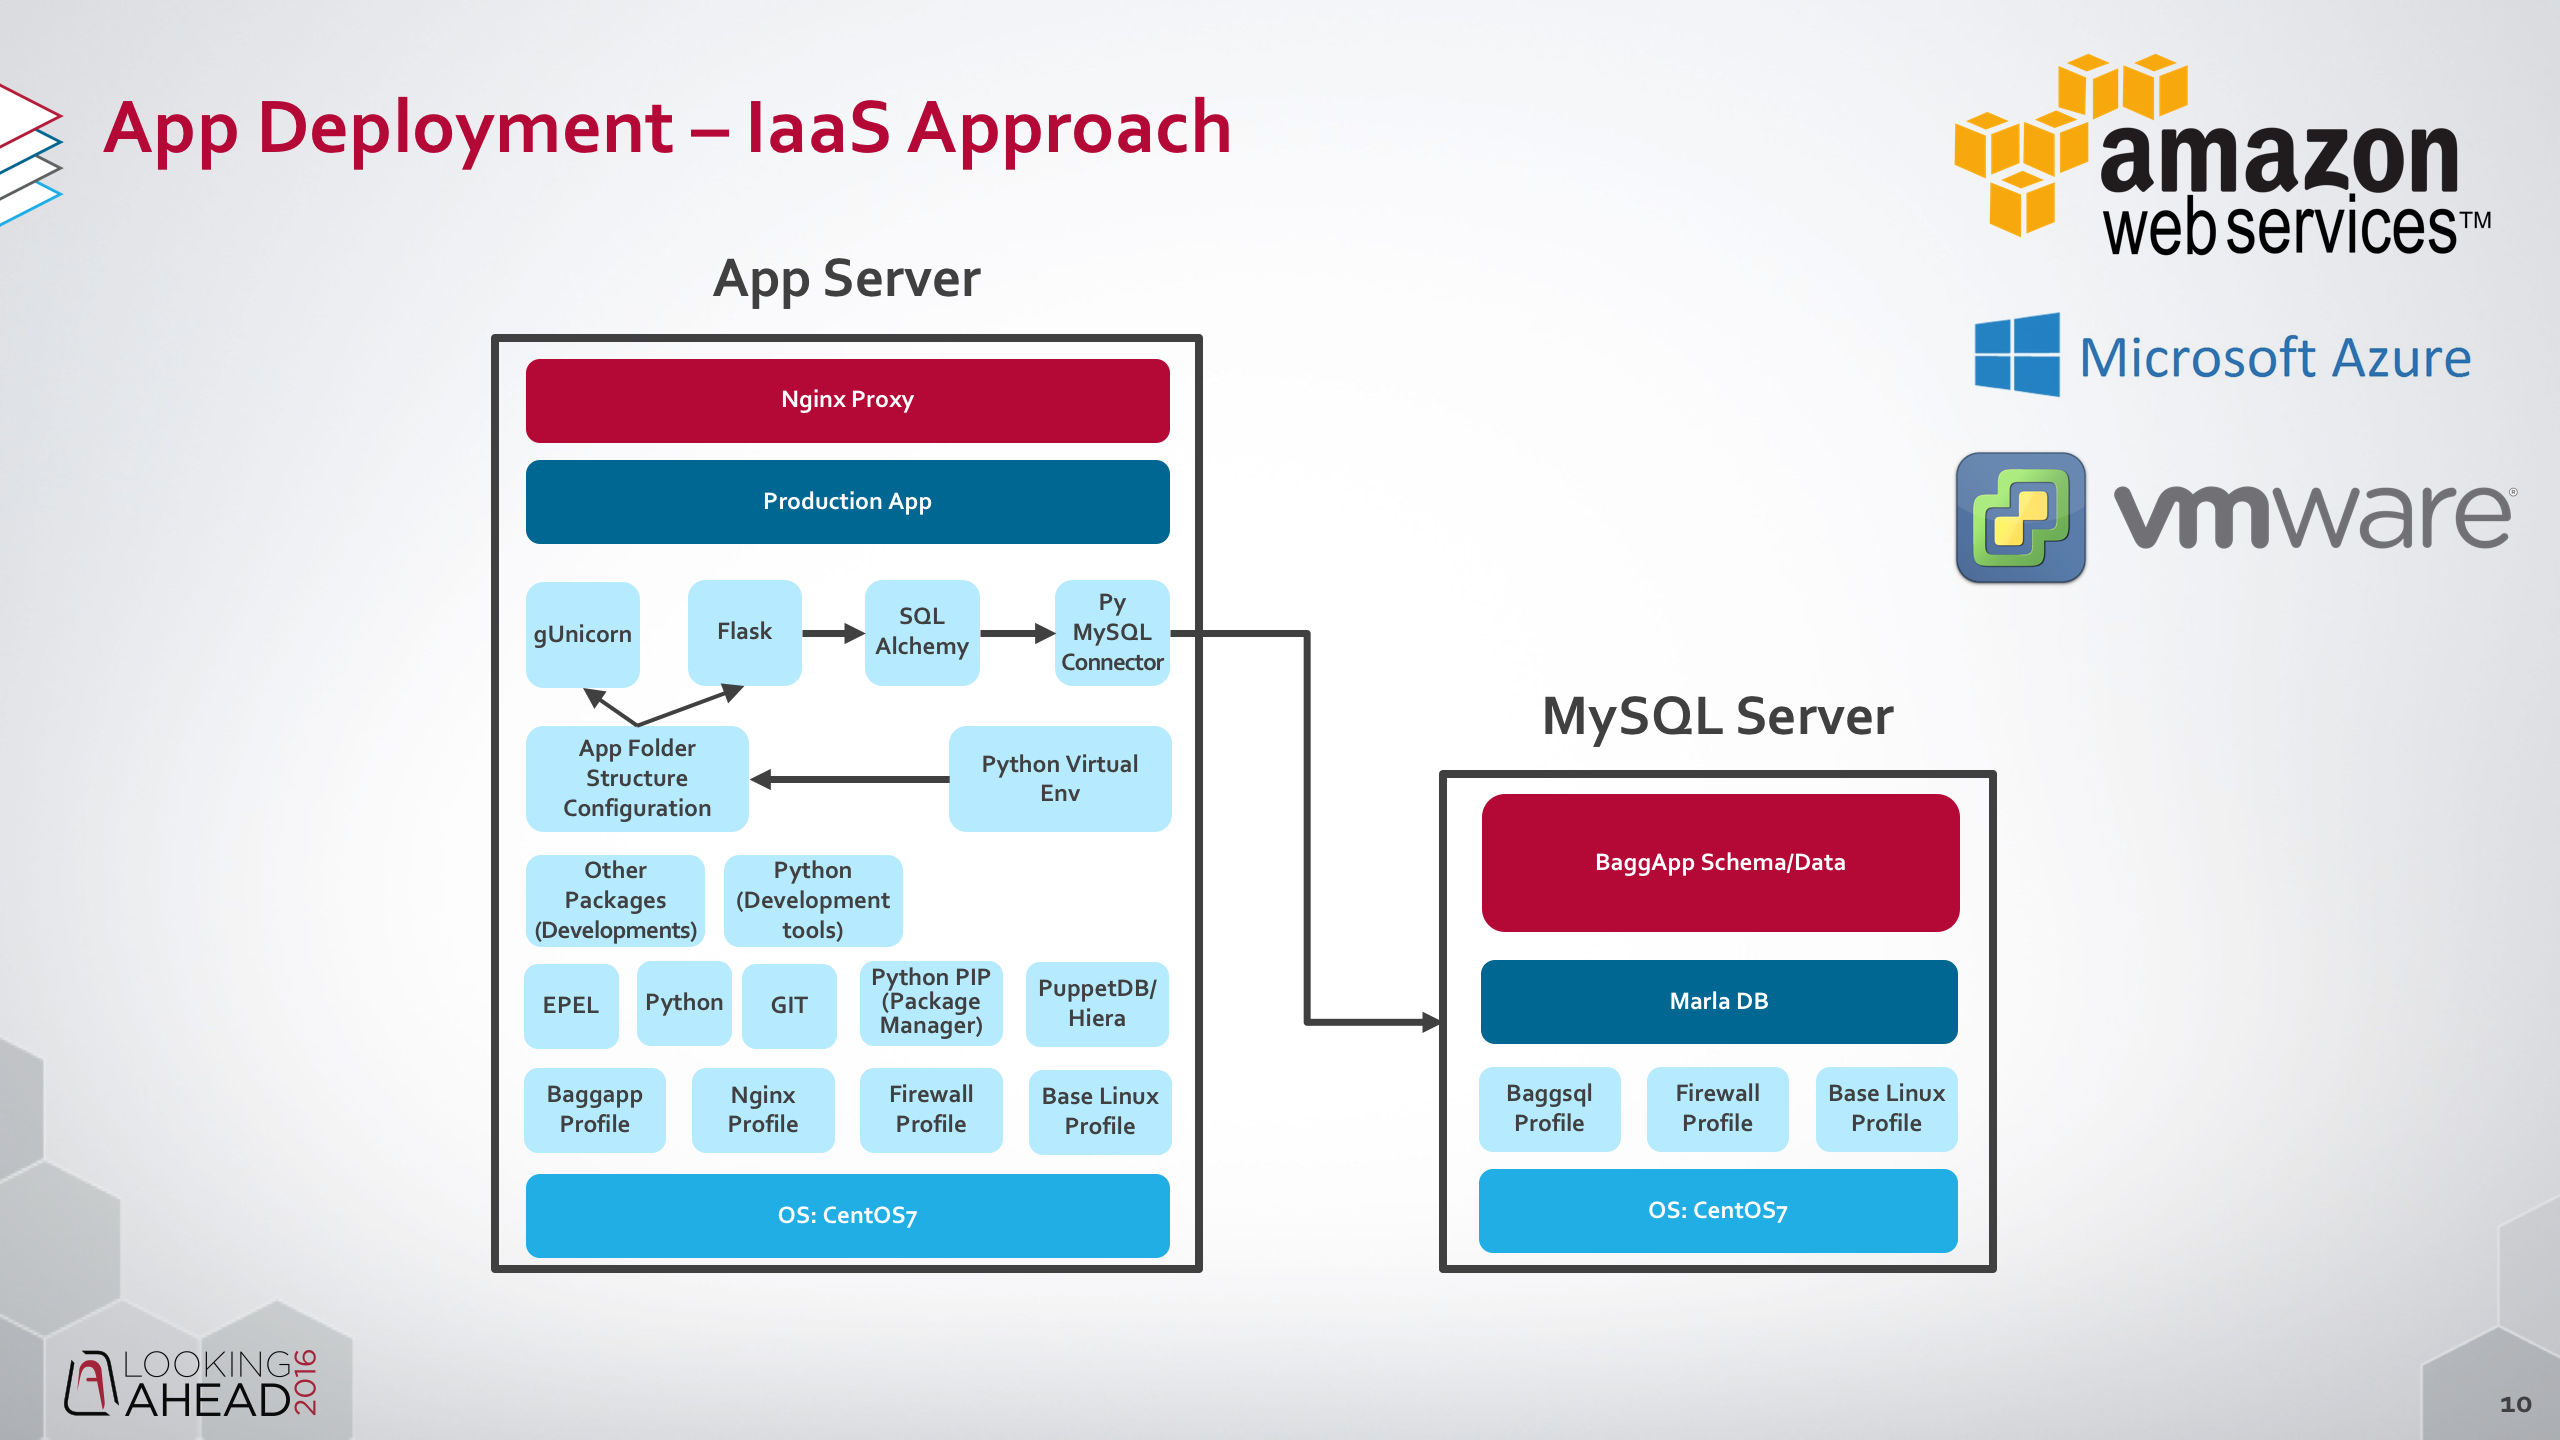
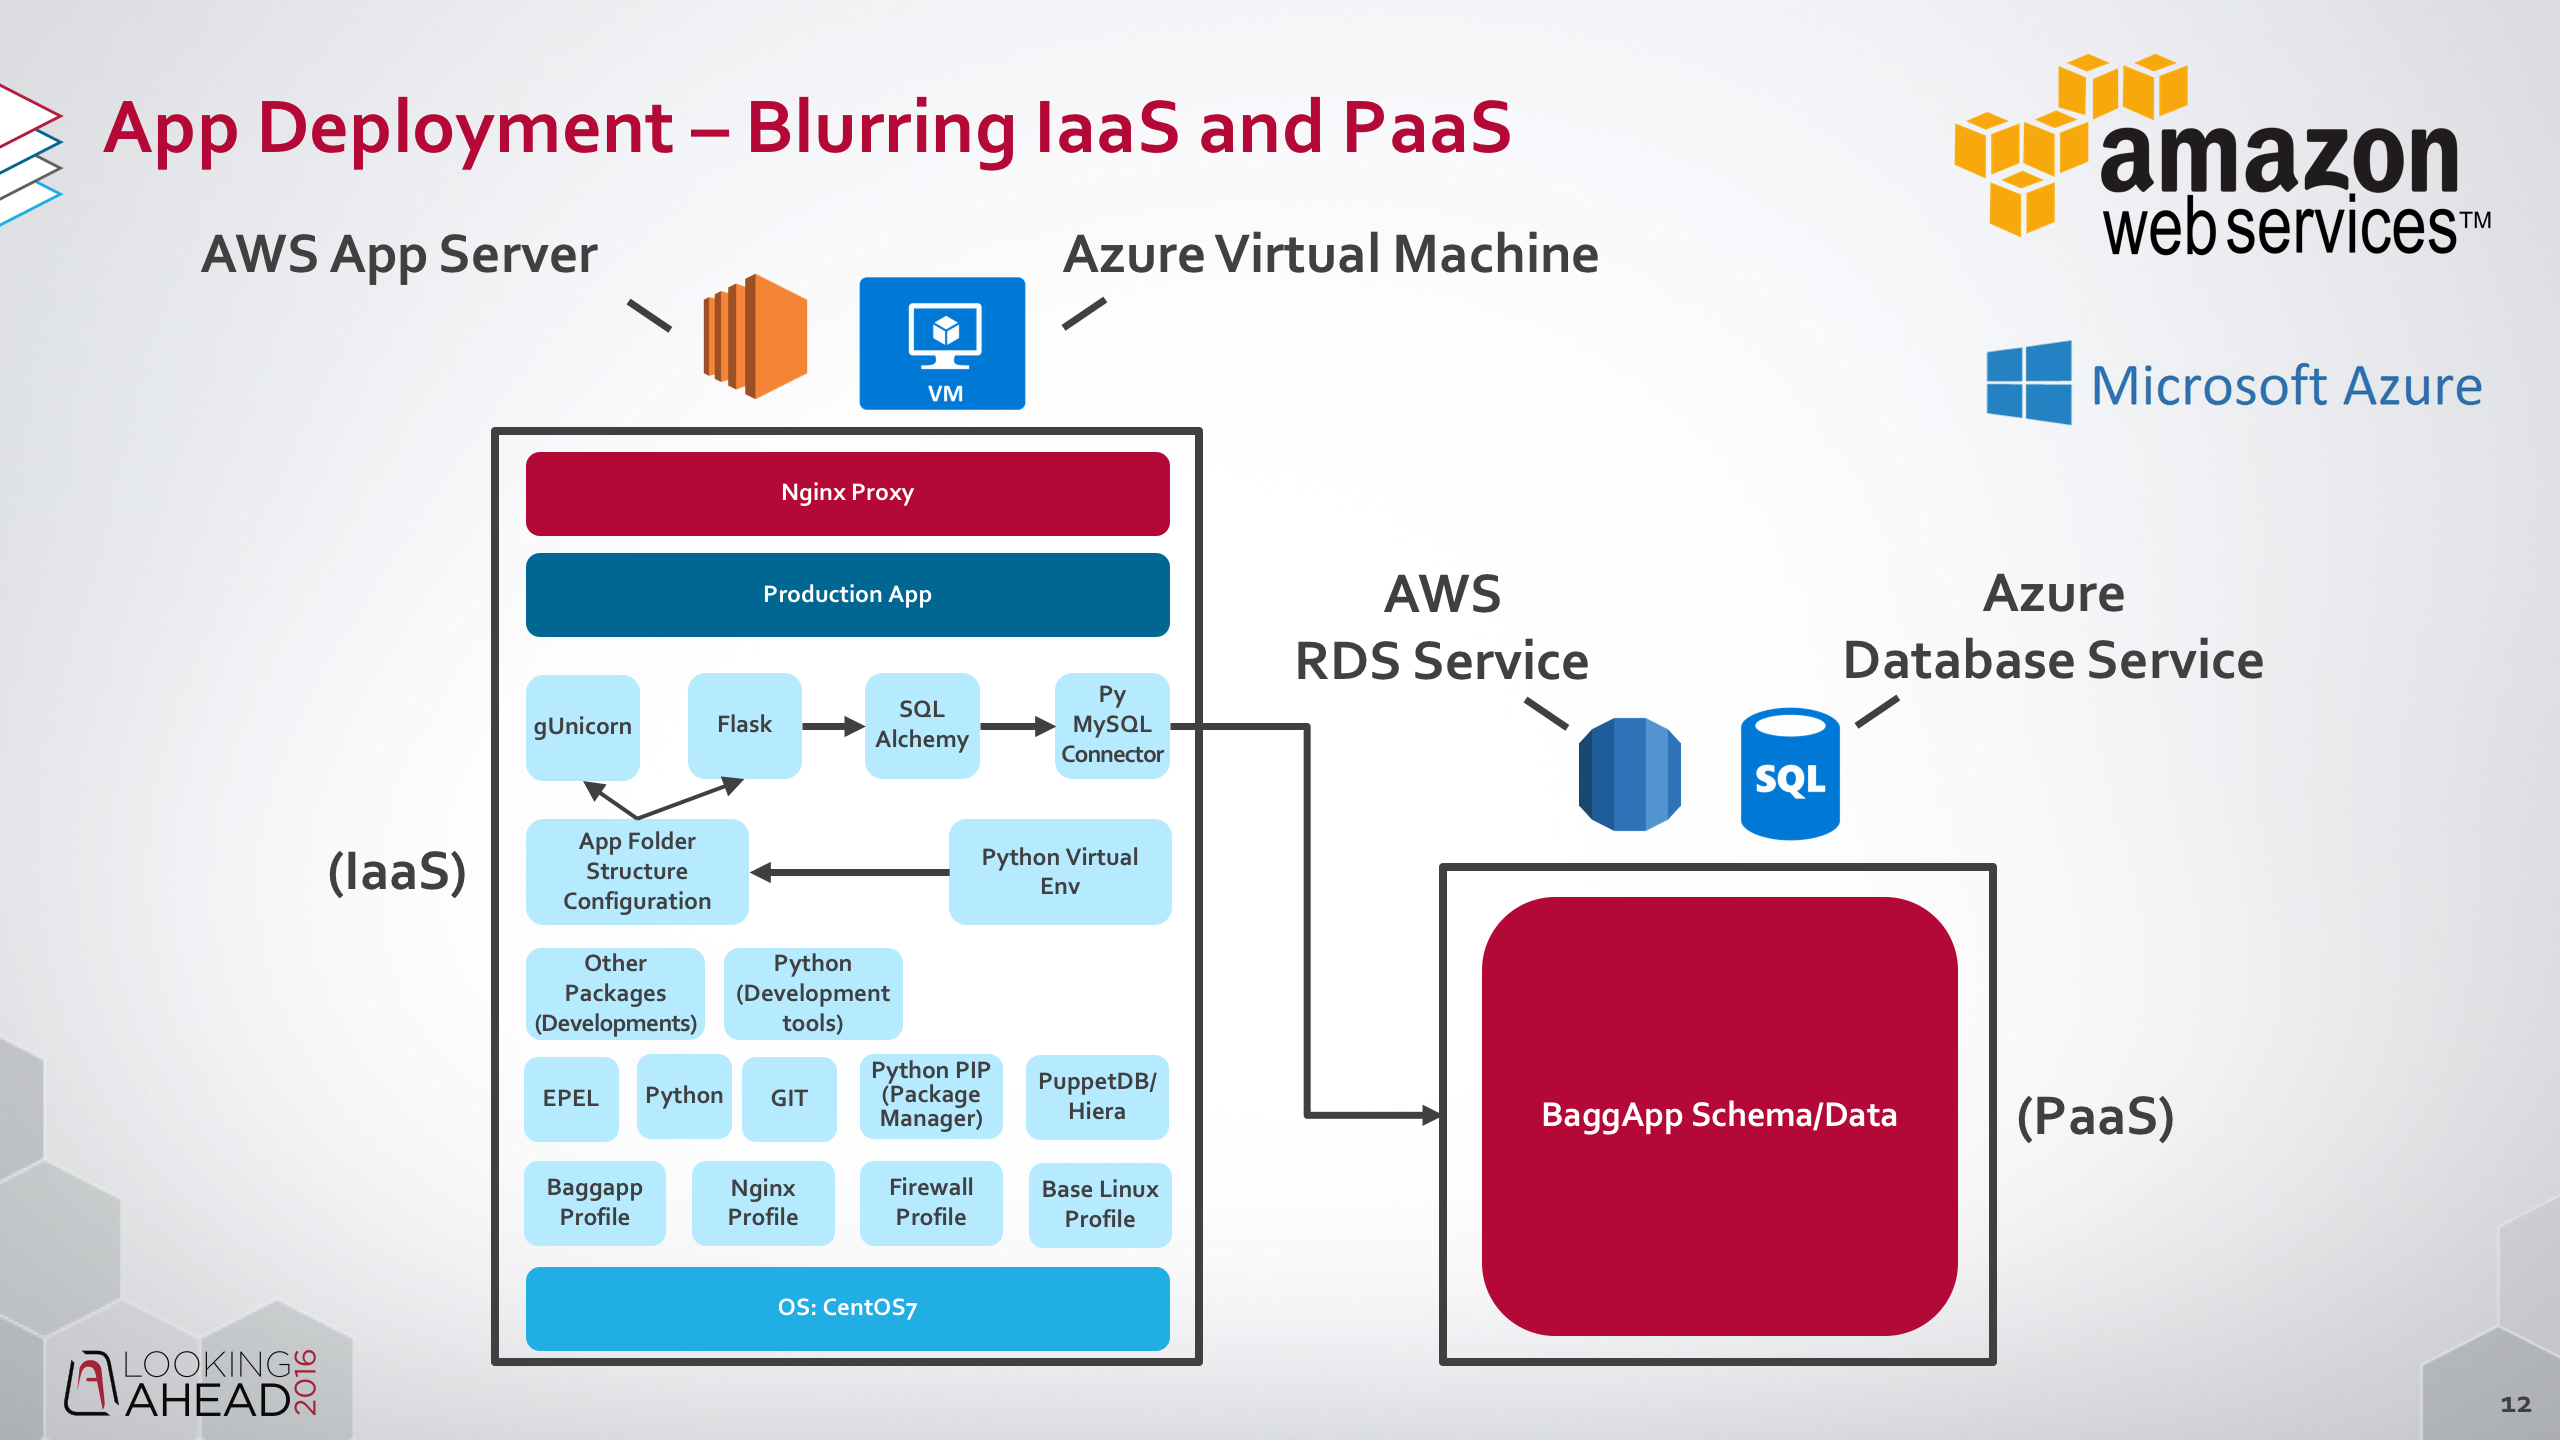
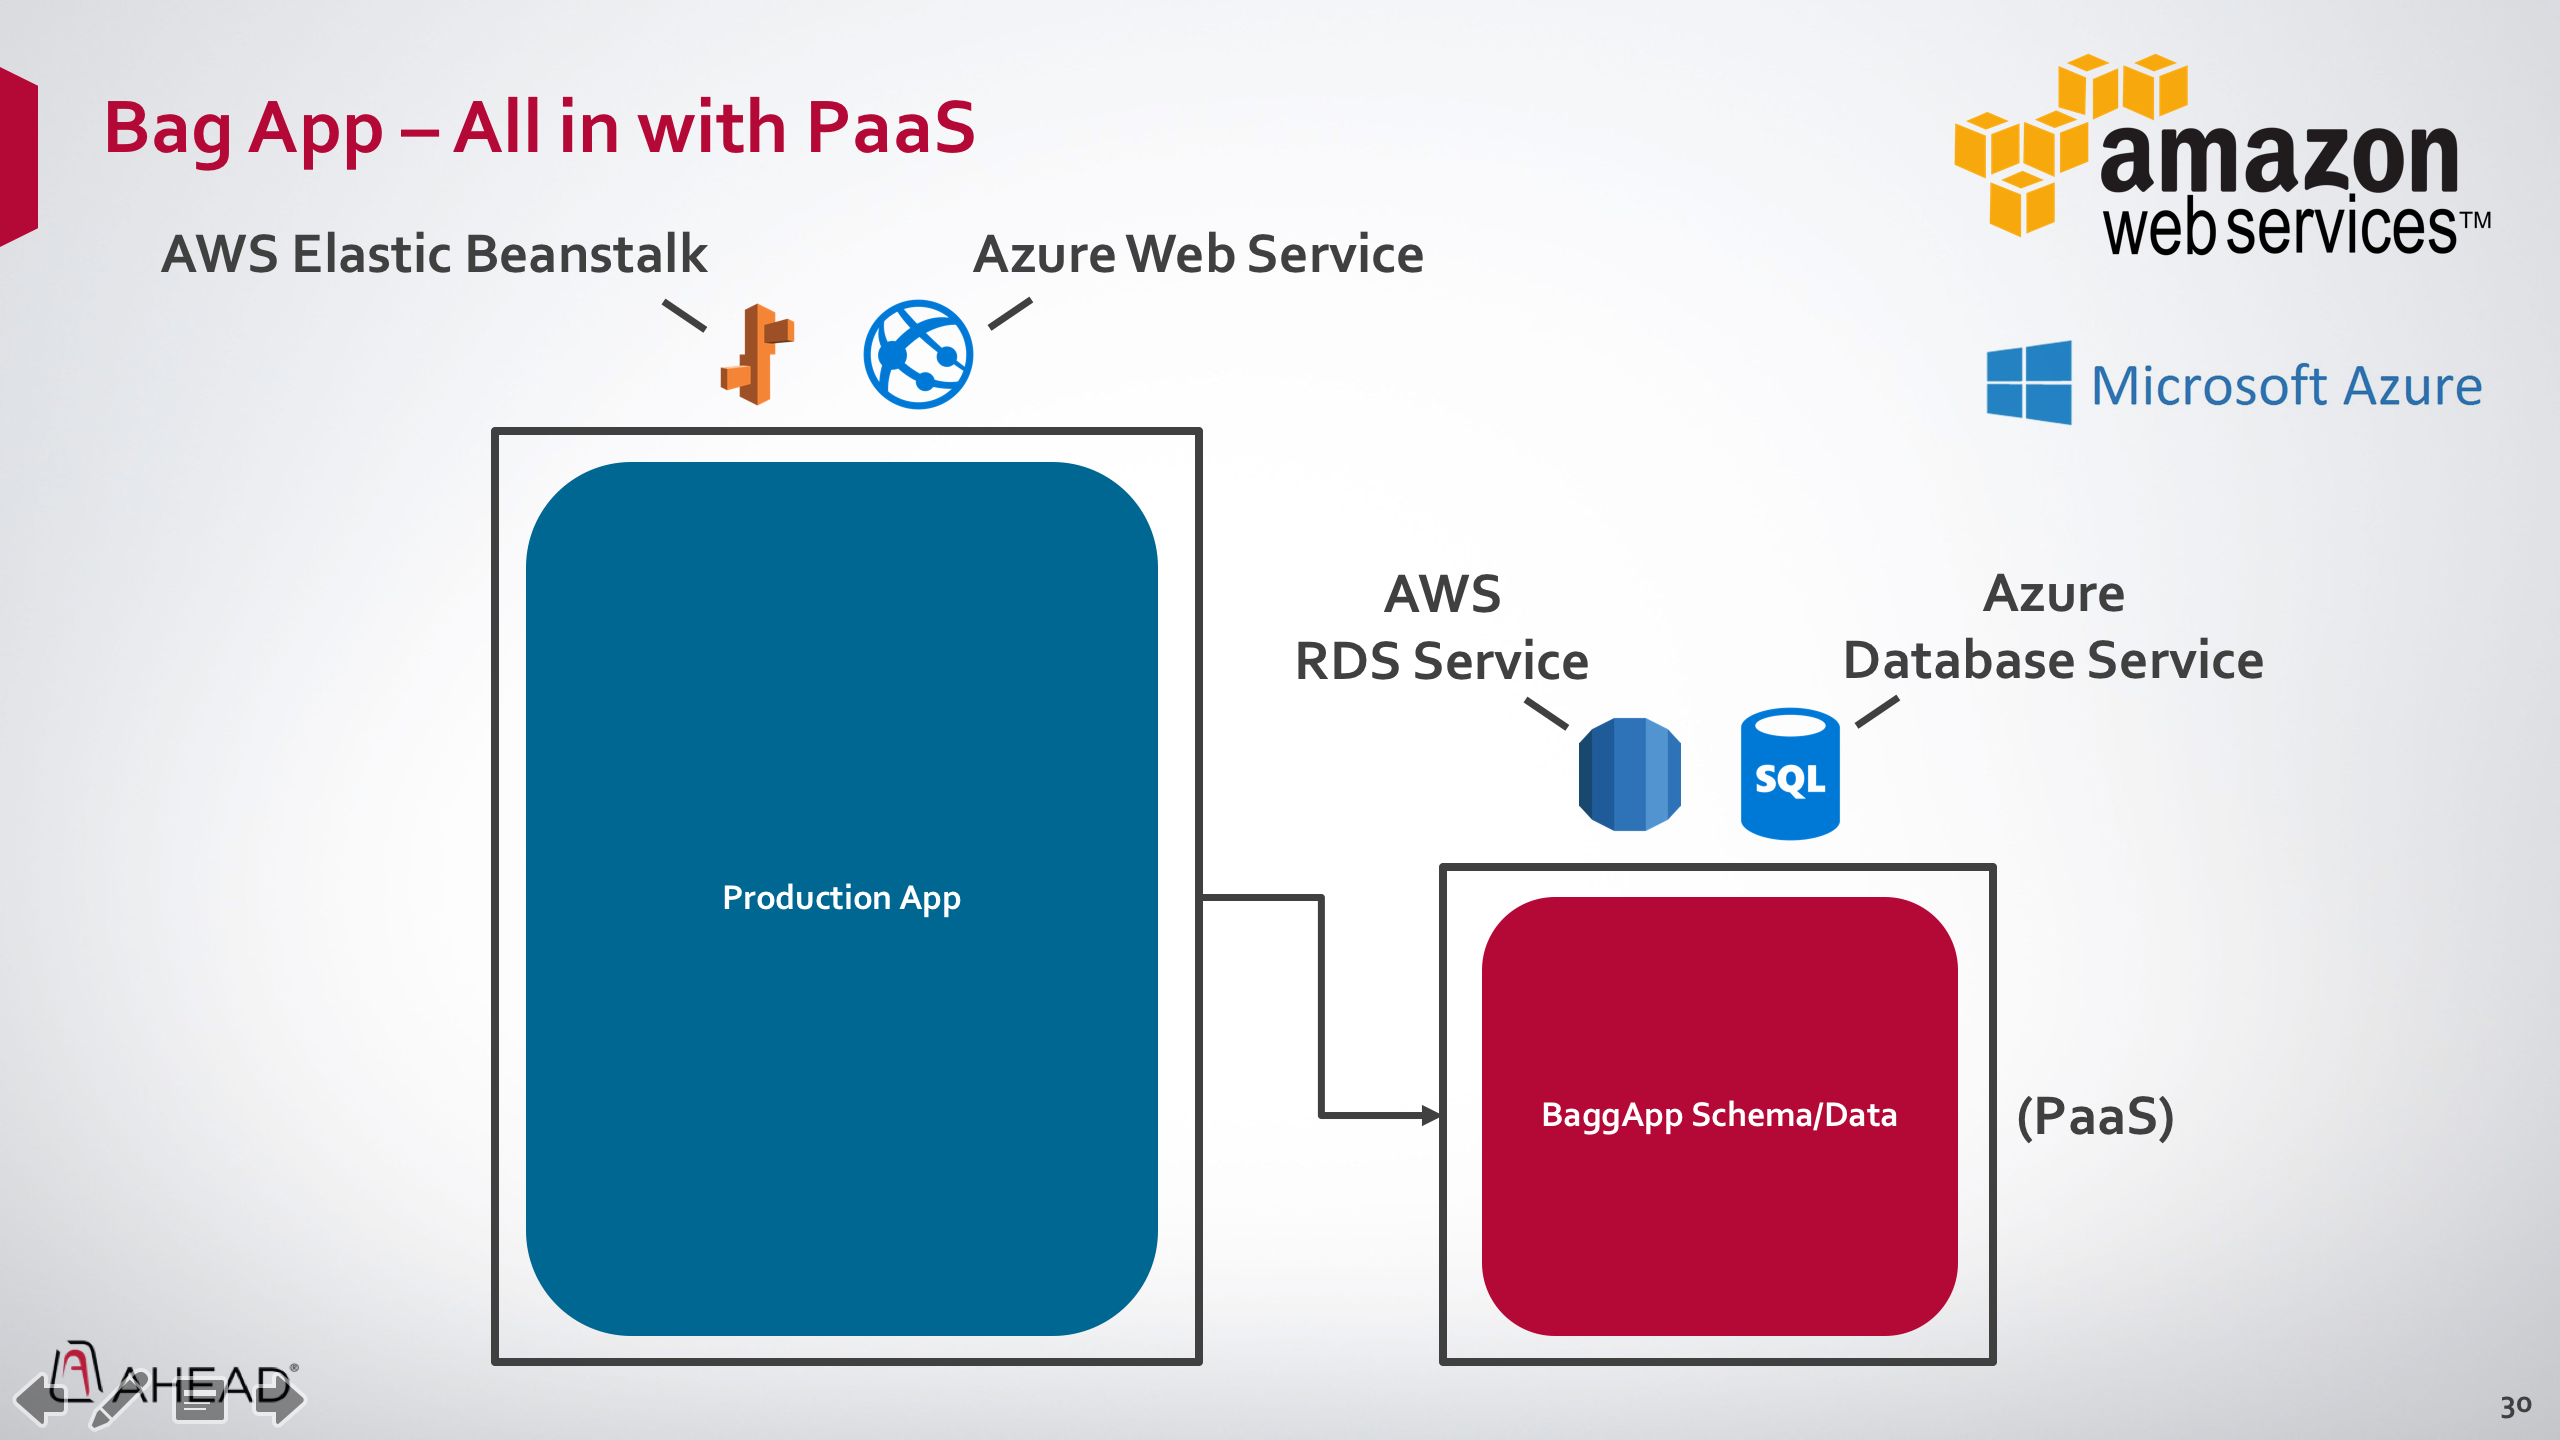
  • Complex Environment Deployments (IaaS, PaaS, SaaS mixes)
    • This means getting everything they need. Not just a VM deployed.
  • Event Based Orchestration – e.g. AWS Lambda to SNOW, Orchestration systems etc.
  • Automated Redeployment of Environments on Schedule
  • Self Service Disaster Recovery CheckBox
  • Self Service Backups and Restores
  • Business Discovery Mapping via Parent/Child Relationships created in blueprints
  • Automated Service Account creation and deletion
  • Automated Snapshots before Patching of Systems
  • Automated Firewall Rule creation and deletion

These are just a handful of ideas.  Remember, with each one, we’re taking out the additional paperwork by automating the tasks you’d typically do in your ITIL tool like ServiceNow.

What is #cloudlife…?

It’s certainly also become a #hashtag we use whenever we are working on Cloudy stuff (e.g. creating a cloud proposal while in the dentist chair…wasn’t me) or thinking about a new innovative Cloud idea while drinking a Tim Carr Starbucks Iced Green Tea (#notpropertea). Essentially, it’s a way of thinking beyond our Infrastructure roles and what the requester is asking for to create something more.

#cloudlife is about reaching for the best possible user experience. One that doesn’t feel like it’s forcing you into a box but instead feels refreshing end enjoyable.


vRealize IaaS Essentials: Building your Windows Server 2012 Template on vSphere – Part 3 (OS Tuning)

Now that we have a base OS build completed, we need to start configuring the OS to the settings we want.

Step 1: Get VMware Tools Installed

Without VMware tools on the OS, many things are sluggish and just annoying. Most importantly it fixes the annoying mouse cursor tracking issues (this is even more noticable when you’re in a VDI session into a VMware Console).

  • Login to your vSphere Web Client and Locate your VM
  • Select the VM > Actions > Guest OS > Install VMware Tools...

rwc-template-tools1

  • You will get a prompt to mount the Tools ISO. Select Mount.

rwc-template-tools2

  • Now inside the OS, Open My Computer/This Computer and Tab over to the CD ROM Drive. I found it almost impossible with the mouse using the VRM Console until Tools was installed so I had no choice but to use the keyboard to get it done. A combination of Tab and Space did the trick.

rwc-template-ostools1

  • Once you are there, run Setup and you should be presented with the VMware Tools installation screen.

rwc-template-ostools2

  • Choose Next
  • Select Typical for your installation type

rwc-template-ostools3


  • Once installation is complete, reboot the OS

Step 2: Fine tune your OS

First of all a big thanks to some of my twitter friends who gave some good suggestions on tweaks here. There is always going to be a debate as to what gets done in the template vs GPO/Configuration Management. I’d say the settings I set below are just the core ones necessary to facilitate deployment of an OS with ease. AD and configuration management should definitely come in after the fact and take care setting other OS settings to their necessary values.

  1. Patch the OS to the latest (It’s worth automating this in the future)
  2. Set Date/Time
  3. Set the OS Hostname to VM Template Name – this helps to know if sysprep worked etc.
  4. Disable the Windows Firewall
  5. Disable UAC
    1. http://social.technet.microsoft.com/wiki/contents/articles/13953.windows-server-2012-deactivating-uac.aspx
  6. Create a Local User account for use by vRealize (e.g. svc_vrealize). You can make sure this account gets disabled automatically as part of your builds or via Puppet, GPO to comply with security requirements. It helps however to be able to easily get into a system using vRO Guest File Operations via a local service account early on.

Also here is a useful link provided by Sean Massey who does a lot of tuning on the Desktop side: https://labs.vmware.com/flings/vmware-os-optimization-tool

Finally, remember to disconnect your CD ISO.

After turning your VM back into a template, we now have a template ready to deploy! Now we can get onto the fun stuff.

Upcoming #vBrownBag Webinar Series: AWS Certified Solutions Architect – Associate Exam

download

It’s finally time to bang out some AWS certifications!

AWS as been on my radar for a long time now, and really this is one of many certifications that are just overdue and need to get done.

Thanks to an invite from Jonathan Frappier to get me motivated and put a date on it, I will be presenting the first in the #vBrownbag series on the certification for AWS Certified Solutions Architect: Associate Exam. Signup by going to the vBrownBag site. Following Part 1, many of my other colleagues at Ahead (Tim Carr & Bryan Krausen) will also be presenting subsequent parts of Domain 1 (Designing highly available, cost-efficient, fault-tolerant, scalable systems).

In part 1, I will be covering the following objectives:

– Identify and recognize cloud architecture considerations, such as fundamental components and effective designs
— How to design cloud services
— Planning and design.

Part 1 is certainly high level and focused on an overview of fundamental components and design. Once I get through the specific requirements, I’m happy to stick around and share real world experiences as well for anyone interested from my time leading the Cloud and Automation practice at Ahead with our clients. I’m sure other Ahead people will be on there if you want to hear their real world experiences as well. Otherwise lets do some cert training!

computertraining

Look forward to seeing many of you on the vBrownbag!

Putting your Cloud on Autopilot and #CloudLife


The Conference

On June 23rd,  I was delighted to speak for the 3rd year at the Looking Ahead 2016 summit. I’ve talked about how much I love my job before and I can say that our summit reinforces that for me every single year. I leave feeling energized as we take risk after risk every year and try to show customers where we are heading and how we can improve their lives.

My Session: Putting Your Cloud on Autopilot

First of all, I would absolutely love feedback on the session, so please send me an e-mail or tweet me. I really appreciate it.

Approaching this years session, it was clear to me so many of the customers I deal with on a day to day basis have moved beyond what I often call the “plumbing phase” of Cloud. I decided to reinforce the message around Cloud by starting off with what it means to me and the Ahead team in general. I am fairly sure every session I do on Cloud for the rest of my life will start off with 60 seconds of what we exactly mean by it; given how misused the term is in the industry.

Deployment Models

Once we got over the basics of doing Infrastructure as a Service, it was time to move onto newer items. In the past I’ve talked a lot about Self Healing Datacenter and how to actually make that a reality, but this time I wanted to focus on the different ways Automation can help across On-Premises and the Public Cloud.

Essentially going from the IaaS Approach via Puppet…

Screen Shot 2016-07-26 at 3.18.32 PM

To a partial refactor using AWS RDS…

Screen Shot 2016-07-26 at 3.17.58 PM

To a complete PaaS deployment…

Screen Shot 2016-07-26 at 3.21.34 PM

All using the same application. I completed a demo showing this, as well as the various ways AWS failover works. The main point here is to stress the choice and flexibility you give up by embracing the various deployment models. I remember saying a few years ago “No 2 clouds are the same”, and that seems to have taken off. I think it’s still valid, at least for now.

Self Healing

AWS_Simple_Icons_Compute_AWSLambda.svg

Then it was time to get back onto the Autopilot theme again, this time using a Google Car to illustrate the mechanisms we use in the real world to create safety. Relating it back to Cloud, I explained an example of event management using AWS Lambda and ServiceNow. I took an AWS Lambda function and used it to connected to ServiceNow so as nodes spun up or spun down ServiceNow Change records would be created automatically. I’ve got a post brewing on the benefits of Orchestration and Event Driven Automation which I hope to finish up some time. I think this is a key topic, often overlooked these days and something I’ve been discussing heavily with our team at Ahead.

Finally – The Cloud Experience

Screen Shot 2016-07-26 at 3.41.29 PM

If there’s one thing I get fed up with at VMUGs and other user groups, it’s people standing up and saying you need to program and that’s the skill. While important, I feel like many just state the obvious in career development without truly explaining what it means to have a functioning Cloud and how you get to that, across On-Premises and in the Datacenter.

Nick Rodriguez and I came up with a new term which we call #CloudLife (Also a future blog post). How do you create the awesome experience that truly changes behaviours in an orgnaization? I talk also with my colleague, Dave Janusz, on this topic alone at length. How do you make someone do something in your IT environment without having to tell them? I love asking this question as it creates all sorts of interesting ideas for design best practices. I’m going to write more on this topic soon also but I hope people start to realize the most successful clouds are the ones that create a user experience that works. I read a book during my University days when I studied a module on Human Computer Interaction. I still state to this day, that the book I read combined with the module taught me some of the most important lessons in IT.

If you haven’t got it, check it out below. It’s a fun read and not entirely related to IT, but I loved it:

Remember, programming is important, but it’s not the only major skill.

With that, I’m going to end this post. I hope to finally sit down soon and write 3 posts I’ve been thinking and talking about for a while…

  • What is #CloudLife?
  • Skills of Successful Cloud Deployments
  • Visual Orchestration vs Non-Visual Orchestration

These topics deserve more debate than they get today. I feel like the DevOps initiatives when done as a Silo (yup you heard me, people do DevOps in a silo that they call DevOps), have masked some of the changes IT has to make. Also IT hasn’t always been able to articulate and truly create the services Developers always needPublic Cloud is here, but there’s more to wrap around it. Do Developers use visual studio and connect directly to Azure? Do they use Docker + IaaS for more flexibility? How do you present the right services and lego bricks of automation?

Time to dream more about….#CloudLife

937605-bigthumbnail

IaaS Fundamentals: Creating a fresh Windows Server 2012 Template – Part 2

With our base VMware vSphere VM shell ready, it’s time to continue installing the Windows OS.

rwc-template-winstart2

Just before we dive in, it is worth noting that depending on how you are remotely connected into the desktop, you may have issues controlling your mouse. In my case I was going via a View Desktop and then into the VRM console. I decided to just use the Tab and Spacebar key instead to make my selections. This will get much easier later on when VMware Tools is installed in the VM.

  • Select Install now, accept the defaults for language etc. until you get to the type of OS you wish to deploy.
  • I choose the Datacenter Edition with GUI here. Note: You can always remove the GUI and go back to ServerCore if needed. I know in my environment our Windows team still generally uses the GUI
  • Click Next once chosen

rwc-template-instancetypes


  • Accept the license terms and click Next
  • Change the installation type to Custom: Install Windows Only (advanced) and click Next.

rwc-newtemplate-installtype


  • Next you will be prompted for your drive layout. It should look like the screenshot below unless you chose a different drive configuration.

rwc-template-driveallocation

  • Leave Drive 0 selected and click Next

Sit back relax and enjoy the show!

rwc-template-installingzzz


Enjoy some tea while you wait…

tea

  • Once finished you will need to enter your Administrator Password for your Windows Template.

Coming soon – Part 3 – Configuring and tuning your OS