Category Archives: Windows Server Build Automation

It’s ON with Turbonomic and vRO

There have been a lot of changes for VMTu Turbonomic.  I believe most in the industry are aware of the bold name change.  This name is more representative of what the product does based on the economic model it is known for.  Besides that with the latest version, Turbonomic also released vRealize Automation workflows to integrate with their product.  You have to be a member of the Green Circle, which is free, but you can download them here.  There are instructions on importing the workflows, setting up Operations Manager as a REST host, etc.  I was excited to see this but, unfortunately, my environment only uses vRealize Orchestrator.
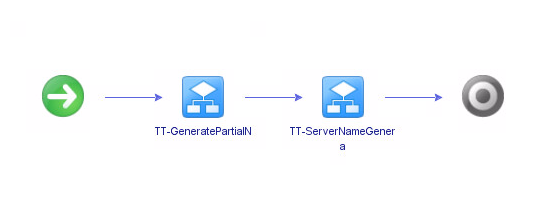
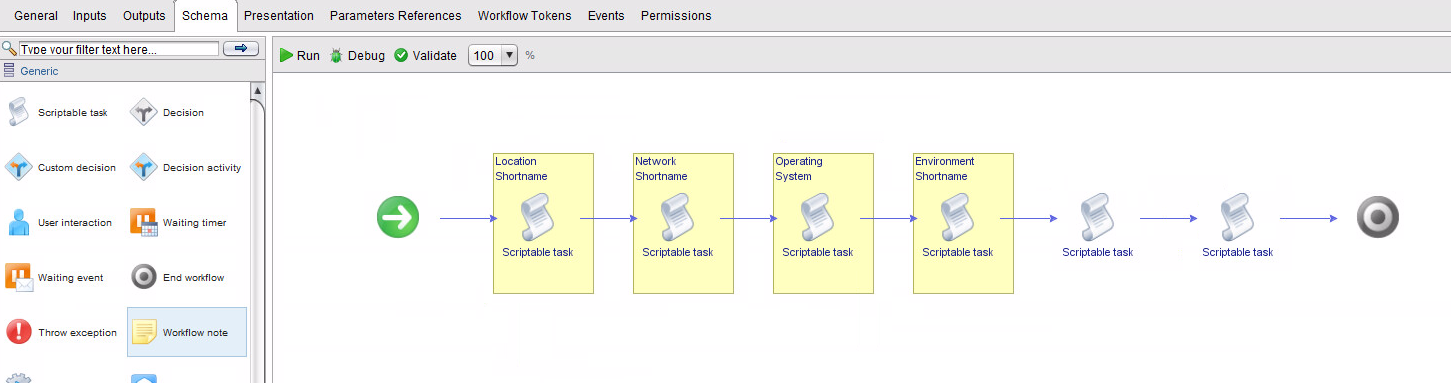
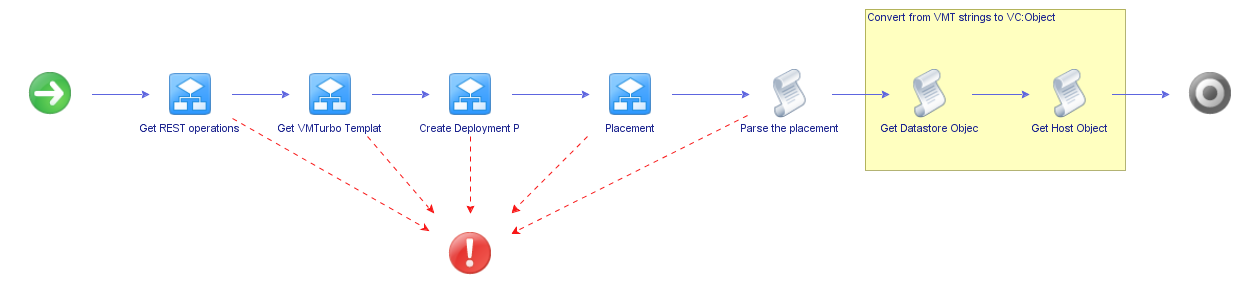
Below is the schema for vRA workflow:

vra_vmt

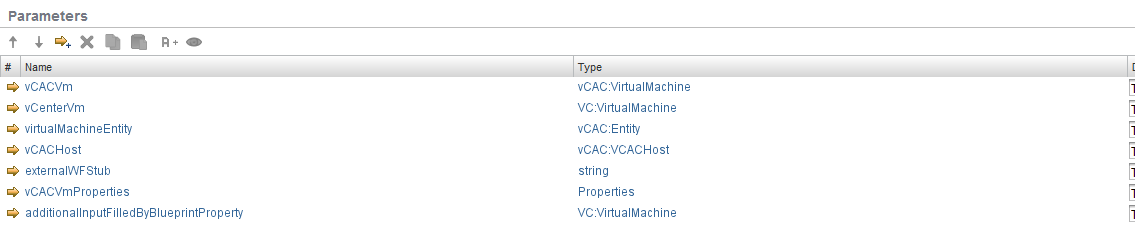
First is a scriptable task to gather inputs for vRA.  The inputs are all vRA specific so I could remove these. At the end it, the workflow is pushing back properties to vRA so I removed “Override vRA Settings” at the end.

Inputs removed from original VMTurbo Main workflow:

parameters


My workflow ended up like this, removing vRA dependencies and ending with 2 scriptable tasks to convert the datastore and host to VC:objects instead of strings.  These scripts will be covered in another post.

newworkflow

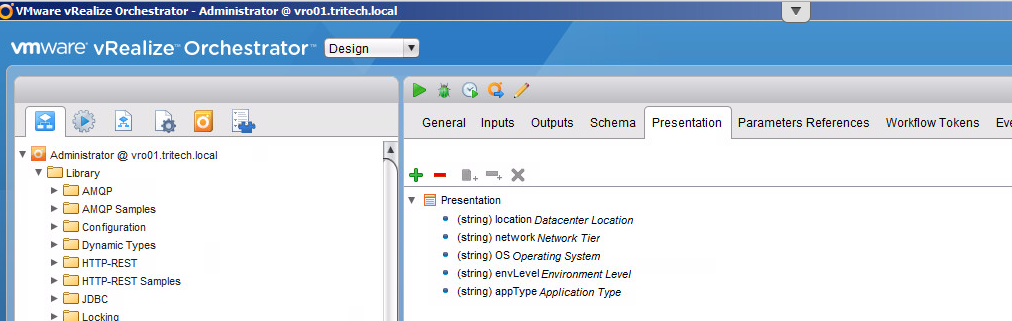
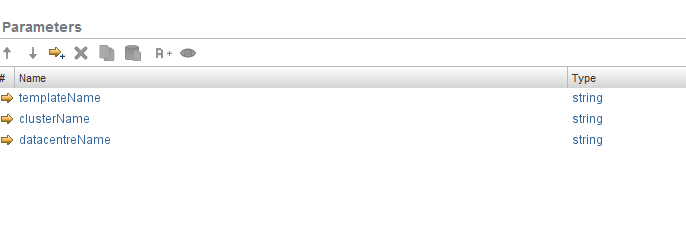
My inputs end up moving from general attributes and are templateName, clusterName and datacentreName. In the future I will likely add a scriptable task at the beginning of the workflow to determine these as they will come from inputs generated by my Windows or Linux Master Build workflow.

Inputs converted from attributes:

newinput

I also now have outputs for the actual VC: Datastore VC: Host System objects for your clone workflow in vRO. These were created via the scriptable tasks which take the strings returned from Turbonomic and do a lookup to match them to the vCenter objects.

Outputs created:

outputs


What’s great about having this functionality from Turbonomic is now the best host and the best datastore will be selected based on analytics from Operations Manager. I originally was picking my datastore based on amount of free space but now using the REST API I can have the least utilized host and datastore supplied to by clone workflow.

Download the modified workflows here.

I’ll be going over these workflows in the upcoming webinar “Overcoming Private Cloud Challenges in Healthcare IT”, September 29th at 2:00PM EST.  Register here

How to match and correlate Windows SCSI Disk IDs with VMware VMDKs

*Note: This is a repost due to moving my posts from SystemsGame.com to 2ninjas1blog.com”

This post comes from a colleague of mine who couldn’t find a great resource on how to correlate the Windows Disk in Disk Management, with the Virtual Disk presented by VMware.

When all the disks are different sizes it is easy, but sometimes they are the same…how can you be sure you are expanding the right disk?

These instructions/steps should allow you to correlate Windows Disks to VMDK Disks.

  1. RDP  to the Windows server in question and run this powershell script
Get-WmiObject Win32_DiskDrive | select-object DeviceID,{$_.size/1024/1024/1024},scsiport,scsibus,scsitargetid,scsilogicalunit | out-file -FilePath c:\OutputPhysicalDrive.txt

This script should allow you to match the OS disks to the VMDK Disks. The output will be referenced in later steps.

Example output

DeviceID : \\.\PHYSICALDRIVE3
$_.size/1024/1024/1024 : 9.99680757522583
scsiport : 3
scsibus : 0
scsitargetid : 0
scsilogicalunit : 0

DeviceID : \\.\PHYSICALDRIVE6
$_.size/1024/1024/1024 : 49.9993586540222
scsiport : 5
scsibus : 0
scsitargetid : 1
scsilogicalunit : 0

DeviceID : \\.\PHYSICALDRIVE4
$_.size/1024/1024/1024 : 19.9936151504517
scsiport : 4
scsibus : 0
scsitargetid : 0
scsilogicalunit : 0

DeviceID : \\.\PHYSICALDRIVE0
$_.size/1024/1024/1024 : 59.996166229248
scsiport : 2
scsibus : 0
scsitargetid : 0
scsilogicalunit : 0

DeviceID : \\.\PHYSICALDRIVE1
$_.size/1024/1024/1024 : 19.9936151504517
scsiport : 2
scsibus : 0
scsitargetid : 1
scsilogicalunit : 0

DeviceID : \\.\PHYSICALDRIVE2
$_.size/1024/1024/1024 : 19.9936151504517
scsiport : 2
scsibus : 0
scsitargetid : 2
scsilogicalunit : 0

DeviceID : \\.\PHYSICALDRIVE5
$_.size/1024/1024/1024 : 49.9993586540222
scsiport : 5
scsibus : 0
scsitargetid : 0
scsilogicalunit : 0

The second step is to get a list of your VMDK disk information by editing the virtual machine in question. 

The information you will be retrieving is the
Disk Name: “Hard disk 1”
Size: “60 GB”
Bus ID: 0
Disk ID: 0

SCSI (X:Y) Hard Disk under Virtual Device Node. The X:Y values are:

X = Bus ID
Y = Disk ID

Enter the Disk information for all VMDK disks into a table like the one below:

Reference OutputPhysicalDrive.txt and match up any OS disks to VMDK disk that have a unique size.

For the non unique drives you will need to match the Windows disk scsitargetid with the VMDK Disk ID.

The first 2 in the example below are both 50GB Drives.

DeviceID : \\.\PHYSICALDRIVE6
$_.size/1024/1024/1024 : 49.9993586540222
scsiport : 5
scsibus : 0
scsitargetid : 1
scsilogicalunit : 0

DeviceID : \\.\PHYSICALDRIVE5
$_.size/1024/1024/1024 : 49.9993586540222
scsiport : 5
scsibus : 0
scsitargetid : 0
scsilogicalunit : 0

The next 3 are all 20GB drives.

DeviceID : \\.\PHYSICALDRIVE2
$_.size/1024/1024/1024 : 19.9936151504517
scsiport : 2
scsibus : 0
scsitargetid : 2

DeviceID : \\.\PHYSICALDRIVE1
$_.size/1024/1024/1024 : 19.9936151504517
scsiport : 2
scsibus : 0
scsitargetid : 1
scsilogicalunit : 0

DeviceID : \\.\PHYSICALDRIVE4
$_.size/1024/1024/1024 : 19.9936151504517
scsiport : 4
scsibus : 0
scsitargetid : 0
scsilogicalunit : 0

Hope this helps anyone else having the issue. I’ll loop around and update the PowerShell script I ended up using for this soon as well.

Thank you vRad for this great guide!

IaaS Fundamentals: Creating a fresh Windows Server 2012 Template – Part 2

With our base VMware vSphere VM shell ready, it’s time to continue installing the Windows OS.

rwc-template-winstart2

Just before we dive in, it is worth noting that depending on how you are remotely connected into the desktop, you may have issues controlling your mouse. In my case I was going via a View Desktop and then into the VRM console. I decided to just use the Tab and Spacebar key instead to make my selections. This will get much easier later on when VMware Tools is installed in the VM.

  • Select Install now, accept the defaults for language etc. until you get to the type of OS you wish to deploy.
  • I choose the Datacenter Edition with GUI here. Note: You can always remove the GUI and go back to ServerCore if needed. I know in my environment our Windows team still generally uses the GUI
  • Click Next once chosen

rwc-template-instancetypes


  • Accept the license terms and click Next
  • Change the installation type to Custom: Install Windows Only (advanced) and click Next.

rwc-newtemplate-installtype


  • Next you will be prompted for your drive layout. It should look like the screenshot below unless you chose a different drive configuration.

rwc-template-driveallocation

  • Leave Drive 0 selected and click Next

Sit back relax and enjoy the show!

rwc-template-installingzzz


Enjoy some tea while you wait…

tea

  • Once finished you will need to enter your Administrator Password for your Windows Template.

Coming soon – Part 3 – Configuring and tuning your OS

Server Name Generator – Final

Now that we have our partial name creator and our workflow to check for the next available name, we can bring it all together for a complete server name workflow.

Complete Server Name Workflow

General Attributes:

  • partialName: Type = String

 Inputs:

  • appType: Type = String
  • location: Type = String
  • network: Type = String
  • envLevel: Type = String
  • OS: Type = String
  • domainSuffix = string

Outputs:

  • vmName: Type = String
  • fqdnOut: Type = String

The Workflow:

completeWorkflow

As explained in Server Name Generator – Part 1, we create the partial name based on datacenter location, network, operating system and environment.  We now append that with a number and check if the name exists in DNS using the worfklow from Server Name Generator – Part 2.

Now the output you will see is something similar to this in the logs:

[2016-04-18 15:01:08.930] [I] Entering Generate Partial Name Worfklow
[2016-04-18 15:01:08.935] [I] The datacenter shortname is AKL
[2016-04-18 15:01:08.948] [I] The network shortname is P1
[2016-04-18 15:01:08.981] [I] The OS shortname is W
[2016-04-18 15:01:08.994] [I] The environment shortname is 1
[2016-04-18 15:01:09.013] [I] The shortname of the application is APP
[2016-04-18 15:01:09.028] [I] The partial name of the VM is AKLP1W1APP
[2016-04-18 15:01:09.030] [I] Leaving Generate Partial Name Workflow
[2016-04-18 15:01:09.072] [I] Your partial name is: AKLP1W1APP
[2016-04-18 15:01:09.073] [I] Starting loop --- 
[2016-04-18 15:01:09.075] [I] Server Name: AKLP1W1APP01 found in master list - Incrementing with next number and starting over
[2016-04-18 15:01:09.078] [I] Server name: AKLP1W1APP02 not found in master list. Recording new name and continuing.
[2016-04-18 15:01:09.079] [I] Checking host for existing DNS record: AKLP1W1APP02.tritech.local
[2016-04-18 15:01:09.086] [I] Check complete for FQDN: AKLP1W1APP02.tritech.local Found IP address of: null
[2016-04-18 15:01:09.588] [I] 
[2016-04-18 15:01:09.591] [I] The vmName to pass as output is: AKLP1W1APP02
[2016-04-18 15:01:09.592] [I] The FQDN to use is: AKLP1W1APP02.tritech.local

AKLP1W1APP01 already existed so our loop went to the next number 02 and found that it didn’t exist.

This concludes the Server Naming series. You can download the complete workflow here.  If you have any questions, or found this content useful, let us know with a comment.


IaaS Fundamentals: Creating a fresh Windows Server 2012 Template – Part 1

Now that we’ve set our approach for template creation and management, it’s time to create our on-premises vSphere template for Windows Server 2012. The example below is based on VMware vSphere as the hypervisor of choice.

Things you will need

  1. Microsoft Windows Server 2012 ISO (Download from Microsoft)
  2. License Key
  3. vCenter Access

Step 1: Create your ISO

It really helps to first upload your ISO to one of your datastores. Many people prefer an NFS store attached to vSphere for this purpose as it it allows more flexibility when you want to connect that ISO to multiple other hosts where your storage array may not be mapped. In our lab examples, we are using a Tintri-T880 VMstore to keep our templates.

Create a Folder and Upload Windows ISO

  • Login to vCenter
  • Browse to your Datastore
  • Create a New Folder (Something like ISOs or Windows ISOs so you can find it easily)

rwc-w2k12-datastoreadd

  • Browse to your new folder
  • Select Upload File to Datastore
  • Browse for your ISO and let it upload. This will take a short while depending on your connection to vSphere

Step 2: Create your VM Shell

  • Switch back to VMs & Templates View
  • Create a new folder to store your templates in

rwc-template-newfolder-1


  • With your new folder selected, select Create a New Virtual Machine from the actions menu

rwc-template-newVM-1

  • Select Create a new virtual machine and click next
  • Type in a name for your template. In our example we use “TT_W2K12_Template”. Simple and easy to find. Select the VM Templates folder you created previously and click next.
  • Select your vSphere Cluster and click next
  • Select your Datastore and click next
  • Choose your compatibility level. Our clusters are all at 5.5 or above so we have no issues selecting the default of ESXi 5.5 and later.
  • Customize your VM Hardware
    • Choose your CPU, Memory, and Disk configuration
      • 1 CPU
      • 4096 MB Memory
      • 60GB Disk (Up from the default of 40GB. Many could argue to keep it at 40, but with patches and other functions in Windows Management I’ve found 60 to be a safer amount. Plus, since I’m thin provisioned on the storage, it adds little additional cost to me)
    • Change the network adapter to VMXNET3 (The days of needing to use the E1000 are over and 2012 supports the VMXNET3 fine without needing to install VMware tools first)

rwc-newtemplate-customizehw

  • Attach the ISO we created earlier to the CD-ROM

rwc-newtemplate-iso

  • Select the VM Options Tab and change the boot options so that the VM boots to the BIOS first.

rwc-template-bios


  • Power On the VM and it should be automatically in the BIOS
  • Go to Advanced > I/O Device Configuration and disable the Floppy Drive, Serial Ports, and Parallel Port

rwc-newtemplate-disableio


  • Press F10 to Save and Exit
  • Edit Settings on your VM and connect the CD Rom Drive.

rwc-template-cdconnect

  • Restart the VM to begin installing the OS

rwc-template-winstart1

This concludes the template prep, in part 2 we will continue installing the OS.


Server Name Generator – Part 2

Now that we have our partial name being created from Server Name Generator – Part 1, we can have a workflow that appends with a number and check to see if that name already exists within the environment.  The server names will be checked via DNS and via a text file named names.txt saved on the vRealize Orchestrator appliance.

First some pre-work needs to be done.  We need to be able to add host names as they are created to the “names.txt” file

1. Login as root onto the appliance
2. Locate and view the “js-io-rights.conf” file by running “: less /etc/vco/app-server/js-io-rights.conf.  The purpose of this file is explained here on VMware’s documentation site.

addline

You will see “+rwx /var/run/vco/” as shown above.  This means vRO can read, write and execute from this location.  This is where will place our text file to write host names to.

3.  CD to var/run/vco and do a “touch names.txt” to create the file in that directory.

4.  As you can see we need to change the rights so run: chmod 666 names.txt to give read/write access to vRO.

names

Server Name Generator Workflow

General Attributes:

  • None

 Inputs:

  • partialname: Type = String
  • domainSuffix: Type = String

Outputs:

  • vmName: Type = String
  • fqdnout: Type = String

The Concept:

CODE

The Code:

// Read temp server name list - prepare to invoke file writing capabilities if needed
var fr = new FileReader("/var/run/vco/names.txt");
var fw = new FileWriter("/var/run/vco/names.txt");

fr.open();
var content = fr.readAll();
fr.close();

// Initialize variables
var number = 1 ;
var temphost = 0 ; // If we don't set temphost to zero, we break out of for loop immediately


// Function to pad zeros on number that we increment while number is less then 10
function padzero(number) {
 return (number < 10 ? '0' : '') + number
}

// increment through hostnames until we find a hostname that does not exist

System.log("Your partial name is: " + partialName) ;
System.log("Starting loop --- ") ;

for (number=1; temphost != null; number++)
{
 var padded_number=padzero(number) ;
 var vmName = partialName + padded_number;
 
 if(content.search(vmName) <0)
 {
 System.log("Server name: " + vmName + " not found in master list. Recording new name and continuing.") ;
 fw.open() ;
 fw.writeLine(" " + vmName) ;
 fw.close() ;
 
 var fqdn = vmName + "." + domainSuffix ;
 
 System.log("Checking host for existing DNS record: " + fqdn) ;
 var temphost = System.resolveHostName(fqdn) ;


 System.log("Check complete for FQDN: " + fqdn + " Found IP address of: " + temphost) ;
 System.sleep(500) ;
 }
 else
 {
 System.log("Server Name: " + vmName + " found in master list - Incrementing with next number and starting over") ;
 temphost != null ;
 }
}

// Log for debugging purposes
//Output FQDN
fqdnOut = fqdn;

System.log("") ;
System.log("The vmName to pass as output is: " + vmName);
System.log("The FQDN to use is: " + fqdnOut) ;

Download the workflow here

In the next post, we will put the two workflows together to pass the partial name to the server name generator for a completely automated name.

Server Name Generator – Part 1

Generate Partial Name Workflow

Summary/Use Cases:

So you finally agreed on a naming standard, congratulations!  This one uses a datacenter location  + network tier + OS + environment level (prod, test, dmz) + application type.  This workflow has several scriptable tasks within it to go with the naming standard we have chosen for servers.  An example server name with this workflow would be AKLP1L1APP (Auckland datacenter on the production VLAN running on a Linux OS for a generic application) with the sequential number appended at the end.  This workflow outputs a partial name to the Server Name Generator Workflow(coming in Part 2) depending on the drop-down choices a user can pick.  An action, is also used, that is dependent on Location in the Presentation of the workflow.   Only location Auckland will have DMZ as an option.

General Attributes:

  • datacenterSN: Type = String
  • networkSN: Type = String
  • envNUM: Type = Number
  • appSN: Type = String
  • osSN: Type = String


Inputs:

  • appType: Type = String
  • location: Type = String
  • network: Type = String
  • envLevel: Type = String
  • OS: Type = String

Outputs:

  • partialName: Type = String

The Workflow:

In the workflow, be sure to use notes to  describe what is being done in each task.

workflowNotes

The Code:

Each scriptable task uses a switch statement with cases defined.

The Network task looks like:

switch(network)
{
//--TriTech Production environment---//
 case "Production":
 {
 networkSN = "P1"
 }
 
break;
//--TriTech DMZ environment---//
 case "DMZ":
 {
 networkSN = "Z1"
 }

break;
//--TriTech Test environment---//
 case "Test":
 {
 networkSN = "T1"
 }
 
break;

}

System.log("The network shortname is " + networkSN);

The code is the same format for Location,Operating System, Environment and Application.


Instead of adding a list of predefined answers, you can create an Action with a Return type: Array/String
createAction

action


Code for the action

var result = new Array();
switch (DatacenterSN) 
       {
      case "Auckland":
              result.push("Production");
              result.push("DMZ");
              result.push("Test");
break;

       case "Cape Town":
              result.push("Production");
              result.push("Test");


       case "London":
              result.push("Production");
              result.push("Test");

default:
        result.push("Unknown Error. Contact automation team");
        }
return result;


Now attach the action to the presentation of Network Tier by going to the Presentation tab on the workflow.
Presentation allows you options for your inputs, you can set a drop down list by using Predefined answers (probably the most common choice) or in this case we are choosing Predefined list of elements.

presentationview

Select Network Tier
addToPreso

Hit the fun purple button to make an action call
funpurple

Search in the filter box for your Action and tie it to Datacenter location
location


Now you should see the Get Action code for Network Tier
preso2


The end result.  Only DMZ in the Network Tier will Display for the Datacenter Location, Auckland.  This can be useful in other cases such as specific VLANs assigned to specific locations as well.

dmzAuckland

At the end, we put it all together with the Partial VM Name scriptable task:

partialName = datacenterSN + networkSN + osSN + envNum + appSN
 System.log(partialName);


Download the Generate Partial Name workflow here
We will use this later to create a full server name in the next post of the Server Name Generation series.

Real World Clouds with vRealize Automation 7 – Getting Started

Welcome to what we hope is a long journey in Real World Clouds. Over the past 6 years, we’ve both personally seen much change in this space but one thing that we felt was definitely missing in the blogosphere, were answers to real customer questions. In this series, we’re hoping to showcase some of the complex integrations and advanced services that can be built using the vRealize Suite. Our goal is to get you setup with blueprints and then discuss all the nitty gritty details around service design. With that said, let’s get started.

deployacloud

Getting Started

First of all, this is not a beginners series. You will absolutely need to have vRealize Automation 7 setup and configured. We also assume you already know what Business Groups, Reservations, Entitlements, etc. are. Some of these items will be recapped as needed, but if you want a great getting started guide on vRealize Automation 7 there are several great resources at the www.theithollow.com by Eric Shanks and http://www.virtualjad.com by Jad El-Zein.

The following items are assumed to be in place and working:

  • vRealize Automation 7 Installed and Configured – Simple or Distributed is fine
  • vRealize Orchestrator Installed and Configured
    • vSphere Plugin Configured
    • vRealize Automation Plugin Configured
    • Active Directory Plugin Configured
  • Tenant Configuration Complete with EndPoints for vSphere and vRO configured
  • 1 x Fabric Group created
  • 1 x Business Group created
  • 1 x Reservation created

Programming Skills

Am I going to need to program? The short answer is, absolutely yes. We get asked this a lot and we definitely plan on writing some posts on this soon, but for now, let’s assume you have a basic knowledge in the following areas:

  • Javascript
    • Basic Understanding of variable passing
    • If/Else
    • Switch
    • While Loops
    • For Loops

Also be sure to check out W3 Schools http://www.w3schools.com/js/default.asp which is a great reference website. I almost always search in google things like “w3schools javascript while loop” to find what I need quickly. 

For a great primer on Javascript, I still to this day recommend the book Eloquent Javascript. It’s also a great book just to have at hand while programming workflows.


Last, but certainly not least, are other great vRO/vRA Websites like vCO Team, and many others.

vRealize Orchestrator

vRealize Orchestrator (vRO) is going to be the basis for a number of the subsequent posts. Don’t worry if you aren’t 100% versed in vRO just yet. We will walk you through all of the workflows in detail and I’m also in parallel working to publish a pluralsight class (https://www.pluralsight.com/)  on developing workflows with vRO.

Infrastructure

We will be focusing primarily on VMware vSphere 6 in this series. It is assumed you already have a base understanding of vSphere and vCenter.

Other Useful VMware Reference Sites:

VMware Documentation – http://pubs.vmware.com/vra-70/index.jsp

vRealize Automation SDK 7.0 – https://developercenter.vmware.com/web/sdk/7.0.0/vrealize-automation

VMware vRealize Automation Cloud Client – https://developercenter.vmware.com/tool/cloudclient/4.0.0

Environment Decisions Workflow


Summary/Use Cases:

This workflow can be used to automatically choose the appropriate ESXi cluster to deploy your virtual machine.  Using a switch statement for “environment’, different cases are defined for each environment within vCenter.  In this workflow, there are DEV and QA cluster examples.  When the environment input equals “ninja_Dev”, the host, folder, resource pools, etc will be populated with the values you defined in the cases.

Inputs:

  • environment: Type = String

Outputs:

  • network: Type = VC:Network
  • host: Type = VC:HostSystem
  • datastore=VC:Datastore
  • resourcePool=VC:ResourcePool
  • folder=VC:VmFolder
  • dnsServers=Array/string
  • dvPortgroup=VC:DistributedPortGroup
  • domainCreds=Credential

The Workflow:

environment_decisions


The Code:

As you can see there is only a scriptable task within the workflow using the switch statement


switch(environment) {

//------Ninja Dev Environment------
case "ninja_Dev":
host = ninjaDEV_Host;
folder = ninjaDEV_Folder;
datastore = ninjaDEV_Datastore;
resourcePool = ninjaDEV_ResourcePool;
network = ninjaDEV_Network;
dnsServers = ninja_Dev_QA_Prod_DNS;
dvPortGroup = ninjaDEV_PortGroup;
domainCreds = ninjaComCreds;
System.log("Host is: " + host);

break ;
//------End of Ninja Dev Environment------

//------Ninja QA Environment------
case "ninja_QA":
host = ninjaQA_Host;
folder = ninjaQA_Folder;
datastore = ninjaQA_Datastore;
resourcePool = ninjaQA_ResourcePool;
network = ninjaQA_Network;
dnsServers = ninja_Dev_QA_Prod_DNS;
dvPortGroup = ninjaQA_PortGroup;
domainCreds = ninjaQaCreds;
System.log("Host is: " + host);

break ;
//------End of ninja QA Environment------

}

System.log(host);

Server Name Generator Workflow


Summary/Use Cases:

This workflow can be used to automatically generate a server name in your environment.  With the inputs given, it generates the next unused name available.  In my case, I used partial name because we have different environments (Prod, Dev, QA).

Inputs:

  • partialname: Type = String
  • domainSuffix: Type = String

Outputs:

  • vmName: Type = String
  • fqdnout: Type = String

The Workflow:

ServerNameGenerator


The Code:

As you can see there is only a scriptable task within the workflow.


// Read temp server name list - prepare to invoke file writing capabilities if needed
var fr = new FileReader("D:\\VCOInstallationPath\\Windows\\IPReservation\\NamesReserved.txt");
var fw = new FileWriter("D:\\VCOInstallationPath\\Windows\\IPReservation\\NamesReserved.txt");

fr.open();
var content = fr.readAll();
fr.close();

// Initialize variables
var number = 1 ;
var temphost = 0 ; // If we don't set temphost to zero, we break out of for loop imediatley
// Function to pad zeros on number that we increment while number is less then 10
function padzero(number) {
return (number < 10 ? '0' : '') + number
}

// increment through hostnames unitil we find a hostname that does not exist

System.log("Your partial name is: " + partialname) ;
System.log("Starting loop --- ") ;

for (number=1; temphost != null; number++)
{
var padded_number=padzero(number) ;
var vmName = partialname + padded_number;

if(content.search(vmName) <0)
{
System.log("Server name: " + vmName + " not found in master list. Recording new name and continuing.") ;
fw.open() ;
fw.writeLine(" " + vmName) ;
fw.close() ;
var fqdn = vmName + "." + domainSuffix ;
var temphost = System.resolveHostName(fqdn) ;
System.log(temphost);
System.log("A host by the name of " + fqdn + " exists with the IP address of: " + temphost) ;
System.sleep(500) ;
}
else
{
System.log("Server Name: " + vmName + " found in master list - Incrementing with next number and starting over") ;
temphost != null ;
}
}

// Log for debuging purposes
//Output FQDN
fqdnout = fqdn;

System.log("") ;
System.log("The vmName to pass as output is: " + vmName);
System.log("The FQDN to use is: " + fqdn) ;