Tag Archives: vRO

New Pluralsight Course – Introduction to Workflow Development with VMware vRealize Orchestrator

I’m pleased to announce that as of last week, Pluralsight have released my first Training Course on VMware vRealize Orchestrator. I’ve been working with this product since the early days and I couldn’t be more thrilled to have completed a 2 hour course teaching people how to get up and running quickly.

Here is quick a video overview of the Course:

I aimed this course at getting people into workflow development. This means I don’t focus on product installation and plugin installations, but more on specifically how you can develop and code the workflows.

The course contains the following 7 modules:

  1.  Getting Started – A tour of vRealize Orchestrator and the components.
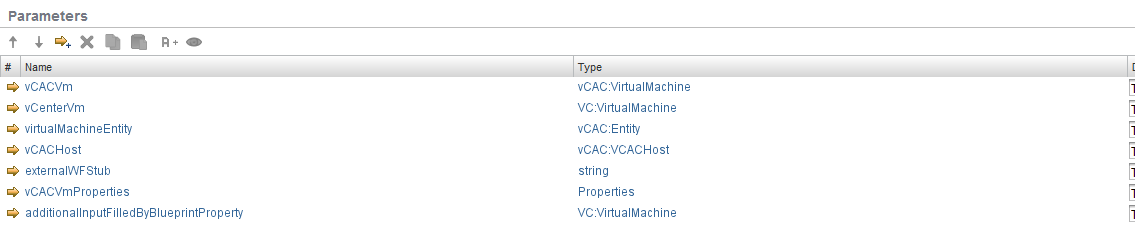
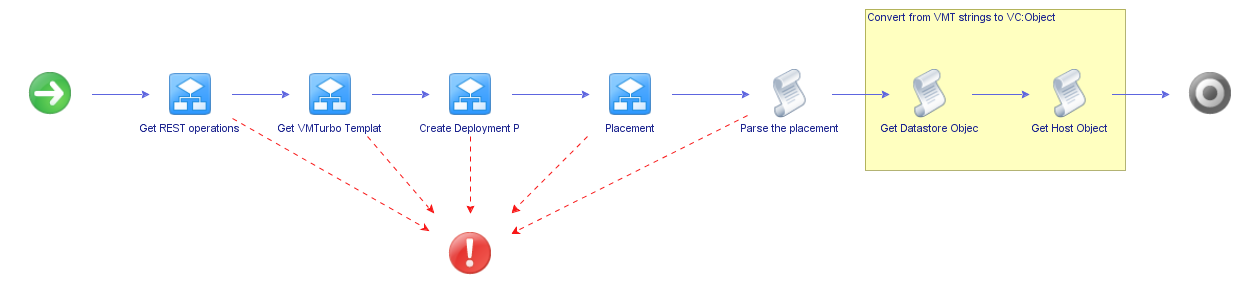
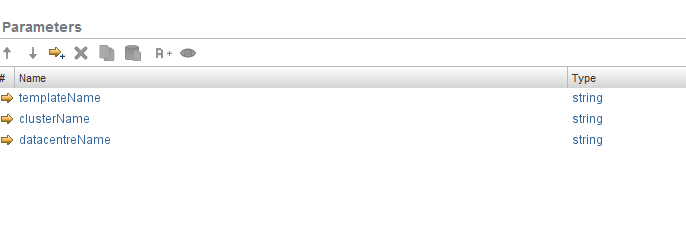
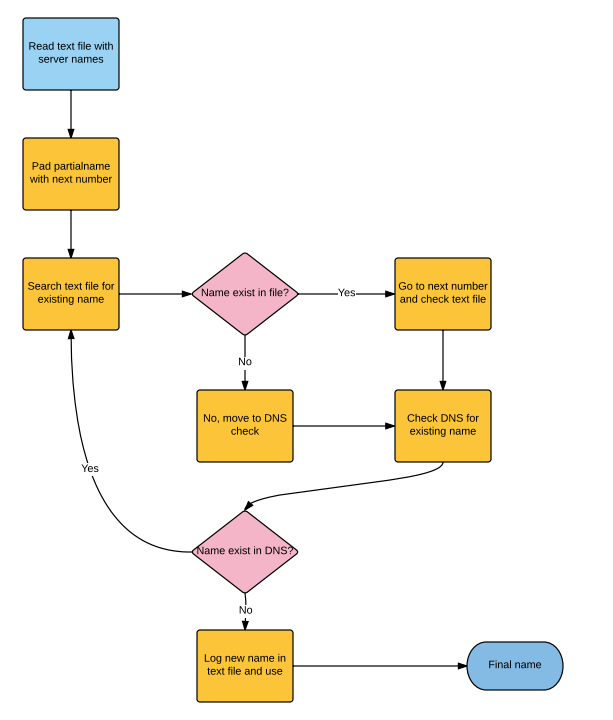
  2. Building Workflows – Approach to workflow design, followed by some basic workflow creation.
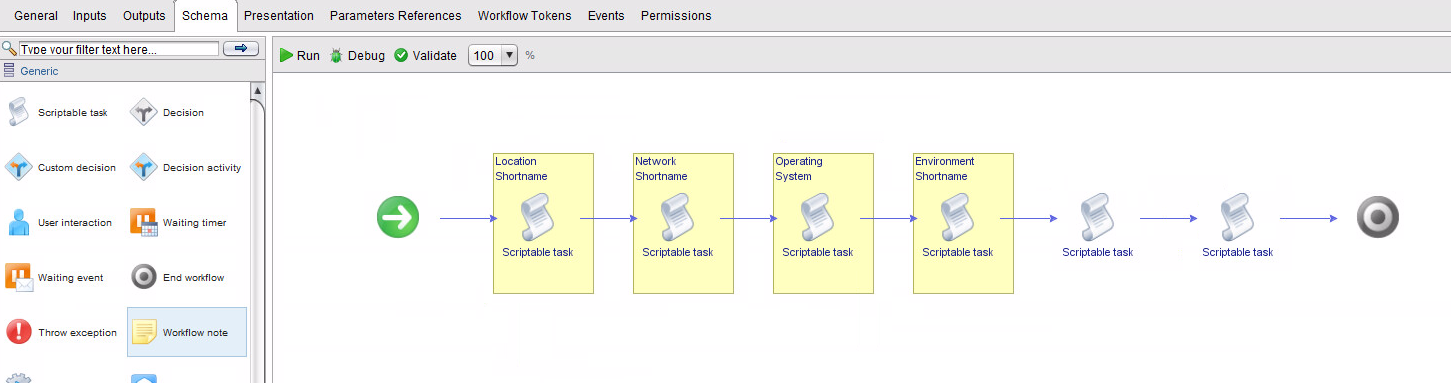
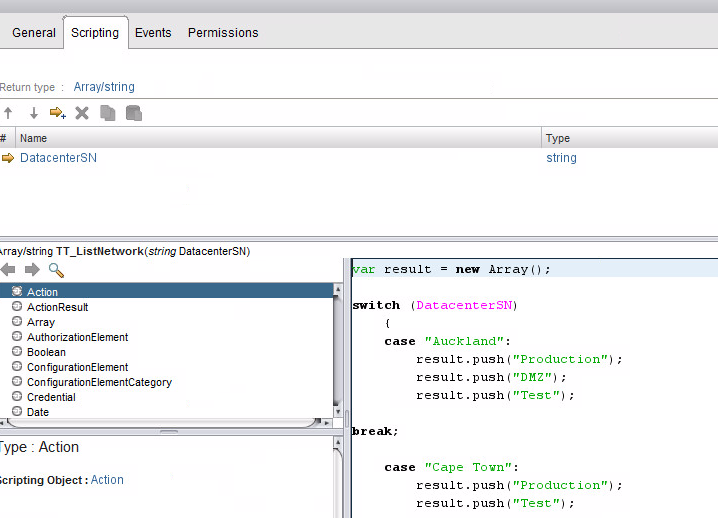
  3. Scriptable Tasks – Learn some basic Javascript and start using Scriptable tasks.
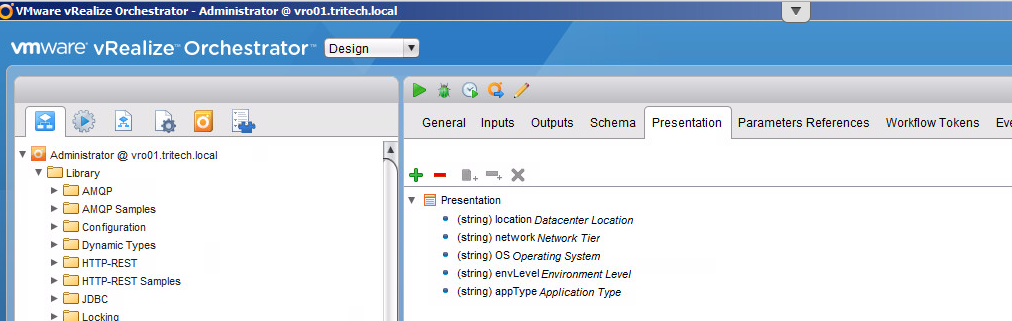
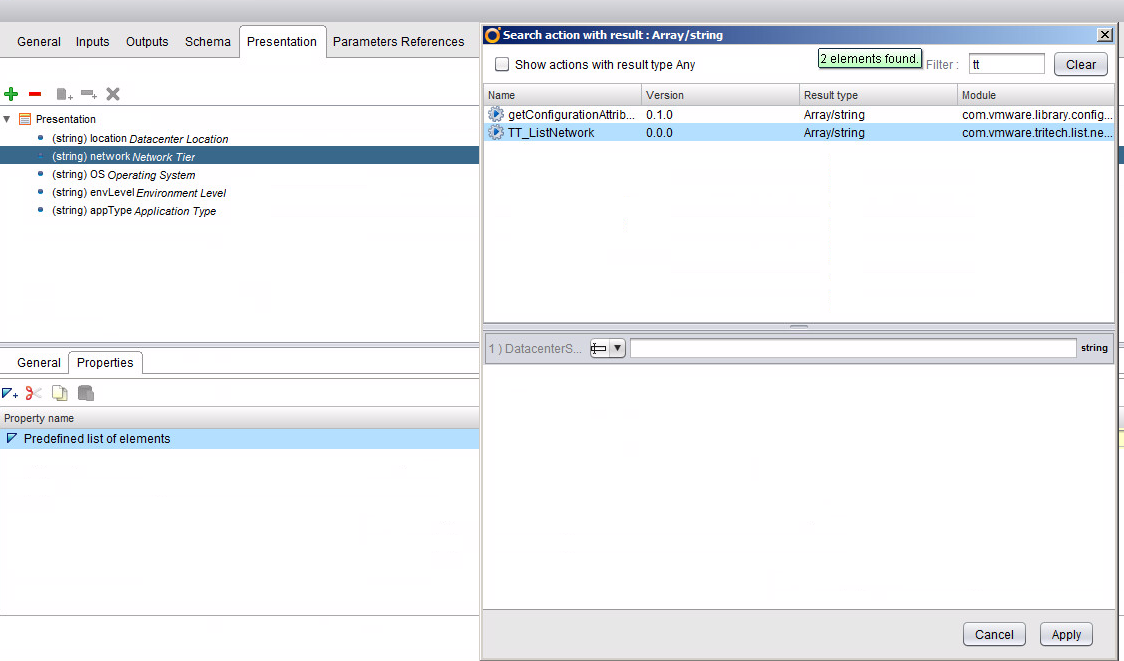
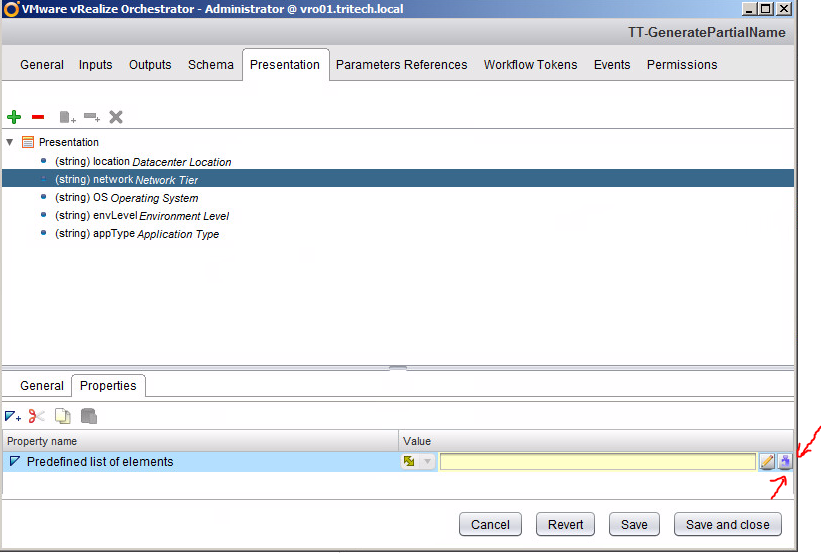
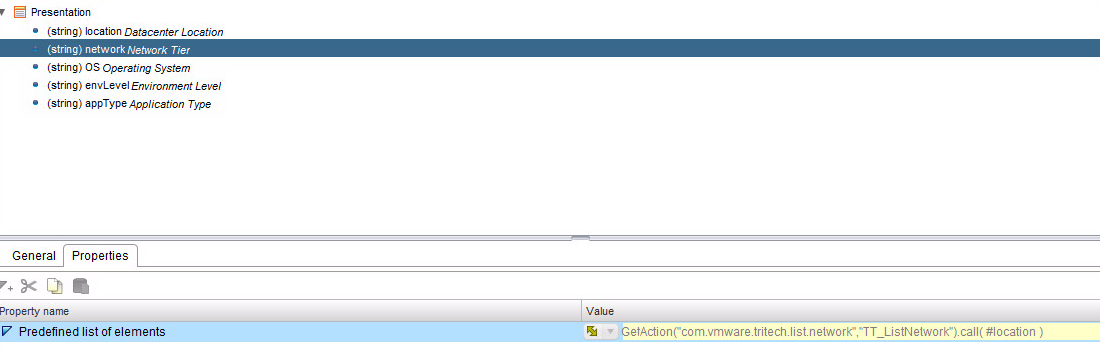
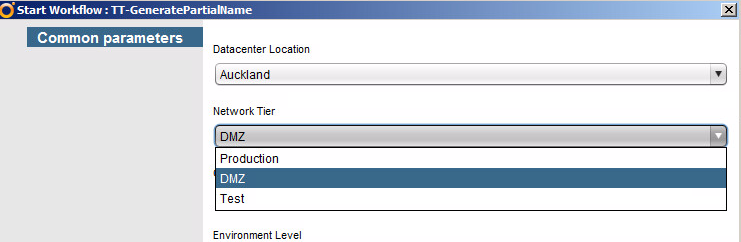
  4. Input Presentation and Additional Javascript – Learn some basic ways to use the presentation view, as well as more javascript.
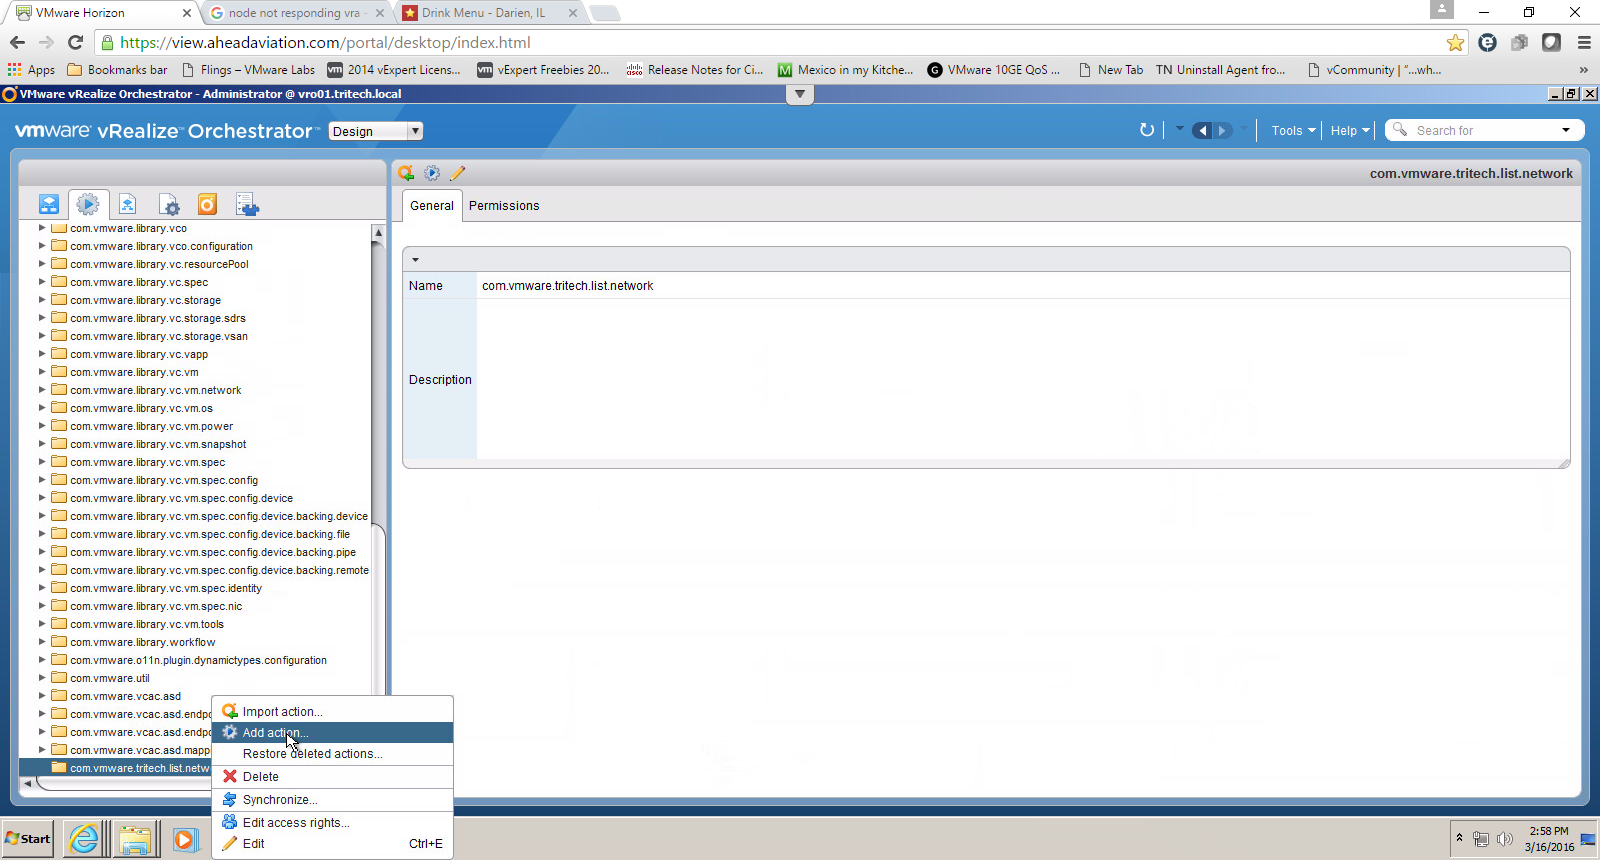
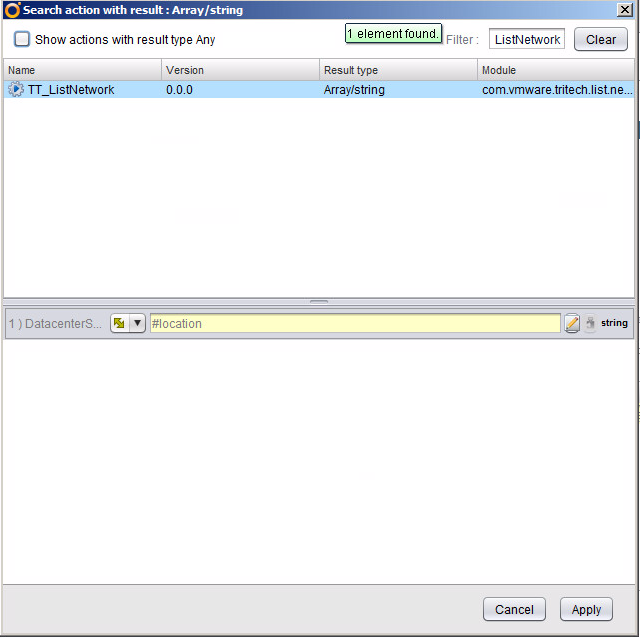
  5. Actions – Turn scriptable tasks into reusable actions.
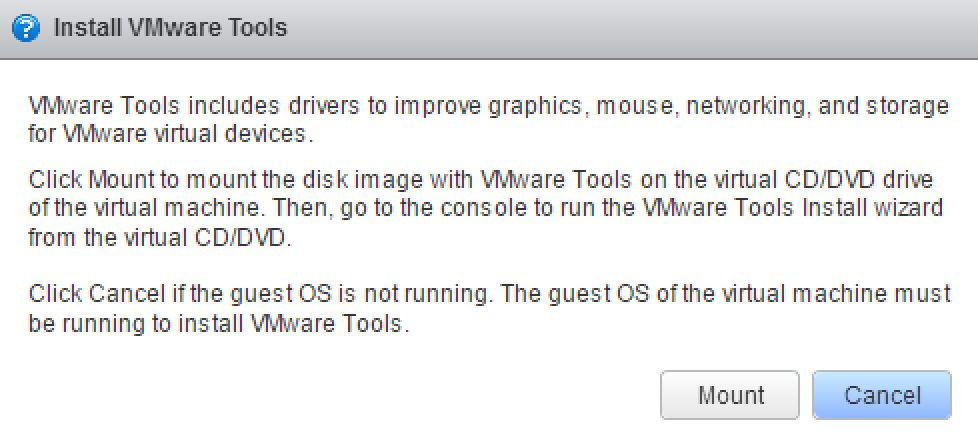
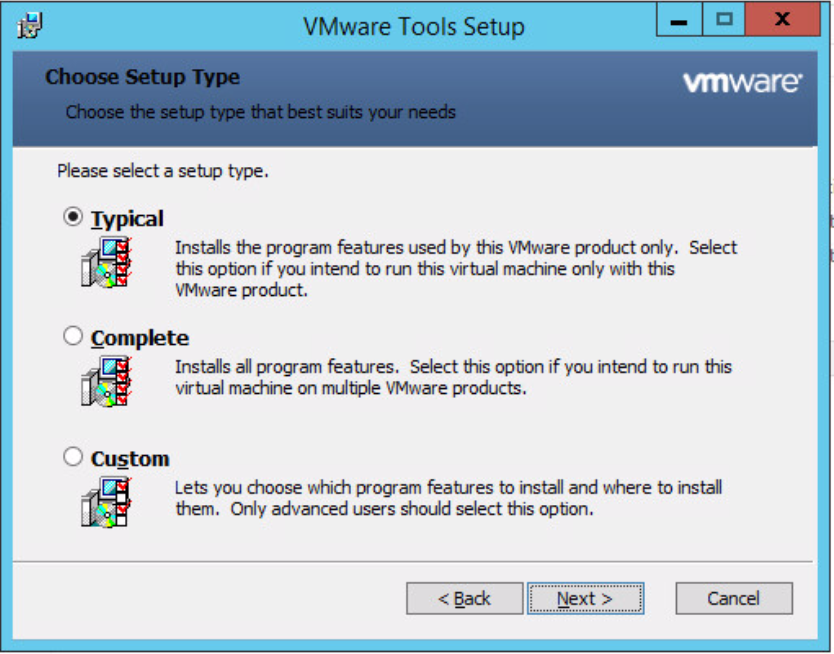
  6. VMware Tools and HW Upgrade – A basic real world example for combining workflows in a real world use case.
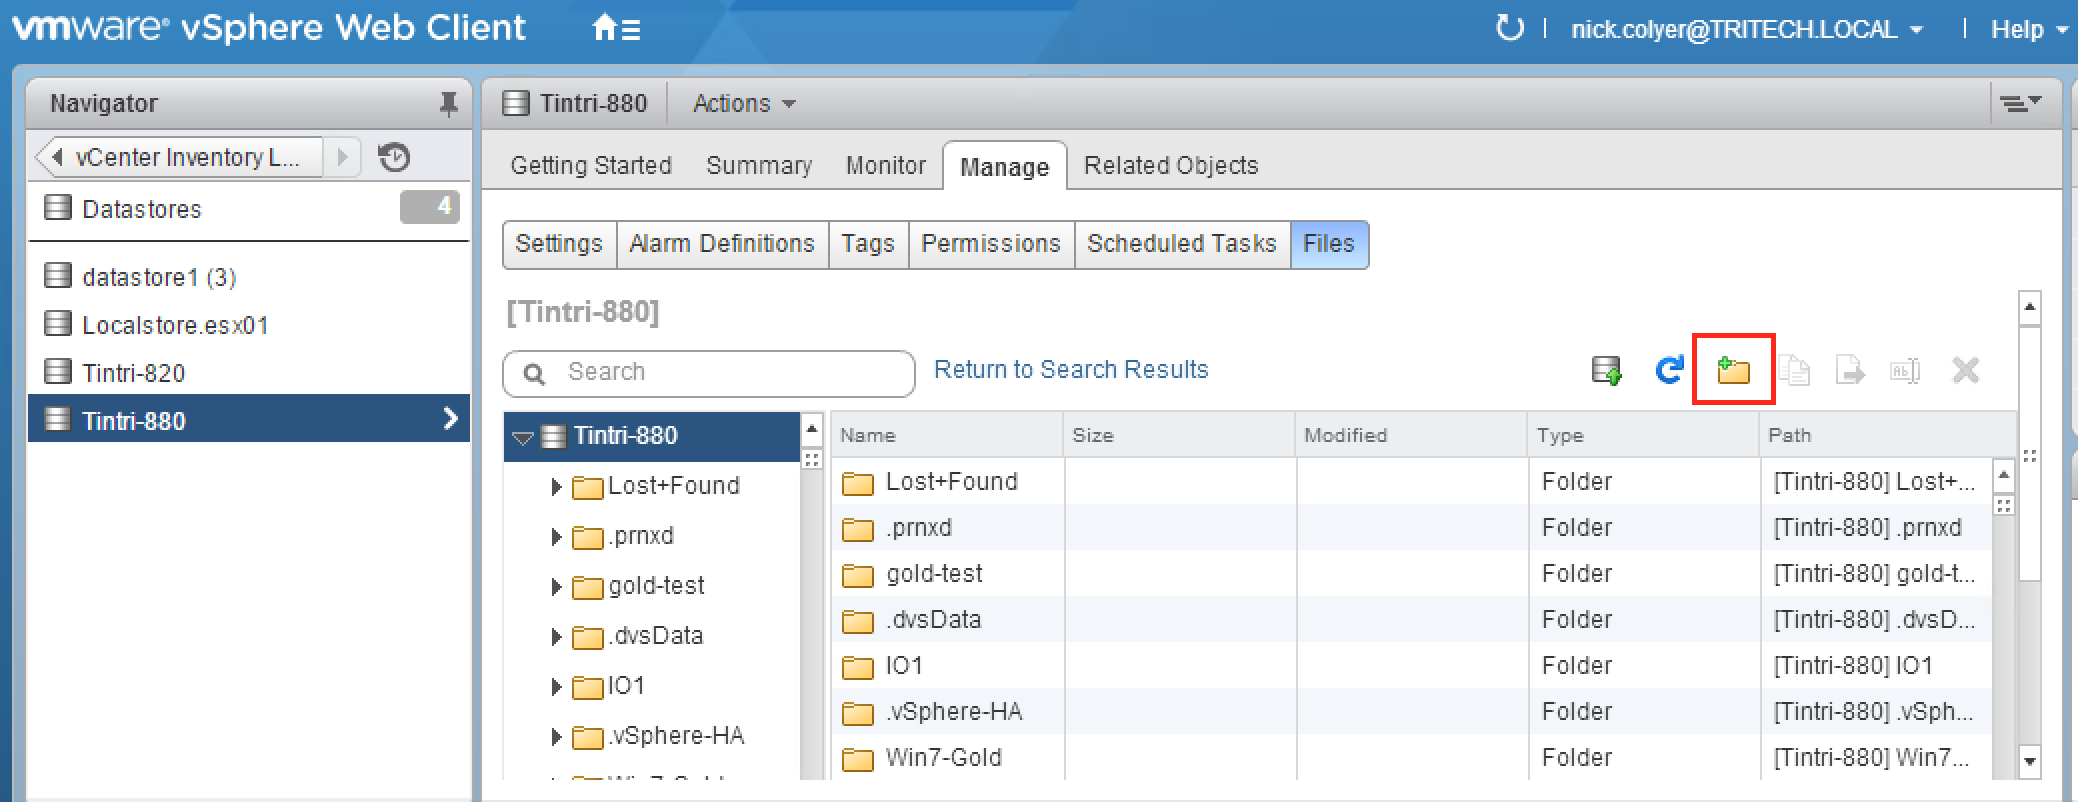
  7. Snapshot creation and automated deletion – Create a snapshot and then schedule it for automatic deletion at a future date.

In addition to my course, I also work with a large number of customers in my role at Ahead. For anyone looking to get started with Orchestrator, Ahead also now offers an AHEADStart for VMware vRealize Orchestrator which takes care of all the plumbing and gets people up and running with the product.

Please enjoy the course and I would absolutely love any feedback. Teaching in this format has been completely new to me and took some learning and getting used to. I can certainly tell when comparing the first 2 modules to the last 2, the difference as I got more comfortable. I plan to circle back and write about my experience for anyone else looking to do a course in this manner.

Finally, I can’t say enough great things about working with the Pluralsight team. Simply great people.

Nick


It’s ON with Turbonomic and vRO

There have been a lot of changes for VMTu Turbonomic.  I believe most in the industry are aware of the bold name change.  This name is more representative of what the product does based on the economic model it is known for.  Besides that with the latest version, Turbonomic also released vRealize Automation workflows to integrate with their product.  You have to be a member of the Green Circle, which is free, but you can download them here.  There are instructions on importing the workflows, setting up Operations Manager as a REST host, etc.  I was excited to see this but, unfortunately, my environment only uses vRealize Orchestrator.
Below is the schema for vRA workflow:

vra_vmt

First is a scriptable task to gather inputs for vRA.  The inputs are all vRA specific so I could remove these. At the end it, the workflow is pushing back properties to vRA so I removed “Override vRA Settings” at the end.

Inputs removed from original VMTurbo Main workflow:

parameters


My workflow ended up like this, removing vRA dependencies and ending with 2 scriptable tasks to convert the datastore and host to VC:objects instead of strings.  These scripts will be covered in another post.

newworkflow

My inputs end up moving from general attributes and are templateName, clusterName and datacentreName. In the future I will likely add a scriptable task at the beginning of the workflow to determine these as they will come from inputs generated by my Windows or Linux Master Build workflow.

Inputs converted from attributes:

newinput

I also now have outputs for the actual VC: Datastore VC: Host System objects for your clone workflow in vRO. These were created via the scriptable tasks which take the strings returned from Turbonomic and do a lookup to match them to the vCenter objects.

Outputs created:

outputs


What’s great about having this functionality from Turbonomic is now the best host and the best datastore will be selected based on analytics from Operations Manager. I originally was picking my datastore based on amount of free space but now using the REST API I can have the least utilized host and datastore supplied to by clone workflow.

Download the modified workflows here.

I’ll be going over these workflows in the upcoming webinar “Overcoming Private Cloud Challenges in Healthcare IT”, September 29th at 2:00PM EST.  Register here

vRealize Orchestrator Appliance – Guest File Operations Part 1 – (Copying a file to guest VM)

One of the things you will often find you need to do with vRO is to get a file to a guest VM, or just run a file from inside the VM. Now for Windows you can use Powershell remote features in many cases, but what if your server isn’t on the network yet? Until version 5.1 we had to rely on VIX as a way to do this, but now VMware has added a number of new workflows under “Guest Operations” which are much more reliable.

vCO Guest Operations

vRO Guest Operations

“Copy file from vCO to guest” is the one I’m going to be using in this example.

First of all copy the workflow into a sandbox area. This way you can move a bunch of the inputs to attributes and not have to key them in each time (e.g. The local administrator username, password, and test VM).

In my example, I’m going to create a text file called test.txt in a new folder under /opt called “vcofiles”.

My target machine is a Windows 2008 R2 server, where I will copy the file and place it in the C:\temp\ folder with the name “testcopy.txt”

If you run the workflow then these are my input parameters:

GuestFileOperations-Run

The problem is that if you run this you will get an error similar to this:

“No permissions on the file for the attempted operation (Workflow: Copying files from vCO appliance to guest/Scriptable task…”

GuestFileFailure

GuestFileFailure

In order to fix this you first need to give the correct rights to the folder and file on your vCO Appliance.

1. Login as root onto the appliance
2. Give Read/Write/Execution rights to the new folder

FolderRights

3. Give Read/Write rights to the Text file you made

Filerights

Unfortunately we aren’t quite done yet. You also need to tell orchestrator which locations it can read/write/execute from. This involves editing the “js-io-rights.conf” file located in “/opt/vmo/app-server/server/vmo/conf”

Java-FolderRights-2

Add the line “+rwx /opt/vcofiles/” as shown above.

If anyone isn’t too sure on the linux commands to do this:

  • Type “cd /opt/vmo/app-server/server/vmo/conf” and press enter.
  • Type “vi js-io.rights.conf” and press enter.
  • Use the arrow keys to move the cursor where you want and press the insert key
  • Press Enter and type in the line “+rwx /opt/vcofiles”
  • Press ESC
  • Type “:wq” and press enter.

4. Now, there’s one more thing. You need to restart the vCO service for this to take effect.

Login to the vCO configuration manager, go to startup, and click restart service.

ServiceRestarted

5. Now run your workflow and see if your text file copied across.

Success

You can see a quick video demo of this on youtube. (apologies for the mouse pointer issue..)

Thanks for reading. Let me know if you have any questions.


vRealize Orchestrator Workflow: Change VM Port Group for VM on Standard vSwitch

*Note: This is a repost due to moving my posts from SystemsGame.com to 2ninjas1blog.com”

I was surprised recently to find that no builtin workflow existed for changing the backing information for a VM if you aren’t using a VDS. Now, before I go any further, I’m a big fan of moving to a vSphere Distributed Switch mode, but there are certainly cases where you might encounter a standard vSwitch environment which you need to automate port group changes upon.

The Approach:

Essentially when it comes to changing NIC settings on a VM, you have to change the “Backing” information for the NIC associated with the VM. In my case this was for VMs which were just built as part of an overall automation process, and had only one NIC.

Step 1: Create Action Item.

I created an action item which has 2 inputs.

“vm” of type VC:VirtualMachine – This is basically so you can select the VM in vCO that you want to modify

“vSwitchPGName” of type String – This is so you can pass in the string value of the portgroup name for the vSwitch.

Code:

The code I then used is below. I’ve commented it but please let me know if you have any questions.

var spec = new VcVirtualMachineConfigSpec(); // Initialize a Virtual Machine Config Spec first
var myDeviceChange = new Array(); // Create an array to hold all of your changes
var devices = vm.config.hardware.device;

//Find devices that are VMXNET3 or E1000
for (var i in devices)
	{
		if 	(
				(devices[i] instanceof VcVirtualVmxnet3) ||
				(devices[i] instanceof VcVirtualE1000) 
			)
		{
			System.log("The device we are going to modify is: " + devices[i]);
			var nicChangeSpec = new VcVirtualDeviceConfigSpec(); //This is the specification for the Network adapter we are going to change
			nicChangeSpec.operation = VcVirtualDeviceConfigSpecOperation.edit; //Use edit as we are going to be modifying a NIC
			nicChangeSpec.device = new VcVirtualE1000;
			nicChangeSpec.device.key = devices[i].key; 
			System.log("NicChangeSpec key is : " + nicChangeSpec.device.key);

			nicChangeSpec.device.addressType = devices[i].addressType;
			nicChangeSpec.device.macAddress = devices[i].macAddress;

			System.log("Adding backing info" ) ;
			//Add backing information

			nicChangeSpec.device.backing = new VcVirtualEthernetCardNetworkBackingInfo();
			System.log("Backing info for nicChangeSpec is : " + nicChangeSpec.backing);
			nicChangeSpec.device.backing.deviceName = vSwitchPGName; //Change the backing to the portgroup input
			System.log("Backing info for deviceName on nicChangeSpec is : " + nicChangeSpec.device.backing.deviceName);

			//Push change spec to device change variable
			myDeviceChange.push(nicChangeSpec);

		}
	}

spec.deviceChange = myDeviceChange;
System.log("DeviceChange Spec is: " + spec.deviceChange);
return vm.reconfigVM_Task(spec);

Step 2:

I created a simple workflow which calls this action item and then has a vim3WaitTaskEnd so we can be sure the task is completed before moving on to any other workflows. This is useful if you are going to be incorporating this action into a larger process.

Update Port Group for vSwitch

Running the workflow gives you this simple presentation.

vSwitchPG 2

And that’s basically all there is to it. Select your VM, type in your PortGroup name, and voila!

For a vDS, VMware included a workflow out of the box in vCO so there is no need to create any of the above.

Enjoy!

vRealize IaaS Essentials: Building your Windows Server 2012 Template on vSphere – Part 3 (OS Tuning)

Now that we have a base OS build completed, we need to start configuring the OS to the settings we want.

Step 1: Get VMware Tools Installed

Without VMware tools on the OS, many things are sluggish and just annoying. Most importantly it fixes the annoying mouse cursor tracking issues (this is even more noticable when you’re in a VDI session into a VMware Console).

  • Login to your vSphere Web Client and Locate your VM
  • Select the VM > Actions > Guest OS > Install VMware Tools...

rwc-template-tools1

  • You will get a prompt to mount the Tools ISO. Select Mount.

rwc-template-tools2

  • Now inside the OS, Open My Computer/This Computer and Tab over to the CD ROM Drive. I found it almost impossible with the mouse using the VRM Console until Tools was installed so I had no choice but to use the keyboard to get it done. A combination of Tab and Space did the trick.

rwc-template-ostools1

  • Once you are there, run Setup and you should be presented with the VMware Tools installation screen.

rwc-template-ostools2

  • Choose Next
  • Select Typical for your installation type

rwc-template-ostools3


  • Once installation is complete, reboot the OS

Step 2: Fine tune your OS

First of all a big thanks to some of my twitter friends who gave some good suggestions on tweaks here. There is always going to be a debate as to what gets done in the template vs GPO/Configuration Management. I’d say the settings I set below are just the core ones necessary to facilitate deployment of an OS with ease. AD and configuration management should definitely come in after the fact and take care setting other OS settings to their necessary values.

  1. Patch the OS to the latest (It’s worth automating this in the future)
  2. Set Date/Time
  3. Set the OS Hostname to VM Template Name – this helps to know if sysprep worked etc.
  4. Disable the Windows Firewall
  5. Disable UAC
    1. http://social.technet.microsoft.com/wiki/contents/articles/13953.windows-server-2012-deactivating-uac.aspx
  6. Create a Local User account for use by vRealize (e.g. svc_vrealize). You can make sure this account gets disabled automatically as part of your builds or via Puppet, GPO to comply with security requirements. It helps however to be able to easily get into a system using vRO Guest File Operations via a local service account early on.

Also here is a useful link provided by Sean Massey who does a lot of tuning on the Desktop side: https://labs.vmware.com/flings/vmware-os-optimization-tool

Finally, remember to disconnect your CD ISO.

After turning your VM back into a template, we now have a template ready to deploy! Now we can get onto the fun stuff.

Rubrik Announces r528 Cloud Appliance and Sexy New Features

Rubrik announced the r528 cloud appliance today.  Yes, Rubrik just got sexier. Not only has Rubrik grown exponentially as a company ,they are on their  3rd update and are now quite the global force with 90+ signed Channel Partners and 4PB+ Protected in the Field

r528

The r528 offers encryption at rest and in flight from VMware.  Because the appliance is using hardware encryption, there is no compromise on speed or performance.  The self encrypting drives (SED), use  AES 256 circuitry. All data written to disk is encrypted automatically and data read is decrypted automatically.  Eliminating or overwriting the security key would perform an instantaneous wipe.  If a drive were to be taken out, it would be deemed worthless without the key

r528-2

Boring stuff you should know about: NIST

rubrik-fips


This offering is FIPS 140-2 Security validated. What does that mean? It sounds important.  The drives and Rubrik Cryptographic library are FIPS 140-2 certified.  Where most backup appliances are Level 1, Level 2 brings about the ability to detect physical tampering.  If you want to nerd out and read up on FIPS 140 here. From there, you can read that FIPS 140-2 Level 1 provides the lowest level of security. Basic security requirements are specified for a cryptographic module (e.g., at least one Approved algorithm or Approved security function shall be used). No specific physical security mechanisms are required in a Security Level 1 cryptographic module beyond the basic requirement for production-grade components. FIPS 140-2 Level 2 improves upon the physical security mechanisms of a Security Level 1 cryptographic module by requiring features that show evidence of tampering, including tamper-evident coatings or seals that must be broken to attain physical access to the plaintext cryptographic keys and critical security parameters (CSPs) within the module, or pick-resistant locks on covers or doors to protect against unauthorized physical access.

For key management, Rubrik supports external key standards using KMIP 1.0 or they also provide a Trusted Platform Module (TPM) so there would be no need for KMS .  Giving the customer options if they don’t have KMS setup in their environment.

But wait there’s more!

Rubrik Converged Data Management 2.2

Enhancing the auto protect and SLA inheritance Rubrik already offers

  • Dynamic Assignment – Set policy on a vCenter, Data Center, Cluster, Folder, Host, and more.
  • Inheritance Options – Any new object or workload created will automatically pick up parent SLA assignment.
  • Do Not Protect – Block SLA policy from being inherited with explicit denial to prevent data protection at any desired level.

Throttle detection!

Most people don’t want backups to affect workloads.  The software can look for latency to make sure it’s not causing performance issues. If storage latency is rising, it is smart enough to halt additional tasks on the fly.  Backups don’t continue to pile up on your environment like a WWE royal rumble.

Battle_crop_north

Scalability

  • In testing, Rubrik has scaled out to a 20u, 10 brik, 40 node cluster.  That’s insane
  • Protect 10,000 VMS using vSPhere 6.0
  • Instant recovery:  Quicker spin up of clone workloads (thanks to being able to get 20,000 I/O per brik) and faster storage vMotion to your production environment.

Cluster Policy Enhancements

  • Global pause gives you the ability to use a maintenance window to perofrm work on the cluster
  • Recurring First Full Snapshot Window gives you control to say when a full backup should be performed within an SLA
  • New Retention Periods bring increased flexibility for SLA policies to meet different customer requirements
  • Blackout Windows define when no operational taks should be executed by the cluster
NAT Support
For customers that don’t want to use site-to-site tunneling , there is now NAT support for public bi-directional replications.


User Experience and Management
You might as well enjoy managing your backups …userexp
Last but not least
Backup physical alongside your virtual environment.  This includes SQL and Linux. You have all the capabilities for physical recovery that you are used to having for your VMs

Automation Fun

automate_all_the_things

An oldie but goodie, you can tell from this blog, we’re all about automating all the things possible.

There are several options to satisfy the automation ninja within you:

GitHub PowerShell-Module Repository
PowerShell Gallery (NuGet)
Continuous Integration with AppVeyor

And a personal favorite:
vRealize Orchestrator Packages

Rubrik maintains it’s mantra don’t backup go forward with it’s continuous improvements to the backup experience.

IaaS Fundamentals: Creating a fresh Windows Server 2012 Template – Part 1

Now that we’ve set our approach for template creation and management, it’s time to create our on-premises vSphere template for Windows Server 2012. The example below is based on VMware vSphere as the hypervisor of choice.

Things you will need

  1. Microsoft Windows Server 2012 ISO (Download from Microsoft)
  2. License Key
  3. vCenter Access

Step 1: Create your ISO

It really helps to first upload your ISO to one of your datastores. Many people prefer an NFS store attached to vSphere for this purpose as it it allows more flexibility when you want to connect that ISO to multiple other hosts where your storage array may not be mapped. In our lab examples, we are using a Tintri-T880 VMstore to keep our templates.

Create a Folder and Upload Windows ISO

  • Login to vCenter
  • Browse to your Datastore
  • Create a New Folder (Something like ISOs or Windows ISOs so you can find it easily)

rwc-w2k12-datastoreadd

  • Browse to your new folder
  • Select Upload File to Datastore
  • Browse for your ISO and let it upload. This will take a short while depending on your connection to vSphere

Step 2: Create your VM Shell

  • Switch back to VMs & Templates View
  • Create a new folder to store your templates in

rwc-template-newfolder-1


  • With your new folder selected, select Create a New Virtual Machine from the actions menu

rwc-template-newVM-1

  • Select Create a new virtual machine and click next
  • Type in a name for your template. In our example we use “TT_W2K12_Template”. Simple and easy to find. Select the VM Templates folder you created previously and click next.
  • Select your vSphere Cluster and click next
  • Select your Datastore and click next
  • Choose your compatibility level. Our clusters are all at 5.5 or above so we have no issues selecting the default of ESXi 5.5 and later.
  • Customize your VM Hardware
    • Choose your CPU, Memory, and Disk configuration
      • 1 CPU
      • 4096 MB Memory
      • 60GB Disk (Up from the default of 40GB. Many could argue to keep it at 40, but with patches and other functions in Windows Management I’ve found 60 to be a safer amount. Plus, since I’m thin provisioned on the storage, it adds little additional cost to me)
    • Change the network adapter to VMXNET3 (The days of needing to use the E1000 are over and 2012 supports the VMXNET3 fine without needing to install VMware tools first)

rwc-newtemplate-customizehw

  • Attach the ISO we created earlier to the CD-ROM

rwc-newtemplate-iso

  • Select the VM Options Tab and change the boot options so that the VM boots to the BIOS first.

rwc-template-bios


  • Power On the VM and it should be automatically in the BIOS
  • Go to Advanced > I/O Device Configuration and disable the Floppy Drive, Serial Ports, and Parallel Port

rwc-newtemplate-disableio


  • Press F10 to Save and Exit
  • Edit Settings on your VM and connect the CD Rom Drive.

rwc-template-cdconnect

  • Restart the VM to begin installing the OS

rwc-template-winstart1

This concludes the template prep, in part 2 we will continue installing the OS.


Server Name Generator – Part 2

Now that we have our partial name being created from Server Name Generator – Part 1, we can have a workflow that appends with a number and check to see if that name already exists within the environment.  The server names will be checked via DNS and via a text file named names.txt saved on the vRealize Orchestrator appliance.

First some pre-work needs to be done.  We need to be able to add host names as they are created to the “names.txt” file

1. Login as root onto the appliance
2. Locate and view the “js-io-rights.conf” file by running “: less /etc/vco/app-server/js-io-rights.conf.  The purpose of this file is explained here on VMware’s documentation site.

addline

You will see “+rwx /var/run/vco/” as shown above.  This means vRO can read, write and execute from this location.  This is where will place our text file to write host names to.

3.  CD to var/run/vco and do a “touch names.txt” to create the file in that directory.

4.  As you can see we need to change the rights so run: chmod 666 names.txt to give read/write access to vRO.

names

Server Name Generator Workflow

General Attributes:

  • None

 Inputs:

  • partialname: Type = String
  • domainSuffix: Type = String

Outputs:

  • vmName: Type = String
  • fqdnout: Type = String

The Concept:

CODE

The Code:

// Read temp server name list - prepare to invoke file writing capabilities if needed
var fr = new FileReader("/var/run/vco/names.txt");
var fw = new FileWriter("/var/run/vco/names.txt");

fr.open();
var content = fr.readAll();
fr.close();

// Initialize variables
var number = 1 ;
var temphost = 0 ; // If we don't set temphost to zero, we break out of for loop immediately


// Function to pad zeros on number that we increment while number is less then 10
function padzero(number) {
 return (number < 10 ? '0' : '') + number
}

// increment through hostnames until we find a hostname that does not exist

System.log("Your partial name is: " + partialName) ;
System.log("Starting loop --- ") ;

for (number=1; temphost != null; number++)
{
 var padded_number=padzero(number) ;
 var vmName = partialName + padded_number;
 
 if(content.search(vmName) <0)
 {
 System.log("Server name: " + vmName + " not found in master list. Recording new name and continuing.") ;
 fw.open() ;
 fw.writeLine(" " + vmName) ;
 fw.close() ;
 
 var fqdn = vmName + "." + domainSuffix ;
 
 System.log("Checking host for existing DNS record: " + fqdn) ;
 var temphost = System.resolveHostName(fqdn) ;


 System.log("Check complete for FQDN: " + fqdn + " Found IP address of: " + temphost) ;
 System.sleep(500) ;
 }
 else
 {
 System.log("Server Name: " + vmName + " found in master list - Incrementing with next number and starting over") ;
 temphost != null ;
 }
}

// Log for debugging purposes
//Output FQDN
fqdnOut = fqdn;

System.log("") ;
System.log("The vmName to pass as output is: " + vmName);
System.log("The FQDN to use is: " + fqdnOut) ;

Download the workflow here

In the next post, we will put the two workflows together to pass the partial name to the server name generator for a completely automated name.

Real World Cloud: Template Creation and Management

To bake in, or not to bake in, that is the question you must ask.

rwc-keepitsimple

Keeping it simple…

Without a doubt, template creation and template sprawl are items people worry about when getting ready for their cloud environment. Maybe you have a Linux team that use PXE plus kickstart in the past and you’re having to convince them to move to templates, or maybe you had a bunch of templates with everything baked inside. When it comes to cloud, I’m personally a big believer in keeping your template as bare as possible, providing it doesn’t add a significant overhead to the build time.

This means stripping the template down to the base OS and layering everything on top.

The key also to remember here is that you want to try to be able to use a similar approach to your template management in your Public Cloud, as well as, your On-Premises Datacenter. This way you aren’t managing 2 completely separate processes and creating more complexity.

How do I configure things like agents, settings etc. after the template is cloned?

The rise of configuration management tools in the past few years has been key. Puppet and Chef in particular have become extremely widespread in the past few years. On top of that Microsoft is constantly evolving PowerShell DSC, and we have other newcomers like Saltstack and Ansible that are quickly gaining traction.

Essentially, everything you install and configure on top of the VM deployed, will be via Configuration Management. This allows us to completely abstract the configuration from the virtual machine. Think of it like a container (not to be confused with docker), that just hosts a specific configuration. The more you can modularize the pieces that sit on top of the OS, the easier it is to manage. This does however come at a cost of speed, because each application and potentially a number of reboots will need to be configured post VM provisioning.

rwc-vmtemplatelayers

How are Configuration Management Tools Changing?

I’m fortunate enough to work with some great Puppet engineers at Ahead who work on these pieces daily. Rather than retype what one of my colleagues at Ahead has already written, I suggest you check out this blog article on the Ahead Blog. http://blog.thinkahead.com/the-present-and-future-of-configuration-management

Creating the Template:

There are a number of ways to do this, and i’m sure the are more than the ones I list here:

  1. vSphere: Clone from an Existing VM and prep it.
  2. vSphere: Create a fresh template from an ISO.
  3. Amazon: Create a Windows AMI from a running instance. (Use a prebuilt Amazon AMI basically and customize it)
  4. Amazon: Import your vSphere VM and convert.

In the next post, we will be drilling down in detail on creating a fresh Windows vSphere Template for use in your Cloud. As we progress to Public Cloud, we will come back to the Amazon AMI options.

Server Name Generator – Part 1

Generate Partial Name Workflow

Summary/Use Cases:

So you finally agreed on a naming standard, congratulations!  This one uses a datacenter location  + network tier + OS + environment level (prod, test, dmz) + application type.  This workflow has several scriptable tasks within it to go with the naming standard we have chosen for servers.  An example server name with this workflow would be AKLP1L1APP (Auckland datacenter on the production VLAN running on a Linux OS for a generic application) with the sequential number appended at the end.  This workflow outputs a partial name to the Server Name Generator Workflow(coming in Part 2) depending on the drop-down choices a user can pick.  An action, is also used, that is dependent on Location in the Presentation of the workflow.   Only location Auckland will have DMZ as an option.

General Attributes:

  • datacenterSN: Type = String
  • networkSN: Type = String
  • envNUM: Type = Number
  • appSN: Type = String
  • osSN: Type = String


Inputs:

  • appType: Type = String
  • location: Type = String
  • network: Type = String
  • envLevel: Type = String
  • OS: Type = String

Outputs:

  • partialName: Type = String

The Workflow:

In the workflow, be sure to use notes to  describe what is being done in each task.

workflowNotes

The Code:

Each scriptable task uses a switch statement with cases defined.

The Network task looks like:

switch(network)
{
//--TriTech Production environment---//
 case "Production":
 {
 networkSN = "P1"
 }
 
break;
//--TriTech DMZ environment---//
 case "DMZ":
 {
 networkSN = "Z1"
 }

break;
//--TriTech Test environment---//
 case "Test":
 {
 networkSN = "T1"
 }
 
break;

}

System.log("The network shortname is " + networkSN);

The code is the same format for Location,Operating System, Environment and Application.


Instead of adding a list of predefined answers, you can create an Action with a Return type: Array/String
createAction

action


Code for the action

var result = new Array();
switch (DatacenterSN) 
       {
      case "Auckland":
              result.push("Production");
              result.push("DMZ");
              result.push("Test");
break;

       case "Cape Town":
              result.push("Production");
              result.push("Test");


       case "London":
              result.push("Production");
              result.push("Test");

default:
        result.push("Unknown Error. Contact automation team");
        }
return result;


Now attach the action to the presentation of Network Tier by going to the Presentation tab on the workflow.
Presentation allows you options for your inputs, you can set a drop down list by using Predefined answers (probably the most common choice) or in this case we are choosing Predefined list of elements.

presentationview

Select Network Tier
addToPreso

Hit the fun purple button to make an action call
funpurple

Search in the filter box for your Action and tie it to Datacenter location
location


Now you should see the Get Action code for Network Tier
preso2


The end result.  Only DMZ in the Network Tier will Display for the Datacenter Location, Auckland.  This can be useful in other cases such as specific VLANs assigned to specific locations as well.

dmzAuckland

At the end, we put it all together with the Partial VM Name scriptable task:

partialName = datacenterSN + networkSN + osSN + envNum + appSN
 System.log(partialName);


Download the Generate Partial Name workflow here
We will use this later to create a full server name in the next post of the Server Name Generation series.