Tag Archives: vsphere

New Pluralsight Course: Automating AWS and vSphere with Terraform

I’m proud to announce that as of 10:30pm CST last night, my new Pluralsight course “Automating AWS and vSphere with Terraform” has been released!

You can find all of the details about the course on Pluralsight here.

Terraform has been a technology I was keen to get into, and this course is ultimately a 101 course on using Terraform functionality with AWS and vSphere. I decided to build this course across On-Premises and a Public Cloud because of the massive growth in Hybrid Management technologies that we are seeing today (and the amount of bad information in the industry vs real world).

Terraform as you will see in the course can solve many use cases. In addition, if you augment it with other tools in your arsenal, can be an extremely powerful way to perform most of your Infrastructure Automation.

The course covers the following topics:

  • Terraform Overview
  • Installing Terraform
  • Terraform Constructs
  • Using Terraform with AWS
  • Using Terraform with vSphere
  • Terraform Variables and Modules
  • Code Control and Provisioners

As always, please let me know if you have any feedback. Otherwise I hope you enjoy the course!

vRealize Orchestrator Appliance – Guest File Operations Part 1 – (Copying a file to guest VM)

One of the things you will often find you need to do with vRO is to get a file to a guest VM, or just run a file from inside the VM. Now for Windows you can use Powershell remote features in many cases, but what if your server isn’t on the network yet? Until version 5.1 we had to rely on VIX as a way to do this, but now VMware has added a number of new workflows under “Guest Operations” which are much more reliable.

vCO Guest Operations

vRO Guest Operations

“Copy file from vCO to guest” is the one I’m going to be using in this example.

First of all copy the workflow into a sandbox area. This way you can move a bunch of the inputs to attributes and not have to key them in each time (e.g. The local administrator username, password, and test VM).

In my example, I’m going to create a text file called test.txt in a new folder under /opt called “vcofiles”.

My target machine is a Windows 2008 R2 server, where I will copy the file and place it in the C:\temp\ folder with the name “testcopy.txt”

If you run the workflow then these are my input parameters:

GuestFileOperations-Run

The problem is that if you run this you will get an error similar to this:

“No permissions on the file for the attempted operation (Workflow: Copying files from vCO appliance to guest/Scriptable task…”

GuestFileFailure

GuestFileFailure

In order to fix this you first need to give the correct rights to the folder and file on your vCO Appliance.

1. Login as root onto the appliance
2. Give Read/Write/Execution rights to the new folder

FolderRights

3. Give Read/Write rights to the Text file you made

Filerights

Unfortunately we aren’t quite done yet. You also need to tell orchestrator which locations it can read/write/execute from. This involves editing the “js-io-rights.conf” file located in “/opt/vmo/app-server/server/vmo/conf”

Java-FolderRights-2

Add the line “+rwx /opt/vcofiles/” as shown above.

If anyone isn’t too sure on the linux commands to do this:

  • Type “cd /opt/vmo/app-server/server/vmo/conf” and press enter.
  • Type “vi js-io.rights.conf” and press enter.
  • Use the arrow keys to move the cursor where you want and press the insert key
  • Press Enter and type in the line “+rwx /opt/vcofiles”
  • Press ESC
  • Type “:wq” and press enter.

4. Now, there’s one more thing. You need to restart the vCO service for this to take effect.

Login to the vCO configuration manager, go to startup, and click restart service.

ServiceRestarted

5. Now run your workflow and see if your text file copied across.

Success

You can see a quick video demo of this on youtube. (apologies for the mouse pointer issue..)

Thanks for reading. Let me know if you have any questions.


How to match and correlate Windows SCSI Disk IDs with VMware VMDKs

*Note: This is a repost due to moving my posts from SystemsGame.com to 2ninjas1blog.com”

This post comes from a colleague of mine who couldn’t find a great resource on how to correlate the Windows Disk in Disk Management, with the Virtual Disk presented by VMware.

When all the disks are different sizes it is easy, but sometimes they are the same…how can you be sure you are expanding the right disk?

These instructions/steps should allow you to correlate Windows Disks to VMDK Disks.

  1. RDP  to the Windows server in question and run this powershell script
Get-WmiObject Win32_DiskDrive | select-object DeviceID,{$_.size/1024/1024/1024},scsiport,scsibus,scsitargetid,scsilogicalunit | out-file -FilePath c:\OutputPhysicalDrive.txt

This script should allow you to match the OS disks to the VMDK Disks. The output will be referenced in later steps.

Example output

DeviceID : \\.\PHYSICALDRIVE3
$_.size/1024/1024/1024 : 9.99680757522583
scsiport : 3
scsibus : 0
scsitargetid : 0
scsilogicalunit : 0

DeviceID : \\.\PHYSICALDRIVE6
$_.size/1024/1024/1024 : 49.9993586540222
scsiport : 5
scsibus : 0
scsitargetid : 1
scsilogicalunit : 0

DeviceID : \\.\PHYSICALDRIVE4
$_.size/1024/1024/1024 : 19.9936151504517
scsiport : 4
scsibus : 0
scsitargetid : 0
scsilogicalunit : 0

DeviceID : \\.\PHYSICALDRIVE0
$_.size/1024/1024/1024 : 59.996166229248
scsiport : 2
scsibus : 0
scsitargetid : 0
scsilogicalunit : 0

DeviceID : \\.\PHYSICALDRIVE1
$_.size/1024/1024/1024 : 19.9936151504517
scsiport : 2
scsibus : 0
scsitargetid : 1
scsilogicalunit : 0

DeviceID : \\.\PHYSICALDRIVE2
$_.size/1024/1024/1024 : 19.9936151504517
scsiport : 2
scsibus : 0
scsitargetid : 2
scsilogicalunit : 0

DeviceID : \\.\PHYSICALDRIVE5
$_.size/1024/1024/1024 : 49.9993586540222
scsiport : 5
scsibus : 0
scsitargetid : 0
scsilogicalunit : 0

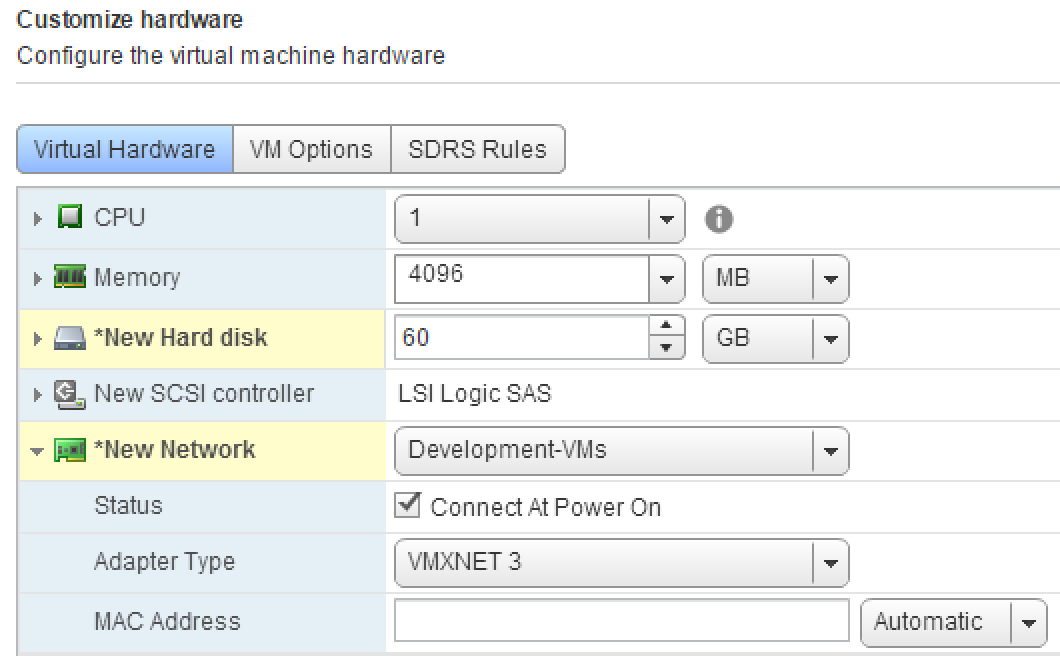
The second step is to get a list of your VMDK disk information by editing the virtual machine in question. 

The information you will be retrieving is the
Disk Name: “Hard disk 1”
Size: “60 GB”
Bus ID: 0
Disk ID: 0

SCSI (X:Y) Hard Disk under Virtual Device Node. The X:Y values are:

X = Bus ID
Y = Disk ID

Enter the Disk information for all VMDK disks into a table like the one below:

Reference OutputPhysicalDrive.txt and match up any OS disks to VMDK disk that have a unique size.

For the non unique drives you will need to match the Windows disk scsitargetid with the VMDK Disk ID.

The first 2 in the example below are both 50GB Drives.

DeviceID : \\.\PHYSICALDRIVE6
$_.size/1024/1024/1024 : 49.9993586540222
scsiport : 5
scsibus : 0
scsitargetid : 1
scsilogicalunit : 0

DeviceID : \\.\PHYSICALDRIVE5
$_.size/1024/1024/1024 : 49.9993586540222
scsiport : 5
scsibus : 0
scsitargetid : 0
scsilogicalunit : 0

The next 3 are all 20GB drives.

DeviceID : \\.\PHYSICALDRIVE2
$_.size/1024/1024/1024 : 19.9936151504517
scsiport : 2
scsibus : 0
scsitargetid : 2

DeviceID : \\.\PHYSICALDRIVE1
$_.size/1024/1024/1024 : 19.9936151504517
scsiport : 2
scsibus : 0
scsitargetid : 1
scsilogicalunit : 0

DeviceID : \\.\PHYSICALDRIVE4
$_.size/1024/1024/1024 : 19.9936151504517
scsiport : 4
scsibus : 0
scsitargetid : 0
scsilogicalunit : 0

Hope this helps anyone else having the issue. I’ll loop around and update the PowerShell script I ended up using for this soon as well.

Thank you vRad for this great guide!

vRealize Orchestrator Workflow: Change VM Port Group for VM on Standard vSwitch

*Note: This is a repost due to moving my posts from SystemsGame.com to 2ninjas1blog.com”

I was surprised recently to find that no builtin workflow existed for changing the backing information for a VM if you aren’t using a VDS. Now, before I go any further, I’m a big fan of moving to a vSphere Distributed Switch mode, but there are certainly cases where you might encounter a standard vSwitch environment which you need to automate port group changes upon.

The Approach:

Essentially when it comes to changing NIC settings on a VM, you have to change the “Backing” information for the NIC associated with the VM. In my case this was for VMs which were just built as part of an overall automation process, and had only one NIC.

Step 1: Create Action Item.

I created an action item which has 2 inputs.

“vm” of type VC:VirtualMachine – This is basically so you can select the VM in vCO that you want to modify

“vSwitchPGName” of type String – This is so you can pass in the string value of the portgroup name for the vSwitch.

Code:

The code I then used is below. I’ve commented it but please let me know if you have any questions.

var spec = new VcVirtualMachineConfigSpec(); // Initialize a Virtual Machine Config Spec first
var myDeviceChange = new Array(); // Create an array to hold all of your changes
var devices = vm.config.hardware.device;

//Find devices that are VMXNET3 or E1000
for (var i in devices)
	{
		if 	(
				(devices[i] instanceof VcVirtualVmxnet3) ||
				(devices[i] instanceof VcVirtualE1000) 
			)
		{
			System.log("The device we are going to modify is: " + devices[i]);
			var nicChangeSpec = new VcVirtualDeviceConfigSpec(); //This is the specification for the Network adapter we are going to change
			nicChangeSpec.operation = VcVirtualDeviceConfigSpecOperation.edit; //Use edit as we are going to be modifying a NIC
			nicChangeSpec.device = new VcVirtualE1000;
			nicChangeSpec.device.key = devices[i].key; 
			System.log("NicChangeSpec key is : " + nicChangeSpec.device.key);

			nicChangeSpec.device.addressType = devices[i].addressType;
			nicChangeSpec.device.macAddress = devices[i].macAddress;

			System.log("Adding backing info" ) ;
			//Add backing information

			nicChangeSpec.device.backing = new VcVirtualEthernetCardNetworkBackingInfo();
			System.log("Backing info for nicChangeSpec is : " + nicChangeSpec.backing);
			nicChangeSpec.device.backing.deviceName = vSwitchPGName; //Change the backing to the portgroup input
			System.log("Backing info for deviceName on nicChangeSpec is : " + nicChangeSpec.device.backing.deviceName);

			//Push change spec to device change variable
			myDeviceChange.push(nicChangeSpec);

		}
	}

spec.deviceChange = myDeviceChange;
System.log("DeviceChange Spec is: " + spec.deviceChange);
return vm.reconfigVM_Task(spec);

Step 2:

I created a simple workflow which calls this action item and then has a vim3WaitTaskEnd so we can be sure the task is completed before moving on to any other workflows. This is useful if you are going to be incorporating this action into a larger process.

Update Port Group for vSwitch

Running the workflow gives you this simple presentation.

vSwitchPG 2

And that’s basically all there is to it. Select your VM, type in your PortGroup name, and voila!

For a vDS, VMware included a workflow out of the box in vCO so there is no need to create any of the above.

Enjoy!

IaaS Fundamentals: Creating a fresh Windows Server 2012 Template – Part 2

With our base VMware vSphere VM shell ready, it’s time to continue installing the Windows OS.

rwc-template-winstart2

Just before we dive in, it is worth noting that depending on how you are remotely connected into the desktop, you may have issues controlling your mouse. In my case I was going via a View Desktop and then into the VRM console. I decided to just use the Tab and Spacebar key instead to make my selections. This will get much easier later on when VMware Tools is installed in the VM.

  • Select Install now, accept the defaults for language etc. until you get to the type of OS you wish to deploy.
  • I choose the Datacenter Edition with GUI here. Note: You can always remove the GUI and go back to ServerCore if needed. I know in my environment our Windows team still generally uses the GUI
  • Click Next once chosen

rwc-template-instancetypes


  • Accept the license terms and click Next
  • Change the installation type to Custom: Install Windows Only (advanced) and click Next.

rwc-newtemplate-installtype


  • Next you will be prompted for your drive layout. It should look like the screenshot below unless you chose a different drive configuration.

rwc-template-driveallocation

  • Leave Drive 0 selected and click Next

Sit back relax and enjoy the show!

rwc-template-installingzzz


Enjoy some tea while you wait…

tea

  • Once finished you will need to enter your Administrator Password for your Windows Template.

Coming soon – Part 3 – Configuring and tuning your OS

IaaS Fundamentals: Creating a fresh Windows Server 2012 Template – Part 1

Now that we’ve set our approach for template creation and management, it’s time to create our on-premises vSphere template for Windows Server 2012. The example below is based on VMware vSphere as the hypervisor of choice.

Things you will need

  1. Microsoft Windows Server 2012 ISO (Download from Microsoft)
  2. License Key
  3. vCenter Access

Step 1: Create your ISO

It really helps to first upload your ISO to one of your datastores. Many people prefer an NFS store attached to vSphere for this purpose as it it allows more flexibility when you want to connect that ISO to multiple other hosts where your storage array may not be mapped. In our lab examples, we are using a Tintri-T880 VMstore to keep our templates.

Create a Folder and Upload Windows ISO

  • Login to vCenter
  • Browse to your Datastore
  • Create a New Folder (Something like ISOs or Windows ISOs so you can find it easily)

rwc-w2k12-datastoreadd

  • Browse to your new folder
  • Select Upload File to Datastore
  • Browse for your ISO and let it upload. This will take a short while depending on your connection to vSphere

Step 2: Create your VM Shell

  • Switch back to VMs & Templates View
  • Create a new folder to store your templates in

rwc-template-newfolder-1


  • With your new folder selected, select Create a New Virtual Machine from the actions menu

rwc-template-newVM-1

  • Select Create a new virtual machine and click next
  • Type in a name for your template. In our example we use “TT_W2K12_Template”. Simple and easy to find. Select the VM Templates folder you created previously and click next.
  • Select your vSphere Cluster and click next
  • Select your Datastore and click next
  • Choose your compatibility level. Our clusters are all at 5.5 or above so we have no issues selecting the default of ESXi 5.5 and later.
  • Customize your VM Hardware
    • Choose your CPU, Memory, and Disk configuration
      • 1 CPU
      • 4096 MB Memory
      • 60GB Disk (Up from the default of 40GB. Many could argue to keep it at 40, but with patches and other functions in Windows Management I’ve found 60 to be a safer amount. Plus, since I’m thin provisioned on the storage, it adds little additional cost to me)
    • Change the network adapter to VMXNET3 (The days of needing to use the E1000 are over and 2012 supports the VMXNET3 fine without needing to install VMware tools first)

rwc-newtemplate-customizehw

  • Attach the ISO we created earlier to the CD-ROM

rwc-newtemplate-iso

  • Select the VM Options Tab and change the boot options so that the VM boots to the BIOS first.

rwc-template-bios


  • Power On the VM and it should be automatically in the BIOS
  • Go to Advanced > I/O Device Configuration and disable the Floppy Drive, Serial Ports, and Parallel Port

rwc-newtemplate-disableio


  • Press F10 to Save and Exit
  • Edit Settings on your VM and connect the CD Rom Drive.

rwc-template-cdconnect

  • Restart the VM to begin installing the OS

rwc-template-winstart1

This concludes the template prep, in part 2 we will continue installing the OS.