Tag Archives: orchestrator

New Pluralsight Course: Automating AWS and vSphere with Terraform

I’m proud to announce that as of 10:30pm CST last night, my new Pluralsight course “Automating AWS and vSphere with Terraform” has been released!

You can find all of the details about the course on Pluralsight here.

Terraform has been a technology I was keen to get into, and this course is ultimately a 101 course on using Terraform functionality with AWS and vSphere. I decided to build this course across On-Premises and a Public Cloud because of the massive growth in Hybrid Management technologies that we are seeing today (and the amount of bad information in the industry vs real world).

Terraform as you will see in the course can solve many use cases. In addition, if you augment it with other tools in your arsenal, can be an extremely powerful way to perform most of your Infrastructure Automation.

The course covers the following topics:

  • Terraform Overview
  • Installing Terraform
  • Terraform Constructs
  • Using Terraform with AWS
  • Using Terraform with vSphere
  • Terraform Variables and Modules
  • Code Control and Provisioners

As always, please let me know if you have any feedback. Otherwise I hope you enjoy the course!

Terraform – Assigning an AWS Key Pair to your EC2 Instance Resource

In the first post on Terraform, we took a look at how to create and destroy a simple EC2 instance. However, one of the common things we need to do in AWS is to assign a Key Value pair, as well as, Tag Instances with names, project codes, etc.

Assign a Key Value Pair

In order to access an EC2 instance once it is created, you need to assign an AWS EC2 Key Pair at the time of instantiating the instance. If you haven’t already done so, go ahead and create a Key Pair from the AWS Console by clicking the Key Pairs section on the left hand side. You will see a screen like the one below. Clicking Create Key Pair will walk you through the process.

awskeypair

During the process you will be prompted to save a private key file (.pem). Keep this safe as you will need it.

Now in Terraform, we are going to add one additional line under the resource section for our EC2 Instance. You can see in my screenshot above that my demo key pair is called “AWS EC2 – SEP 2016”, so we simply need to reference this by adding the following line.

key_name = "AWS EC2 - SEP 2016"

The end result looks like this:

EC2 with keypair

If you execute a terraform apply now, you will see that your new EC2 instance is created and the Key Pair name should appear correctly in the details pane.

screenshot-2016-10-13-13-31-13

Note, if you did not destroy your previous terraform configuration, and you deployed it just like in part 1 without a key pair, you will notice the following when you execute a terraform plan.

changekeypair

The reason for this is because you cannot assign a key pair to an already running EC2 instance. Terraform is letting you know that it will be forced to delete the instance and create a new one. When you perform your terraform apply, your end result will reflect this..

screenshot-2016-10-13-13-29-17

Otherwise that completes this post. Now you know how to use your key pairs. Terraform also has the power to create the pairs on demand which we will hopefully circle back around to in the future.

New Pluralsight Course – Introduction to Workflow Development with VMware vRealize Orchestrator

I’m pleased to announce that as of last week, Pluralsight have released my first Training Course on VMware vRealize Orchestrator. I’ve been working with this product since the early days and I couldn’t be more thrilled to have completed a 2 hour course teaching people how to get up and running quickly.

Here is quick a video overview of the Course:

I aimed this course at getting people into workflow development. This means I don’t focus on product installation and plugin installations, but more on specifically how you can develop and code the workflows.

The course contains the following 7 modules:

  1.  Getting Started – A tour of vRealize Orchestrator and the components.
  2. Building Workflows – Approach to workflow design, followed by some basic workflow creation.
  3. Scriptable Tasks – Learn some basic Javascript and start using Scriptable tasks.
  4. Input Presentation and Additional Javascript – Learn some basic ways to use the presentation view, as well as more javascript.
  5. Actions – Turn scriptable tasks into reusable actions.
  6. VMware Tools and HW Upgrade – A basic real world example for combining workflows in a real world use case.
  7. Snapshot creation and automated deletion – Create a snapshot and then schedule it for automatic deletion at a future date.

In addition to my course, I also work with a large number of customers in my role at Ahead. For anyone looking to get started with Orchestrator, Ahead also now offers an AHEADStart for VMware vRealize Orchestrator which takes care of all the plumbing and gets people up and running with the product.

Please enjoy the course and I would absolutely love any feedback. Teaching in this format has been completely new to me and took some learning and getting used to. I can certainly tell when comparing the first 2 modules to the last 2, the difference as I got more comfortable. I plan to circle back and write about my experience for anyone else looking to do a course in this manner.

Finally, I can’t say enough great things about working with the Pluralsight team. Simply great people.

Nick


Terraform 101 – What is it? How do I use it?

logo_large-3e11db19

I’ve been watching Terraform over the past few years and finally have had some time to start getting stuck into it. I must say, I’m impressed by the potential of this product and others from Hashicorp.

Terraform essentially fits in the Infrastructure Automation category, and has a similar coding approach to tools like Puppet, while in some ways operating more like an Orchestrator without the visual aspect.

What is it?

Essentially it adds a layer of abstraction to services like Amazon, Google etc. Instead of an AWS Cloud Formation template, I can use a Terraform configuration instead. On top of that, and the piece that is more intriguing to me, is the ability to use their module approach as well as other providers and provisioners.

Providers allow you to use the same declarative state language for other systems. I encourage you to check out the list on the Terraform site.

Provisioners allow us to essentially determine what and where we initiate other tasks. For example, you could use local-exec to execute commands locally on the terraform box, or remote-exec to execute on a remote server via SSH or WinRM.

The idea behind all of this is that you have one place, and one language to learn which then works across public Cloud providers. You don’t need to learn say the AWS Cloud Formation Template language and then go learn another language in another cloud provider. You simply would use Terraform to deploy all.

How do I use it?

Let’s get stuck in and walk through a very basic Terraform configuration for deploying an AWS Instance. At the core of Terraform is the .tf file. This combined with other files in the same directory or module directories, form a Terraform Configuration. There are 2 formats to the Terraform files, Terraform format, or JSON. It is recommend that you use the Terraform format which is easily readable (think Puppet DSL).

Example: Create an AWS EC2 Instance with Terraform

Note: For all activities below you will need an AWS account and will be charged via Amazon appropriately. I try to use free tier for all demo examples.

  • Create a folder to store your Terraform configuration.
  • Open up notepad or your favorite editor. I use Visual Studio code along with the Terraform Extension.
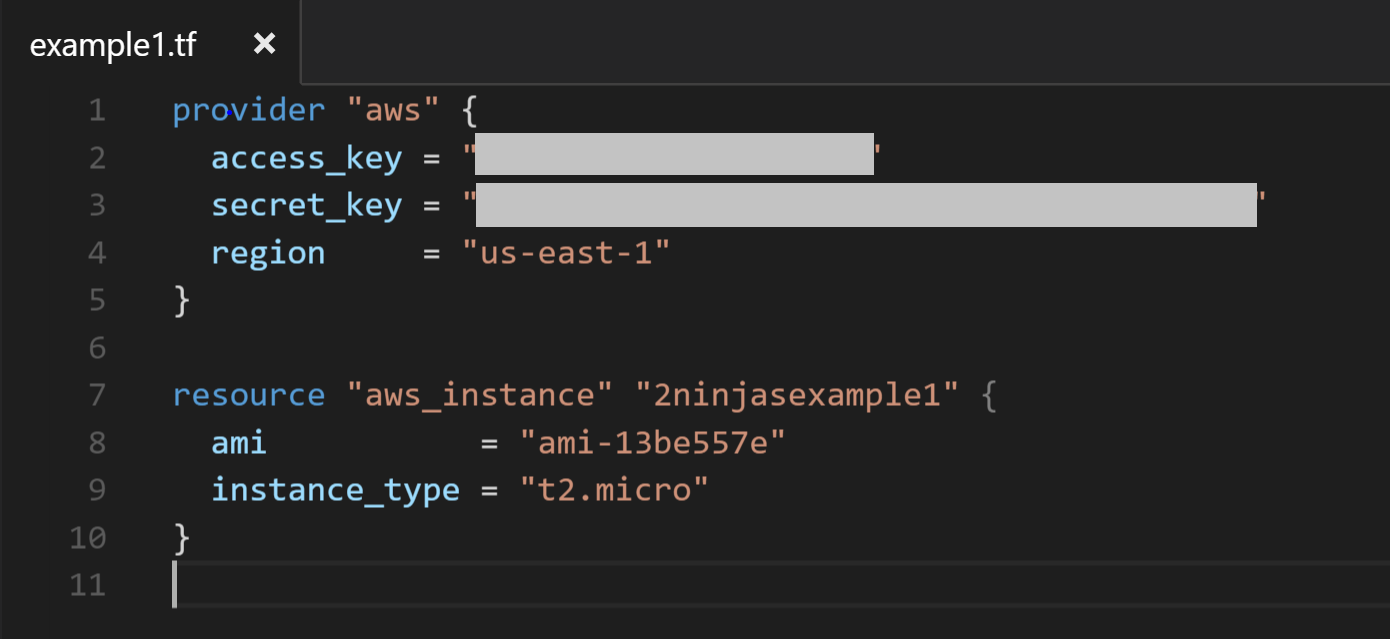
  • Create the Terraform configuration and save it as a .tf file.
terraformcode

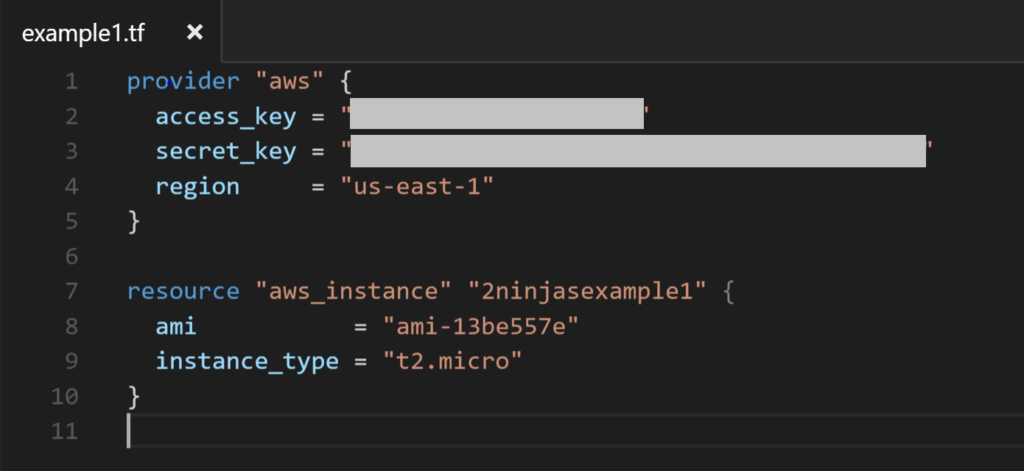
Terraform example for deploying AWS Instance

The first piece we declare is the provider which in this case is AWS. Grab your access key and secret key and then choose a region you want to provision our EC2 Instance into.

provider "aws" {
access_key = "yourkeyhere"
secret_key = "yoursecretkeyhere"
region     = "us-east-1"
}

Next, we declare  our new resource. In this case I am choosing to instantiate and AWS instance called “2ninjasexample1”. I am going to use the Amazon AMI with ID “ami-13be557e”. Finally i’m choosing my type of instance as t2.micro.

resource "aws_instance" "2ninjasexample1" {
ami           = "ami-13be557e"
instance_type = "t2.micro"
}

That’s it for our configuration file. Simply save it in the folder you created in step 1 and browse to that folder.

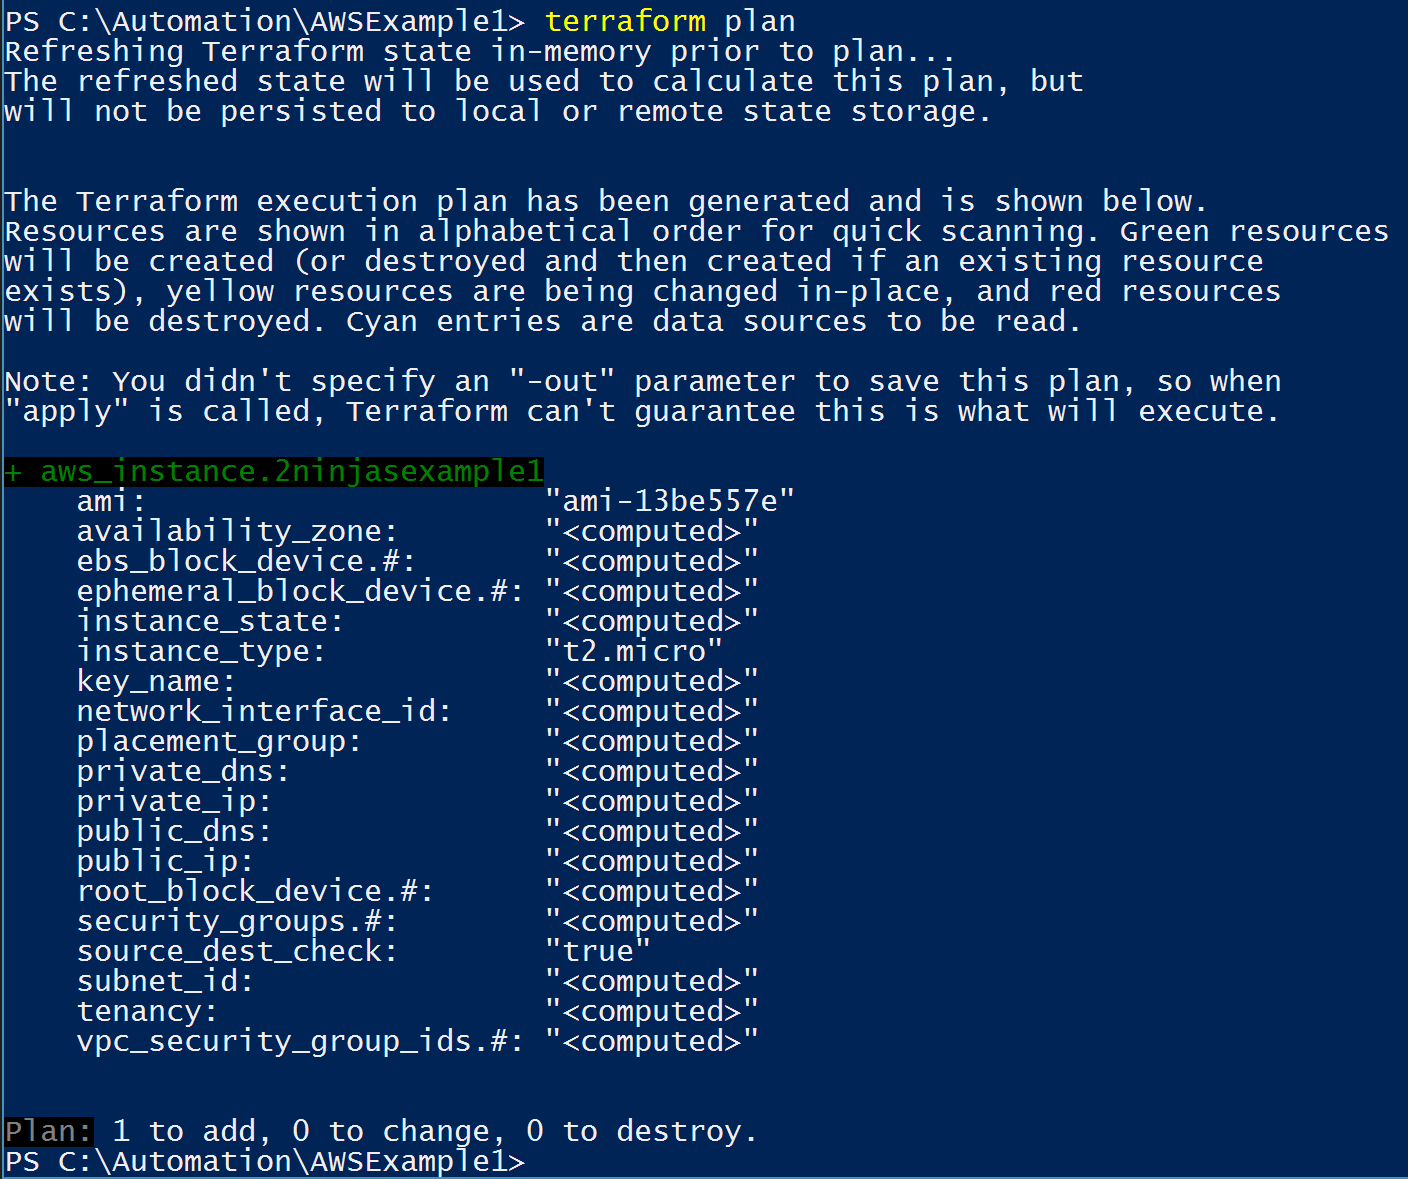
  • Type terraform plan and you should see a result like the screenshot below.terraformplan
    You can see that if we go ahead and run the configuration, it is going to add the aws instance.
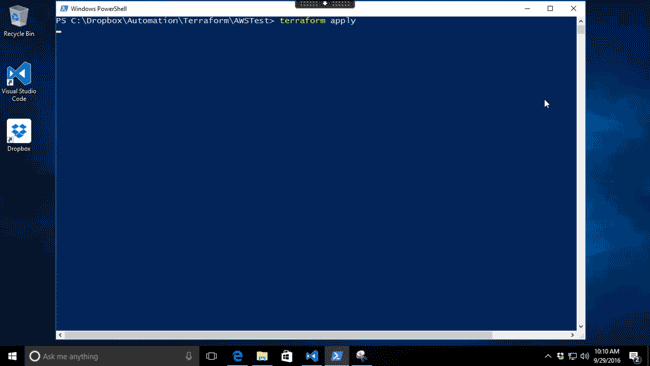
  • Now it’s time to actually apply the configuration. Type terraform apply to go ahead and create the instance.terraformapplyaws

Terraform creates a new AWS EC2 instance as well as 2 additional files in our folder which maintain the state information.

tfstate

If we examine the .tfstate file, you will see it contains all the specific information about our AWS instance.

terrafomstate

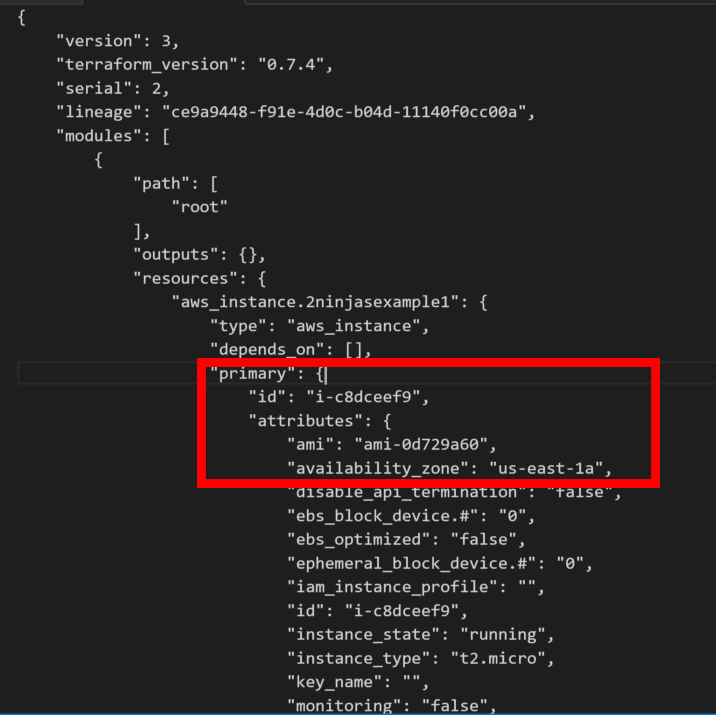
In particular, you can see that it has captured the AWS instance ID which you can also view from your AWS console if you select your EC2 image.

  • Finally let’s destroy the stack. Type terraform destroy. You will be prompted to confirm by typing yes.

terraformdestroy

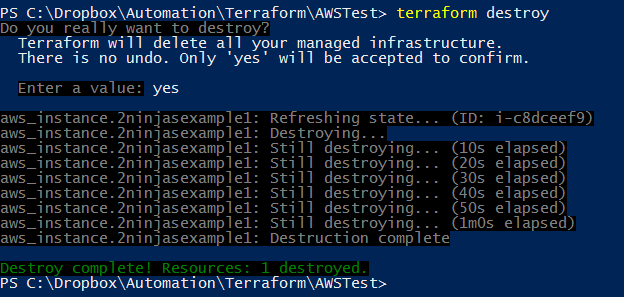
Just like that, it is destroyed! You will also notice your state file updated to reflect this.

Hopefully at this point, you can see the power behind this tool. Stay tuned for more posts on this.


vRealize Orchestrator Workflow: Change VM Port Group for VM on Standard vSwitch

*Note: This is a repost due to moving my posts from SystemsGame.com to 2ninjas1blog.com”

I was surprised recently to find that no builtin workflow existed for changing the backing information for a VM if you aren’t using a VDS. Now, before I go any further, I’m a big fan of moving to a vSphere Distributed Switch mode, but there are certainly cases where you might encounter a standard vSwitch environment which you need to automate port group changes upon.

The Approach:

Essentially when it comes to changing NIC settings on a VM, you have to change the “Backing” information for the NIC associated with the VM. In my case this was for VMs which were just built as part of an overall automation process, and had only one NIC.

Step 1: Create Action Item.

I created an action item which has 2 inputs.

“vm” of type VC:VirtualMachine – This is basically so you can select the VM in vCO that you want to modify

“vSwitchPGName” of type String – This is so you can pass in the string value of the portgroup name for the vSwitch.

Code:

The code I then used is below. I’ve commented it but please let me know if you have any questions.

var spec = new VcVirtualMachineConfigSpec(); // Initialize a Virtual Machine Config Spec first
var myDeviceChange = new Array(); // Create an array to hold all of your changes
var devices = vm.config.hardware.device;

//Find devices that are VMXNET3 or E1000
for (var i in devices)
	{
		if 	(
				(devices[i] instanceof VcVirtualVmxnet3) ||
				(devices[i] instanceof VcVirtualE1000) 
			)
		{
			System.log("The device we are going to modify is: " + devices[i]);
			var nicChangeSpec = new VcVirtualDeviceConfigSpec(); //This is the specification for the Network adapter we are going to change
			nicChangeSpec.operation = VcVirtualDeviceConfigSpecOperation.edit; //Use edit as we are going to be modifying a NIC
			nicChangeSpec.device = new VcVirtualE1000;
			nicChangeSpec.device.key = devices[i].key; 
			System.log("NicChangeSpec key is : " + nicChangeSpec.device.key);

			nicChangeSpec.device.addressType = devices[i].addressType;
			nicChangeSpec.device.macAddress = devices[i].macAddress;

			System.log("Adding backing info" ) ;
			//Add backing information

			nicChangeSpec.device.backing = new VcVirtualEthernetCardNetworkBackingInfo();
			System.log("Backing info for nicChangeSpec is : " + nicChangeSpec.backing);
			nicChangeSpec.device.backing.deviceName = vSwitchPGName; //Change the backing to the portgroup input
			System.log("Backing info for deviceName on nicChangeSpec is : " + nicChangeSpec.device.backing.deviceName);

			//Push change spec to device change variable
			myDeviceChange.push(nicChangeSpec);

		}
	}

spec.deviceChange = myDeviceChange;
System.log("DeviceChange Spec is: " + spec.deviceChange);
return vm.reconfigVM_Task(spec);

Step 2:

I created a simple workflow which calls this action item and then has a vim3WaitTaskEnd so we can be sure the task is completed before moving on to any other workflows. This is useful if you are going to be incorporating this action into a larger process.

Update Port Group for vSwitch

Running the workflow gives you this simple presentation.

vSwitchPG 2

And that’s basically all there is to it. Select your VM, type in your PortGroup name, and voila!

For a vDS, VMware included a workflow out of the box in vCO so there is no need to create any of the above.

Enjoy!

vRealize IaaS Essentials: Building your Windows Server 2012 Template on vSphere – Part 3 (OS Tuning)

Now that we have a base OS build completed, we need to start configuring the OS to the settings we want.

Step 1: Get VMware Tools Installed

Without VMware tools on the OS, many things are sluggish and just annoying. Most importantly it fixes the annoying mouse cursor tracking issues (this is even more noticable when you’re in a VDI session into a VMware Console).

  • Login to your vSphere Web Client and Locate your VM
  • Select the VM > Actions > Guest OS > Install VMware Tools...

rwc-template-tools1

  • You will get a prompt to mount the Tools ISO. Select Mount.

rwc-template-tools2

  • Now inside the OS, Open My Computer/This Computer and Tab over to the CD ROM Drive. I found it almost impossible with the mouse using the VRM Console until Tools was installed so I had no choice but to use the keyboard to get it done. A combination of Tab and Space did the trick.

rwc-template-ostools1

  • Once you are there, run Setup and you should be presented with the VMware Tools installation screen.

rwc-template-ostools2

  • Choose Next
  • Select Typical for your installation type

rwc-template-ostools3


  • Once installation is complete, reboot the OS

Step 2: Fine tune your OS

First of all a big thanks to some of my twitter friends who gave some good suggestions on tweaks here. There is always going to be a debate as to what gets done in the template vs GPO/Configuration Management. I’d say the settings I set below are just the core ones necessary to facilitate deployment of an OS with ease. AD and configuration management should definitely come in after the fact and take care setting other OS settings to their necessary values.

  1. Patch the OS to the latest (It’s worth automating this in the future)
  2. Set Date/Time
  3. Set the OS Hostname to VM Template Name – this helps to know if sysprep worked etc.
  4. Disable the Windows Firewall
  5. Disable UAC
    1. http://social.technet.microsoft.com/wiki/contents/articles/13953.windows-server-2012-deactivating-uac.aspx
  6. Create a Local User account for use by vRealize (e.g. svc_vrealize). You can make sure this account gets disabled automatically as part of your builds or via Puppet, GPO to comply with security requirements. It helps however to be able to easily get into a system using vRO Guest File Operations via a local service account early on.

Also here is a useful link provided by Sean Massey who does a lot of tuning on the Desktop side: https://labs.vmware.com/flings/vmware-os-optimization-tool

Finally, remember to disconnect your CD ISO.

After turning your VM back into a template, we now have a template ready to deploy! Now we can get onto the fun stuff.

Server Name Generator – Final

Now that we have our partial name creator and our workflow to check for the next available name, we can bring it all together for a complete server name workflow.

Complete Server Name Workflow

General Attributes:

  • partialName: Type = String

 Inputs:

  • appType: Type = String
  • location: Type = String
  • network: Type = String
  • envLevel: Type = String
  • OS: Type = String
  • domainSuffix = string

Outputs:

  • vmName: Type = String
  • fqdnOut: Type = String

The Workflow:

completeWorkflow

As explained in Server Name Generator – Part 1, we create the partial name based on datacenter location, network, operating system and environment.  We now append that with a number and check if the name exists in DNS using the worfklow from Server Name Generator – Part 2.

Now the output you will see is something similar to this in the logs:

[2016-04-18 15:01:08.930] [I] Entering Generate Partial Name Worfklow
[2016-04-18 15:01:08.935] [I] The datacenter shortname is AKL
[2016-04-18 15:01:08.948] [I] The network shortname is P1
[2016-04-18 15:01:08.981] [I] The OS shortname is W
[2016-04-18 15:01:08.994] [I] The environment shortname is 1
[2016-04-18 15:01:09.013] [I] The shortname of the application is APP
[2016-04-18 15:01:09.028] [I] The partial name of the VM is AKLP1W1APP
[2016-04-18 15:01:09.030] [I] Leaving Generate Partial Name Workflow
[2016-04-18 15:01:09.072] [I] Your partial name is: AKLP1W1APP
[2016-04-18 15:01:09.073] [I] Starting loop --- 
[2016-04-18 15:01:09.075] [I] Server Name: AKLP1W1APP01 found in master list - Incrementing with next number and starting over
[2016-04-18 15:01:09.078] [I] Server name: AKLP1W1APP02 not found in master list. Recording new name and continuing.
[2016-04-18 15:01:09.079] [I] Checking host for existing DNS record: AKLP1W1APP02.tritech.local
[2016-04-18 15:01:09.086] [I] Check complete for FQDN: AKLP1W1APP02.tritech.local Found IP address of: null
[2016-04-18 15:01:09.588] [I] 
[2016-04-18 15:01:09.591] [I] The vmName to pass as output is: AKLP1W1APP02
[2016-04-18 15:01:09.592] [I] The FQDN to use is: AKLP1W1APP02.tritech.local

AKLP1W1APP01 already existed so our loop went to the next number 02 and found that it didn’t exist.

This concludes the Server Naming series. You can download the complete workflow here.  If you have any questions, or found this content useful, let us know with a comment.


Real World Clouds with vRealize Automation 7 – Getting Started

Welcome to what we hope is a long journey in Real World Clouds. Over the past 6 years, we’ve both personally seen much change in this space but one thing that we felt was definitely missing in the blogosphere, were answers to real customer questions. In this series, we’re hoping to showcase some of the complex integrations and advanced services that can be built using the vRealize Suite. Our goal is to get you setup with blueprints and then discuss all the nitty gritty details around service design. With that said, let’s get started.

deployacloud

Getting Started

First of all, this is not a beginners series. You will absolutely need to have vRealize Automation 7 setup and configured. We also assume you already know what Business Groups, Reservations, Entitlements, etc. are. Some of these items will be recapped as needed, but if you want a great getting started guide on vRealize Automation 7 there are several great resources at the www.theithollow.com by Eric Shanks and http://www.virtualjad.com by Jad El-Zein.

The following items are assumed to be in place and working:

  • vRealize Automation 7 Installed and Configured – Simple or Distributed is fine
  • vRealize Orchestrator Installed and Configured
    • vSphere Plugin Configured
    • vRealize Automation Plugin Configured
    • Active Directory Plugin Configured
  • Tenant Configuration Complete with EndPoints for vSphere and vRO configured
  • 1 x Fabric Group created
  • 1 x Business Group created
  • 1 x Reservation created

Programming Skills

Am I going to need to program? The short answer is, absolutely yes. We get asked this a lot and we definitely plan on writing some posts on this soon, but for now, let’s assume you have a basic knowledge in the following areas:

  • Javascript
    • Basic Understanding of variable passing
    • If/Else
    • Switch
    • While Loops
    • For Loops

Also be sure to check out W3 Schools http://www.w3schools.com/js/default.asp which is a great reference website. I almost always search in google things like “w3schools javascript while loop” to find what I need quickly. 

For a great primer on Javascript, I still to this day recommend the book Eloquent Javascript. It’s also a great book just to have at hand while programming workflows.


Last, but certainly not least, are other great vRO/vRA Websites like vCO Team, and many others.

vRealize Orchestrator

vRealize Orchestrator (vRO) is going to be the basis for a number of the subsequent posts. Don’t worry if you aren’t 100% versed in vRO just yet. We will walk you through all of the workflows in detail and I’m also in parallel working to publish a pluralsight class (https://www.pluralsight.com/)  on developing workflows with vRO.

Infrastructure

We will be focusing primarily on VMware vSphere 6 in this series. It is assumed you already have a base understanding of vSphere and vCenter.

Other Useful VMware Reference Sites:

VMware Documentation – http://pubs.vmware.com/vra-70/index.jsp

vRealize Automation SDK 7.0 – https://developercenter.vmware.com/web/sdk/7.0.0/vrealize-automation

VMware vRealize Automation Cloud Client – https://developercenter.vmware.com/tool/cloudclient/4.0.0