Author Archives: Amy Manley

2 Ninjas 1 Roof

This may or may not come as a shock to you but 2 Ninjas is also now under one roof.   Family blending definitely has its challenges but it is an exciting time for us.  We are looking forward to bringing new content as well as we settle in.  Moving and getting the kids situated has taken a lot of our time hence the hiatus.  It’s not something you can automate, unfortunately.  We are both  excited to start posting here again on our current works in progress!


Identity and Access Management – AWS Part 1

Amazon’s Identity and Access Management or IAM as commonly referred to gives centralized control to your AWS account. Not only can you give shared access with role based permissions you can also provide temporary access to users. Like Active Directory, you can set up a password rotation policy, length and complexity. There is an option for added security with multifactor authentication through providers like Google.

Log into your AWS account and click on the IAM symbol
iam4

iam1

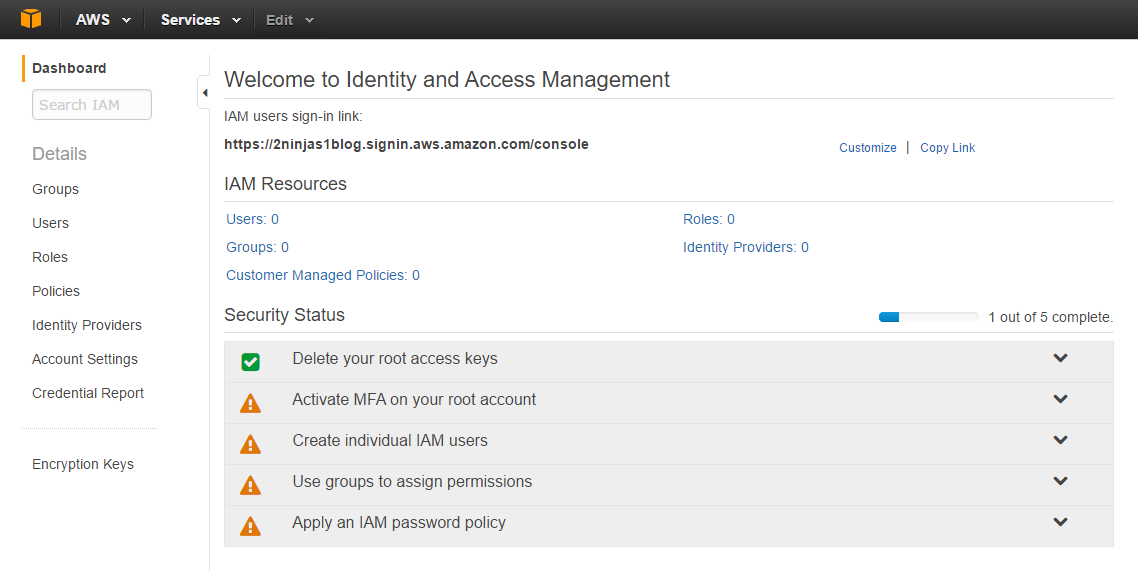
When creating your console link you have to remember it is a global DNS name space.  What you choose may already be in use.  Also your  users, groups, roles etc are not region specific. They are shared globally.   Here I created 2ninjas1blog by clicking on customize next to my IAM link. There are now 5 steps to complete your setup. You’ll see the root access keys are already deleted.

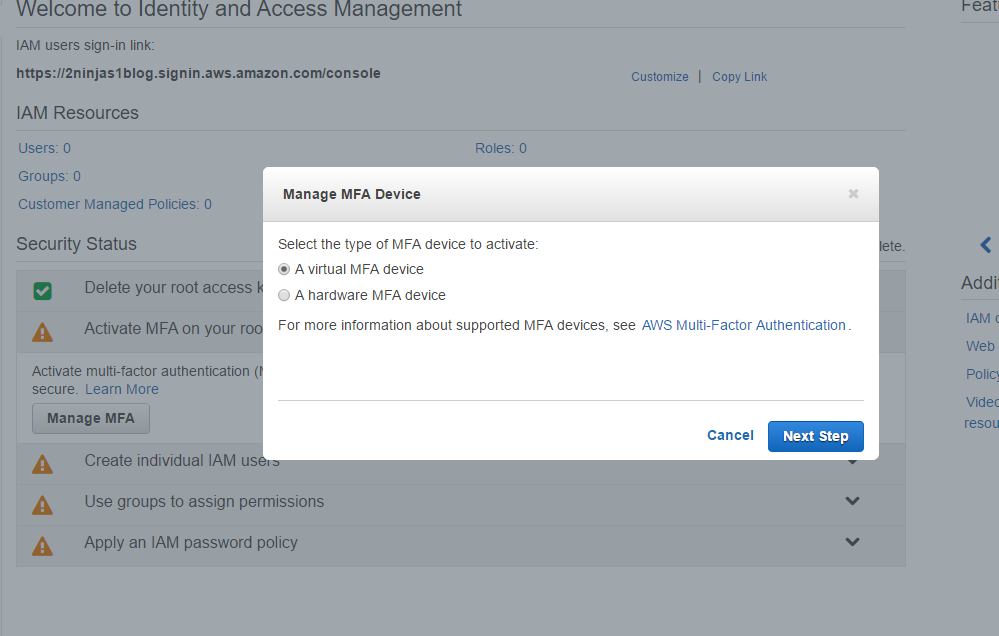
Click on Active MFA on your root account and then Manage MFA

You can select Virtual or Hardware, here I selected Virtual. There is a link from Amazon showing supported MFA devices. The Google Authenticator on your smartphone works well and is easy for this demonstration.
mfa1

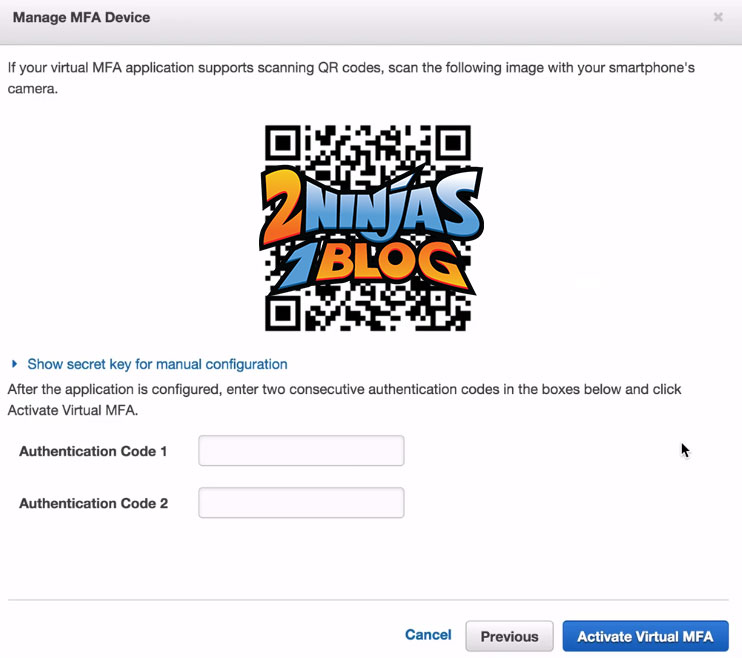
A QR code will be displayed. This is where your authenticator device comes in. I used Google authenticator on my phone and scanned the QR code. You then input 2 codes from the authenticator
iam

And click Activate Virtual MFA

You will now get a message that the MFA device was successfully associated.

Now that we have activated MFA on the root account, lets go on to the next step and Create individual IAM users
Click on Create individual IAM users on the dashboard and on the left click Users

image

Click Create New Users. Remember by default users will not have access until permissions are granted to them.

Here I create our 2 users and click on generate an access key for each user. This is very important to save because you cannot obtain it later. This will prompt a download of the credentials after we create a password.

image

The next screen shows the Access Key ID and Secret Access Key.  These can be used for CLI to directly interact with the AWS console.  You can download the credentials and put them in a safe place because this will be the only chance you get.  Below is an example user to show the screen.

keys

Here are both accounts but no password is assigned to either one.
image

We need to click check next to the User Name and click User Actions and select Manage Password
image

Here you can have an auto-generated password and set if you want the user to reset their password at login. Credentials in a form of a csv file can be downloaded and should be kept in a safe place.

Now these logins are useless without permissions assigned. You can assign them directly to a user account but it’s best practice to create a group and assign users to the gorup.

Now we are on the 4th task of our IAM console, Use groups to assign permissions.
In order to assign permissions we need to create a group with a policy attached. Policies have the permissions listed within them. Click on Groups then

image

Through the wizard, I can Set a Group Name
image

Then attach the Administrator Policy
image and click Generate

image

Now I can add my 2 users to my new Administrator group. By going to Groups on my dashboard, click the check box next to NinjaAdmins and under Group Actions select Add Users to Group.

Now I can select NinjaAmy and NinjaNick to be NinjaAdmins
image

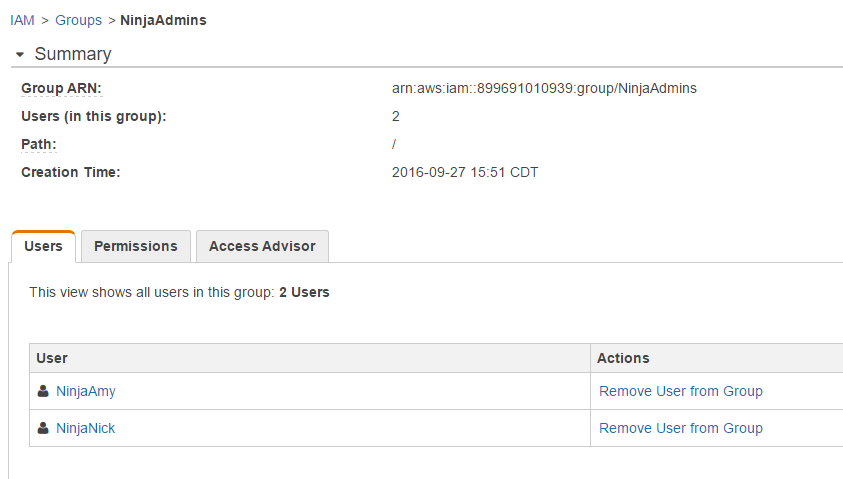
I select my NinjaAmy and NinjaNick users and now I can see 2 users are part of my NinjaAdmin group

groups2

You can always go back and click on Groups to see who is a member and what sort of permissions they have.  You can also remove users from the group
group3

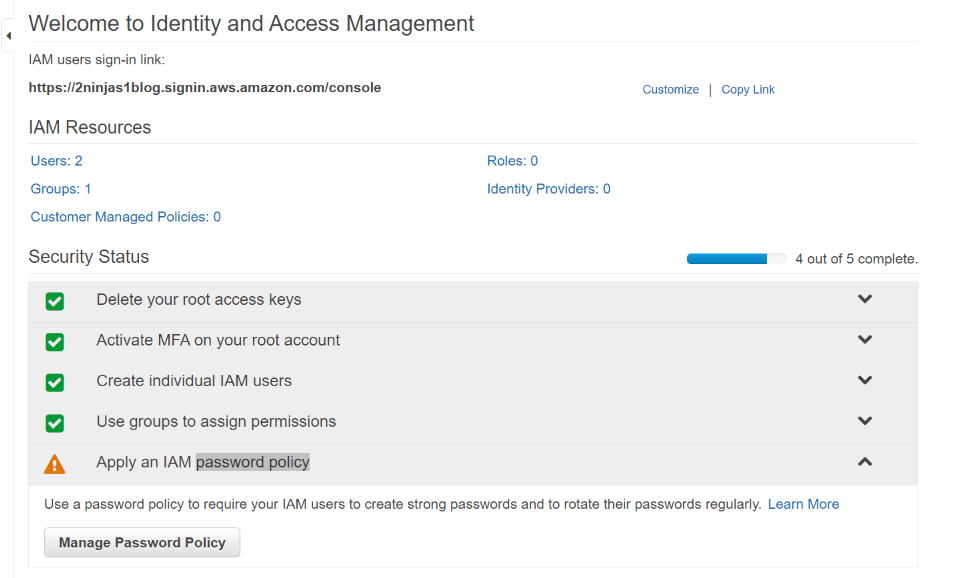
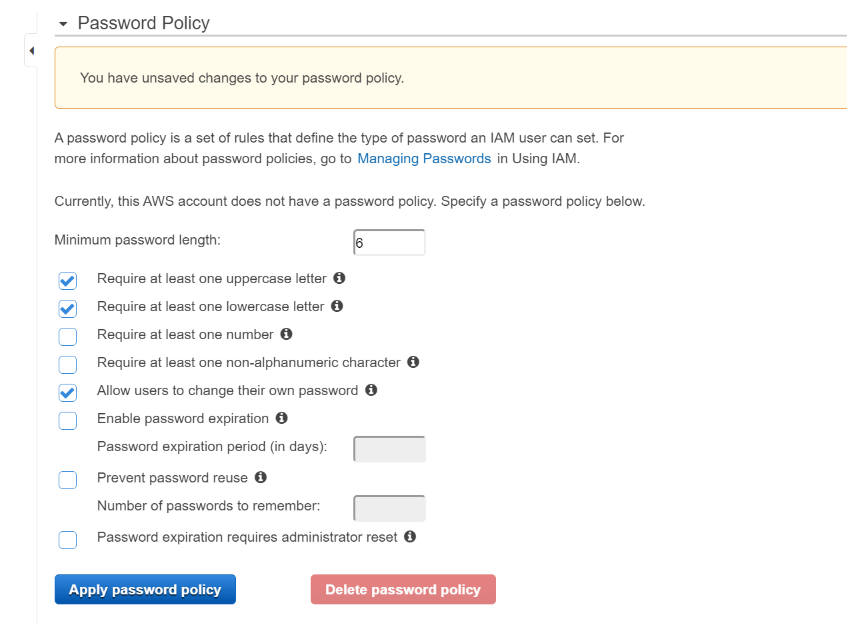
Yay, we are almost done.  Lastly, we have to Apply an IAM password policy.  Click on Manage Password Policy
iam2

Here you can go through a number of requirements
iam3

Apply your password policy and you will see you are now finished setting up IAM.

I can now log into https://2ninjas1blog.signin.aws.amazon.com/console with my username: NinjaAmy and come into the AWS console, no longer using root

login

On the top right, you can see NinjaAmy in lieu of root.

login2

This completes Part 1 of IAM. Part 2 will go deeper into the roles and policies.

It’s ON with Turbonomic and vRO

There have been a lot of changes for VMTu Turbonomic.  I believe most in the industry are aware of the bold name change.  This name is more representative of what the product does based on the economic model it is known for.  Besides that with the latest version, Turbonomic also released vRealize Automation workflows to integrate with their product.  You have to be a member of the Green Circle, which is free, but you can download them here.  There are instructions on importing the workflows, setting up Operations Manager as a REST host, etc.  I was excited to see this but, unfortunately, my environment only uses vRealize Orchestrator.
Below is the schema for vRA workflow:

vra_vmt

First is a scriptable task to gather inputs for vRA.  The inputs are all vRA specific so I could remove these. At the end it, the workflow is pushing back properties to vRA so I removed “Override vRA Settings” at the end.

Inputs removed from original VMTurbo Main workflow:

parameters


My workflow ended up like this, removing vRA dependencies and ending with 2 scriptable tasks to convert the datastore and host to VC:objects instead of strings.  These scripts will be covered in another post.

newworkflow

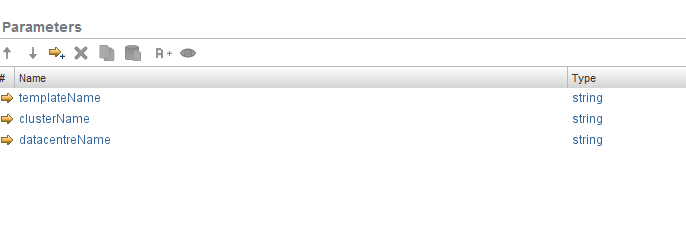
My inputs end up moving from general attributes and are templateName, clusterName and datacentreName. In the future I will likely add a scriptable task at the beginning of the workflow to determine these as they will come from inputs generated by my Windows or Linux Master Build workflow.

Inputs converted from attributes:

newinput

I also now have outputs for the actual VC: Datastore VC: Host System objects for your clone workflow in vRO. These were created via the scriptable tasks which take the strings returned from Turbonomic and do a lookup to match them to the vCenter objects.

Outputs created:

outputs


What’s great about having this functionality from Turbonomic is now the best host and the best datastore will be selected based on analytics from Operations Manager. I originally was picking my datastore based on amount of free space but now using the REST API I can have the least utilized host and datastore supplied to by clone workflow.

Download the modified workflows here.

I’ll be going over these workflows in the upcoming webinar “Overcoming Private Cloud Challenges in Healthcare IT”, September 29th at 2:00PM EST.  Register here

Rubrik Announces r528 Cloud Appliance and Sexy New Features

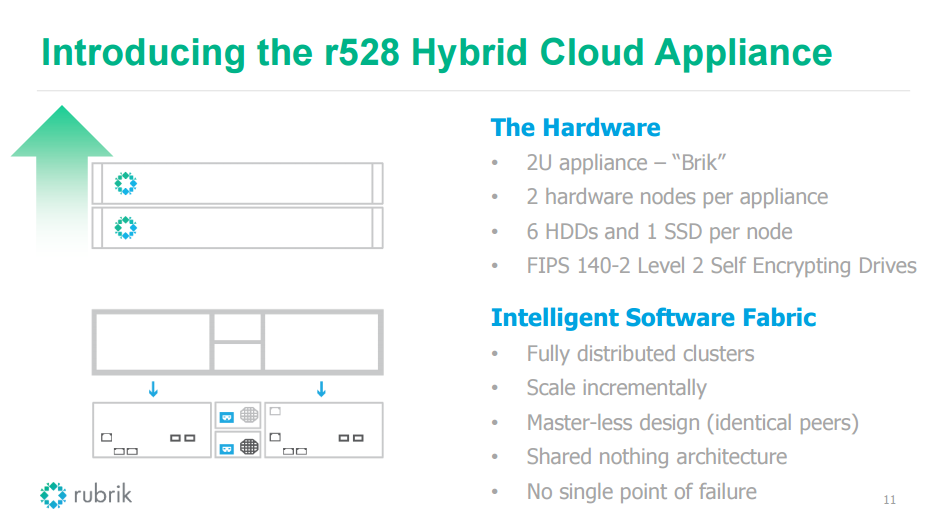
Rubrik announced the r528 cloud appliance today.  Yes, Rubrik just got sexier. Not only has Rubrik grown exponentially as a company ,they are on their  3rd update and are now quite the global force with 90+ signed Channel Partners and 4PB+ Protected in the Field

r528

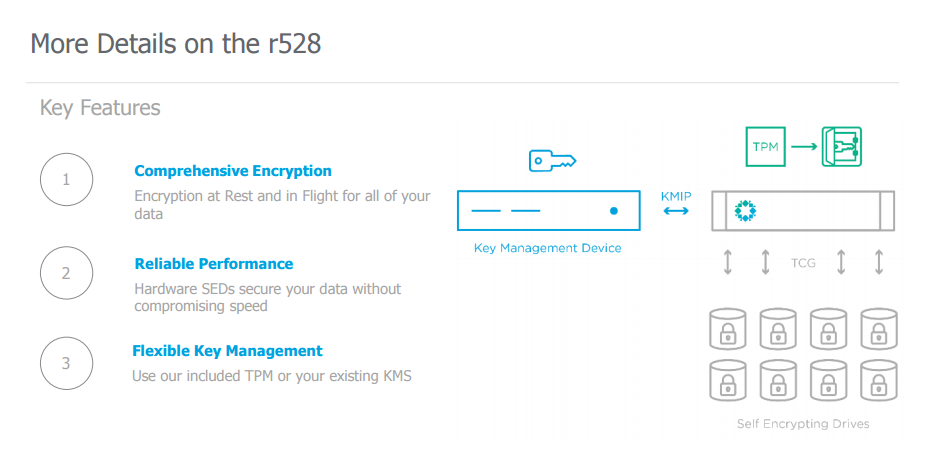
The r528 offers encryption at rest and in flight from VMware.  Because the appliance is using hardware encryption, there is no compromise on speed or performance.  The self encrypting drives (SED), use  AES 256 circuitry. All data written to disk is encrypted automatically and data read is decrypted automatically.  Eliminating or overwriting the security key would perform an instantaneous wipe.  If a drive were to be taken out, it would be deemed worthless without the key

r528-2

Boring stuff you should know about: NIST

rubrik-fips


This offering is FIPS 140-2 Security validated. What does that mean? It sounds important.  The drives and Rubrik Cryptographic library are FIPS 140-2 certified.  Where most backup appliances are Level 1, Level 2 brings about the ability to detect physical tampering.  If you want to nerd out and read up on FIPS 140 here. From there, you can read that FIPS 140-2 Level 1 provides the lowest level of security. Basic security requirements are specified for a cryptographic module (e.g., at least one Approved algorithm or Approved security function shall be used). No specific physical security mechanisms are required in a Security Level 1 cryptographic module beyond the basic requirement for production-grade components. FIPS 140-2 Level 2 improves upon the physical security mechanisms of a Security Level 1 cryptographic module by requiring features that show evidence of tampering, including tamper-evident coatings or seals that must be broken to attain physical access to the plaintext cryptographic keys and critical security parameters (CSPs) within the module, or pick-resistant locks on covers or doors to protect against unauthorized physical access.

For key management, Rubrik supports external key standards using KMIP 1.0 or they also provide a Trusted Platform Module (TPM) so there would be no need for KMS .  Giving the customer options if they don’t have KMS setup in their environment.

But wait there’s more!

Rubrik Converged Data Management 2.2

Enhancing the auto protect and SLA inheritance Rubrik already offers

  • Dynamic Assignment – Set policy on a vCenter, Data Center, Cluster, Folder, Host, and more.
  • Inheritance Options – Any new object or workload created will automatically pick up parent SLA assignment.
  • Do Not Protect – Block SLA policy from being inherited with explicit denial to prevent data protection at any desired level.

Throttle detection!

Most people don’t want backups to affect workloads.  The software can look for latency to make sure it’s not causing performance issues. If storage latency is rising, it is smart enough to halt additional tasks on the fly.  Backups don’t continue to pile up on your environment like a WWE royal rumble.

Battle_crop_north

Scalability

  • In testing, Rubrik has scaled out to a 20u, 10 brik, 40 node cluster.  That’s insane
  • Protect 10,000 VMS using vSPhere 6.0
  • Instant recovery:  Quicker spin up of clone workloads (thanks to being able to get 20,000 I/O per brik) and faster storage vMotion to your production environment.

Cluster Policy Enhancements

  • Global pause gives you the ability to use a maintenance window to perofrm work on the cluster
  • Recurring First Full Snapshot Window gives you control to say when a full backup should be performed within an SLA
  • New Retention Periods bring increased flexibility for SLA policies to meet different customer requirements
  • Blackout Windows define when no operational taks should be executed by the cluster
NAT Support
For customers that don’t want to use site-to-site tunneling , there is now NAT support for public bi-directional replications.


User Experience and Management
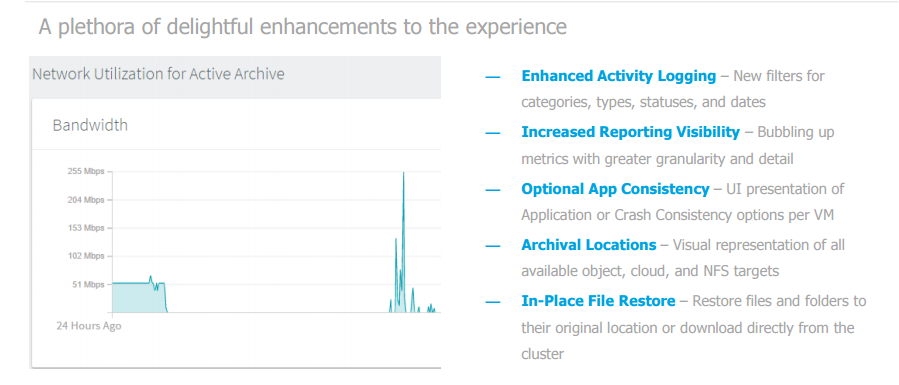
You might as well enjoy managing your backups …userexp
Last but not least
Backup physical alongside your virtual environment.  This includes SQL and Linux. You have all the capabilities for physical recovery that you are used to having for your VMs

Automation Fun

automate_all_the_things

An oldie but goodie, you can tell from this blog, we’re all about automating all the things possible.

There are several options to satisfy the automation ninja within you:

GitHub PowerShell-Module Repository
PowerShell Gallery (NuGet)
Continuous Integration with AppVeyor

And a personal favorite:
vRealize Orchestrator Packages

Rubrik maintains it’s mantra don’t backup go forward with it’s continuous improvements to the backup experience.

Server Name Generator – Final

Now that we have our partial name creator and our workflow to check for the next available name, we can bring it all together for a complete server name workflow.

Complete Server Name Workflow

General Attributes:

  • partialName: Type = String

 Inputs:

  • appType: Type = String
  • location: Type = String
  • network: Type = String
  • envLevel: Type = String
  • OS: Type = String
  • domainSuffix = string

Outputs:

  • vmName: Type = String
  • fqdnOut: Type = String

The Workflow:

completeWorkflow

As explained in Server Name Generator – Part 1, we create the partial name based on datacenter location, network, operating system and environment.  We now append that with a number and check if the name exists in DNS using the worfklow from Server Name Generator – Part 2.

Now the output you will see is something similar to this in the logs:

[2016-04-18 15:01:08.930] [I] Entering Generate Partial Name Worfklow
[2016-04-18 15:01:08.935] [I] The datacenter shortname is AKL
[2016-04-18 15:01:08.948] [I] The network shortname is P1
[2016-04-18 15:01:08.981] [I] The OS shortname is W
[2016-04-18 15:01:08.994] [I] The environment shortname is 1
[2016-04-18 15:01:09.013] [I] The shortname of the application is APP
[2016-04-18 15:01:09.028] [I] The partial name of the VM is AKLP1W1APP
[2016-04-18 15:01:09.030] [I] Leaving Generate Partial Name Workflow
[2016-04-18 15:01:09.072] [I] Your partial name is: AKLP1W1APP
[2016-04-18 15:01:09.073] [I] Starting loop --- 
[2016-04-18 15:01:09.075] [I] Server Name: AKLP1W1APP01 found in master list - Incrementing with next number and starting over
[2016-04-18 15:01:09.078] [I] Server name: AKLP1W1APP02 not found in master list. Recording new name and continuing.
[2016-04-18 15:01:09.079] [I] Checking host for existing DNS record: AKLP1W1APP02.tritech.local
[2016-04-18 15:01:09.086] [I] Check complete for FQDN: AKLP1W1APP02.tritech.local Found IP address of: null
[2016-04-18 15:01:09.588] [I] 
[2016-04-18 15:01:09.591] [I] The vmName to pass as output is: AKLP1W1APP02
[2016-04-18 15:01:09.592] [I] The FQDN to use is: AKLP1W1APP02.tritech.local

AKLP1W1APP01 already existed so our loop went to the next number 02 and found that it didn’t exist.

This concludes the Server Naming series. You can download the complete workflow here.  If you have any questions, or found this content useful, let us know with a comment.


Server Name Generator – Part 2

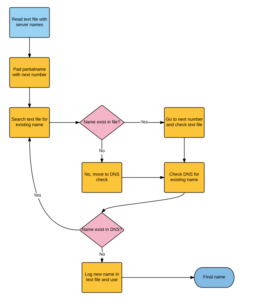
Now that we have our partial name being created from Server Name Generator – Part 1, we can have a workflow that appends with a number and check to see if that name already exists within the environment.  The server names will be checked via DNS and via a text file named names.txt saved on the vRealize Orchestrator appliance.

First some pre-work needs to be done.  We need to be able to add host names as they are created to the “names.txt” file

1. Login as root onto the appliance
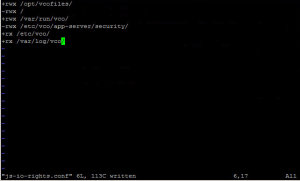
2. Locate and view the “js-io-rights.conf” file by running “: less /etc/vco/app-server/js-io-rights.conf.  The purpose of this file is explained here on VMware’s documentation site.

addline

You will see “+rwx /var/run/vco/” as shown above.  This means vRO can read, write and execute from this location.  This is where will place our text file to write host names to.

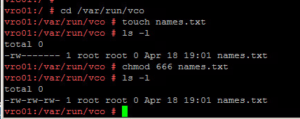
3.  CD to var/run/vco and do a “touch names.txt” to create the file in that directory.

4.  As you can see we need to change the rights so run: chmod 666 names.txt to give read/write access to vRO.

names

Server Name Generator Workflow

General Attributes:

  • None

 Inputs:

  • partialname: Type = String
  • domainSuffix: Type = String

Outputs:

  • vmName: Type = String
  • fqdnout: Type = String

The Concept:

CODE

The Code:

// Read temp server name list - prepare to invoke file writing capabilities if needed
var fr = new FileReader("/var/run/vco/names.txt");
var fw = new FileWriter("/var/run/vco/names.txt");

fr.open();
var content = fr.readAll();
fr.close();

// Initialize variables
var number = 1 ;
var temphost = 0 ; // If we don't set temphost to zero, we break out of for loop immediately


// Function to pad zeros on number that we increment while number is less then 10
function padzero(number) {
 return (number < 10 ? '0' : '') + number
}

// increment through hostnames until we find a hostname that does not exist

System.log("Your partial name is: " + partialName) ;
System.log("Starting loop --- ") ;

for (number=1; temphost != null; number++)
{
 var padded_number=padzero(number) ;
 var vmName = partialName + padded_number;
 
 if(content.search(vmName) <0)
 {
 System.log("Server name: " + vmName + " not found in master list. Recording new name and continuing.") ;
 fw.open() ;
 fw.writeLine(" " + vmName) ;
 fw.close() ;
 
 var fqdn = vmName + "." + domainSuffix ;
 
 System.log("Checking host for existing DNS record: " + fqdn) ;
 var temphost = System.resolveHostName(fqdn) ;


 System.log("Check complete for FQDN: " + fqdn + " Found IP address of: " + temphost) ;
 System.sleep(500) ;
 }
 else
 {
 System.log("Server Name: " + vmName + " found in master list - Incrementing with next number and starting over") ;
 temphost != null ;
 }
}

// Log for debugging purposes
//Output FQDN
fqdnOut = fqdn;

System.log("") ;
System.log("The vmName to pass as output is: " + vmName);
System.log("The FQDN to use is: " + fqdnOut) ;

Download the workflow here

In the next post, we will put the two workflows together to pass the partial name to the server name generator for a completely automated name.

Server Name Generator – Part 1

Generate Partial Name Workflow

Summary/Use Cases:

So you finally agreed on a naming standard, congratulations!  This one uses a datacenter location  + network tier + OS + environment level (prod, test, dmz) + application type.  This workflow has several scriptable tasks within it to go with the naming standard we have chosen for servers.  An example server name with this workflow would be AKLP1L1APP (Auckland datacenter on the production VLAN running on a Linux OS for a generic application) with the sequential number appended at the end.  This workflow outputs a partial name to the Server Name Generator Workflow(coming in Part 2) depending on the drop-down choices a user can pick.  An action, is also used, that is dependent on Location in the Presentation of the workflow.   Only location Auckland will have DMZ as an option.

General Attributes:

  • datacenterSN: Type = String
  • networkSN: Type = String
  • envNUM: Type = Number
  • appSN: Type = String
  • osSN: Type = String


Inputs:

  • appType: Type = String
  • location: Type = String
  • network: Type = String
  • envLevel: Type = String
  • OS: Type = String

Outputs:

  • partialName: Type = String

The Workflow:

In the workflow, be sure to use notes to  describe what is being done in each task.

workflowNotes

The Code:

Each scriptable task uses a switch statement with cases defined.

The Network task looks like:

switch(network)
{
//--TriTech Production environment---//
 case "Production":
 {
 networkSN = "P1"
 }
 
break;
//--TriTech DMZ environment---//
 case "DMZ":
 {
 networkSN = "Z1"
 }

break;
//--TriTech Test environment---//
 case "Test":
 {
 networkSN = "T1"
 }
 
break;

}

System.log("The network shortname is " + networkSN);

The code is the same format for Location,Operating System, Environment and Application.


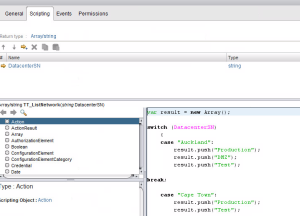
Instead of adding a list of predefined answers, you can create an Action with a Return type: Array/String
createAction

action


Code for the action

var result = new Array();
switch (DatacenterSN) 
       {
      case "Auckland":
              result.push("Production");
              result.push("DMZ");
              result.push("Test");
break;

       case "Cape Town":
              result.push("Production");
              result.push("Test");


       case "London":
              result.push("Production");
              result.push("Test");

default:
        result.push("Unknown Error. Contact automation team");
        }
return result;


Now attach the action to the presentation of Network Tier by going to the Presentation tab on the workflow.
Presentation allows you options for your inputs, you can set a drop down list by using Predefined answers (probably the most common choice) or in this case we are choosing Predefined list of elements.

presentationview

Select Network Tier
addToPreso

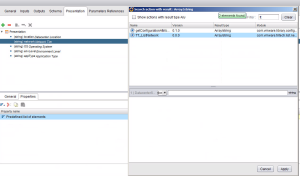
Hit the fun purple button to make an action call
funpurple

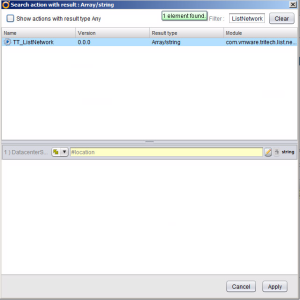
Search in the filter box for your Action and tie it to Datacenter location
location


Now you should see the Get Action code for Network Tier
preso2


The end result.  Only DMZ in the Network Tier will Display for the Datacenter Location, Auckland.  This can be useful in other cases such as specific VLANs assigned to specific locations as well.

dmzAuckland

At the end, we put it all together with the Partial VM Name scriptable task:

partialName = datacenterSN + networkSN + osSN + envNum + appSN
 System.log(partialName);


Download the Generate Partial Name workflow here
We will use this later to create a full server name in the next post of the Server Name Generation series.
Environment Decisions Workflow


Summary/Use Cases:

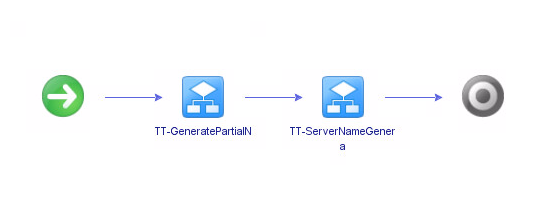
This workflow can be used to automatically choose the appropriate ESXi cluster to deploy your virtual machine.  Using a switch statement for “environment’, different cases are defined for each environment within vCenter.  In this workflow, there are DEV and QA cluster examples.  When the environment input equals “ninja_Dev”, the host, folder, resource pools, etc will be populated with the values you defined in the cases.
Inputs:

  • environment: Type = String

Outputs:

  • network: Type = VC:Network
  • host: Type = VC:HostSystem
  • datastore=VC:Datastore
  • resourcePool=VC:ResourcePool
  • folder=VC:VmFolder
  • dnsServers=Array/string
  • dvPortgroup=VC:DistributedPortGroup
  • domainCreds=Credential

The Workflow:

environment_decisions


The Code:

As you can see there is only a scriptable task within the workflow using the switch statement


switch(environment) {

//------Ninja Dev Environment------
case "ninja_Dev":
host = ninjaDEV_Host;
folder = ninjaDEV_Folder;
datastore = ninjaDEV_Datastore;
resourcePool = ninjaDEV_ResourcePool;
network = ninjaDEV_Network;
dnsServers = ninja_Dev_QA_Prod_DNS;
dvPortGroup = ninjaDEV_PortGroup;
domainCreds = ninjaComCreds;
System.log("Host is: " + host);

break ;
//------End of Ninja Dev Environment------

//------Ninja QA Environment------
case "ninja_QA":
host = ninjaQA_Host;
folder = ninjaQA_Folder;
datastore = ninjaQA_Datastore;
resourcePool = ninjaQA_ResourcePool;
network = ninjaQA_Network;
dnsServers = ninja_Dev_QA_Prod_DNS;
dvPortGroup = ninjaQA_PortGroup;
domainCreds = ninjaQaCreds;
System.log("Host is: " + host);

break ;
//------End of ninja QA Environment------

}

System.log(host);

Server Name Generator Workflow


Summary/Use Cases:

This workflow can be used to automatically generate a server name in your environment.  With the inputs given, it generates the next unused name available.  In my case, I used partial name because we have different environments (Prod, Dev, QA).

Inputs:

  • partialname: Type = String
  • domainSuffix: Type = String

Outputs:

  • vmName: Type = String
  • fqdnout: Type = String

The Workflow:

ServerNameGenerator


The Code:

As you can see there is only a scriptable task within the workflow.


// Read temp server name list - prepare to invoke file writing capabilities if needed
var fr = new FileReader("D:\\VCOInstallationPath\\Windows\\IPReservation\\NamesReserved.txt");
var fw = new FileWriter("D:\\VCOInstallationPath\\Windows\\IPReservation\\NamesReserved.txt");

fr.open();
var content = fr.readAll();
fr.close();

// Initialize variables
var number = 1 ;
var temphost = 0 ; // If we don't set temphost to zero, we break out of for loop imediatley
// Function to pad zeros on number that we increment while number is less then 10
function padzero(number) {
return (number < 10 ? '0' : '') + number
}

// increment through hostnames unitil we find a hostname that does not exist

System.log("Your partial name is: " + partialname) ;
System.log("Starting loop --- ") ;

for (number=1; temphost != null; number++)
{
var padded_number=padzero(number) ;
var vmName = partialname + padded_number;

if(content.search(vmName) <0)
{
System.log("Server name: " + vmName + " not found in master list. Recording new name and continuing.") ;
fw.open() ;
fw.writeLine(" " + vmName) ;
fw.close() ;
var fqdn = vmName + "." + domainSuffix ;
var temphost = System.resolveHostName(fqdn) ;
System.log(temphost);
System.log("A host by the name of " + fqdn + " exists with the IP address of: " + temphost) ;
System.sleep(500) ;
}
else
{
System.log("Server Name: " + vmName + " found in master list - Incrementing with next number and starting over") ;
temphost != null ;
}
}

// Log for debuging purposes
//Output FQDN
fqdnout = fqdn;

System.log("") ;
System.log("The vmName to pass as output is: " + vmName);
System.log("The FQDN to use is: " + fqdn) ;